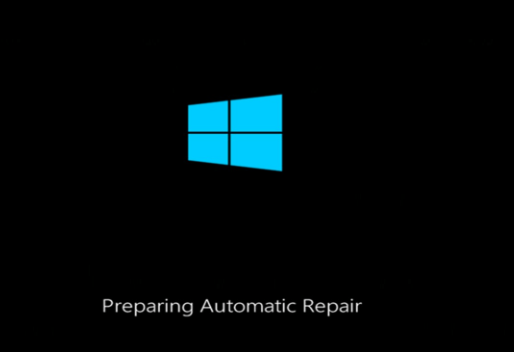
Laptop stuck on Preparing Automatic Repair during startup? This article tells you several solutions to fix the "Preparing Automatic Repair" or "Diagnosing your PC" error in Windows 10/8/7. If any data is lost due to these situations, you can use MiniTool software.
Laptop is stuck during startup – with a screen saying Preparing Automatic Repair or diagnosing your PC!
A true example from answers.microsoft.com is shown below:
My laptop is just stuck in an infinite loop between diagnosing your PC and Preparing Automatic Repair. Sometimes it comes up with repairing disk errors, but never stays and just enters the loop again.
I've read numerous other threads online and have yet to find something that works. Starting to think there is nothing I can personally do.
https://answers.microsoft.com/
Now, before solving the issue, you should know the reasons for Automatic Repair Loop first.
What Causes an Automatic Repair Loop?
Automatic Repair is a feature introduced in Windows 10/8 that can fix some PC issues when the computer cannot boot properly.
But sometimes Windows Automatic Repair might fail to work and get stuck in diagnosing your PC. It will go to a blue or black screen of death error. HP, Lenovo, Asus, Dell, and Acer users are the most common victims of this issue according to a report online.
The causes of Windows 10 Automatic Repair Loop are complex. The most common causes are missing or corrupted system files and missing or outdated drivers. Outdated drivers can affect your PC’s performance and system stability causing the “Preparing Automatic Repair” problem. In addition, the causes of this problem may also include malware, a damaged system registry, etc.
If your laptop is stuck on Preparing Automatic Repair during startup, you can try the following solutions.
Note: If your computer contains massive important data, it is better to recover the important data before attempting any solutions because any mistaken operation might cause data loss permanently. The post How to Recover Data When PC Won't Boot is recommended here.
8 Solutions – Fix Preparing Automatic Repair Loop Windows 10
What should you do if you are one of the users who are encountering the issue of “Preparing Automatic Repair”? Here is a video tutorial for you:
Solution 1. Perform a Hard Reboot
If your Windows cannot boot because of the “Preparing Automatic Repair” or “Diagnosing your PC” error, you can do a hard reboot.
- Remove the battery and AC adapter.
- Press and hold the power button for 20 seconds and see if it will boot up normally.
If this method doesn’t work, you can try the following solutions.
Solution 2. Boot into Safe Mode
The second way is to enter into safe mode when you encounter any issues related to booting up your computer. You should access Windows Recovery Environment (WinRE) to finish all the operations.
Step 1: Turn off your computer.
Step 2: Download Window Media Creation Tool on a working computer to create a bootable media like a bootable USB disk.
Step 3: Insert the bootable media into your PC and boot from it.
Step 4: When prompted to Press any key to boot from CD or DVD, press any key to continue.
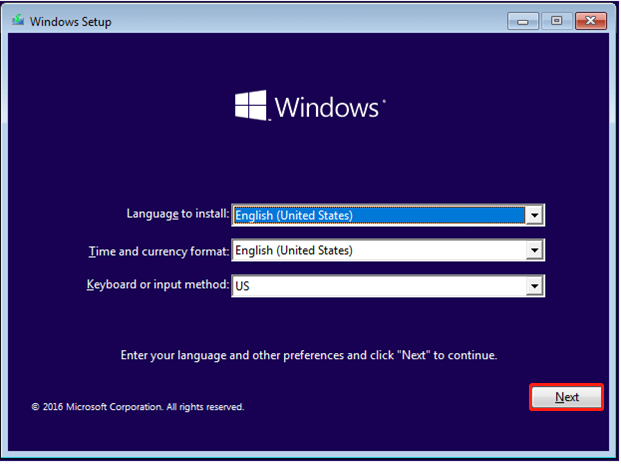
Step 5: Select your language preferences in the Windows Setup interface, and click on the Next button to continue.
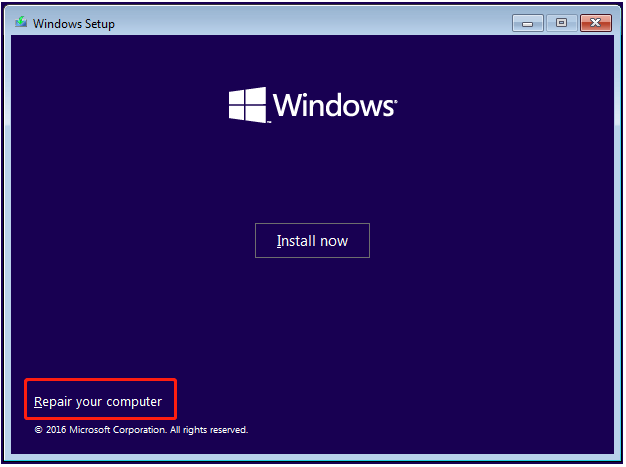
Step 6: Click on Repair your computer to continue.
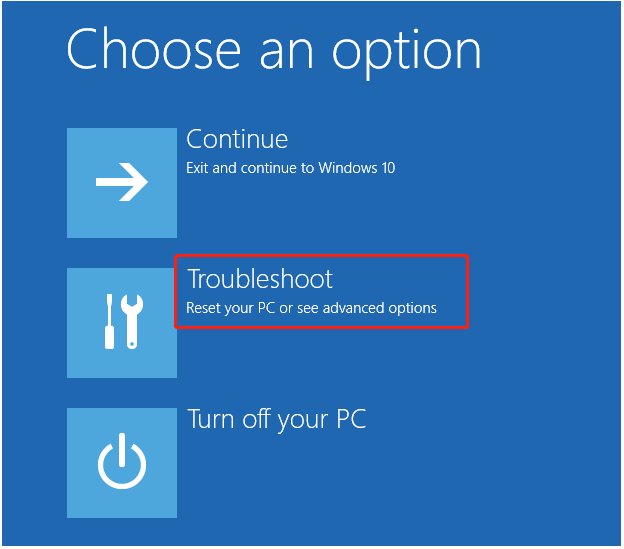
Step 7: Select Troubleshoot.
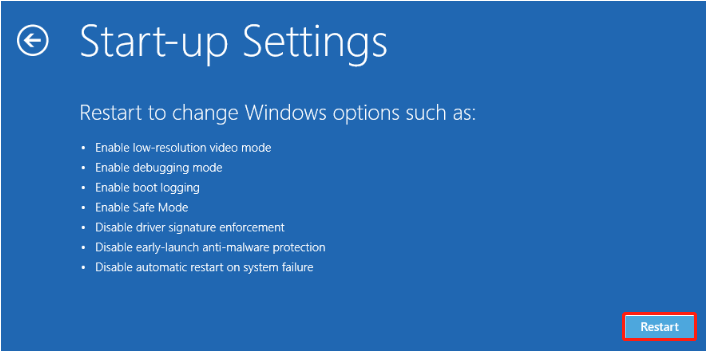
Step 8: Click on Advanced options > Startup Settings.
Step 9: Click on Restart. After restarting, the computer will show another screen that has different startup options.
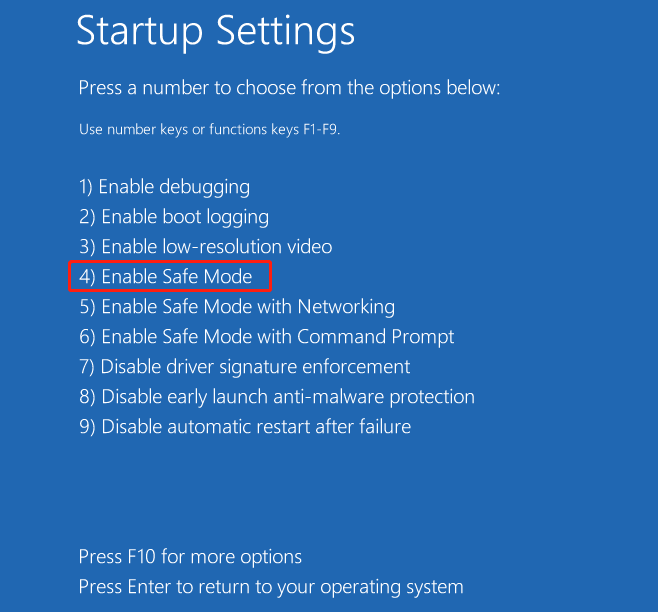
Step 10: On your keyboard, press the 4 or the F4 key to choose Enable Safe Mode (If you need to do some online research after booting into the safe mode, press 5 or F5 to boot into “Safe Mode with Networking“).
Step 11: Now fix the “Preparing Automatic Repair” issue in Safe Mode.
- Run antivirus software to scan for and remove the virus.
- Uninstall suspicious software or drivers.
- Update the hardware driver using a CD/DVD/USB that contains the driver.
Solution 3. Extend System Reserved Partition
If your computer’s system reserved partition is smaller than it should be, you may also get the “Preparing Automatic Repair” or “Diagnosing your PC” error message. To fix this issue, you can try extending the system-reserved partition. You can use MiniTool Partition Wizard to effectively complete this task.
This post “Extend Partition” shows you more information about how to change partition size easily and effectively.
After extending the system-reserved partition, you can restart your computer to check whether this issue has been solved.
![[Fixed] System Reserved Partition Not Showing in Disk Management?](https://images.minitool.com/minitool.com/images/uploads/2023/01/system-reserved-partition-not-showing-in-disk-management-thumbnail.png)
Solution 4. Perform a Startup Repair
Some users recommend performing Startup Repair when the laptop is stuck on Preparing Automatic Repair during startup.
The steps are as follows:
Step 1: Insert the bootable media into your computer and boot from it.
Step 2: Select your language preferences, and click on Next.
Step 3: Click on Repair your computer.
Step 4: Select Troubleshoot > Advanced Options > Startup Repair.

Step 5: Wait for the repair to complete.
Solution 5. Disable Automatic Repair at Windows 10 Boot
During its startup, Windows 10 executes the Automatic Repair feature to fix booting-related issues automatically. This feature is very useful for the average user. However, sometimes it might not sufficient to solve the startup problems. It might even cause the startup problems themselves. Therefore, disabling automatic repair might be a solution to some problems related to Windows 10 booting up. The steps are below.
a) Insert the Windows bootable disk to your PC that has the “Preparing Automatic Repair” or “Diagnosing your PC” error message and boot from it.
b) Select your language preferences, and click on Next.
c) Click on Repair your computer > Troubleshoot > Advanced Options > Command Prompt.
d) Type bcdedit /set {current} recoveryenabled No in the Command Prompt window and press Enter.

e) Wait for the process to finish. Then type exit and press Enter.
Recommended post: Detailed Steps to Fix Windows 10 Endless Reboot Loop
Solution 6. Restore the Windows Registry
Corruption of the Windows registry is a very common issue and can lead to the problem of “Preparing Automatic Repair”. Here is how to restore the Windows registry to get rid of this issue.
Step 1: Boot your computer and go to Repair your computer > Troubleshoot > Advanced Options > Command Prompt (These operations are the same as Solution 5).
Step 2: Input the following command in the Command Prompt window:
C:\Windows\System32\config\regback* C:\Windows\System32\config
Step 3: When prompted which data to restore, type All and press Enter.
Step 4: Wait for the system to finish, and restart your computer.

Solution 7. Reinstall Windows
If your laptop is still stuck on Preparing Automatic Repair during startup, you can try to reinstall Windows.
Before you begin reinstalling Windows, you should recover all your data and files in case of any data loss. However, I guess you might be wondering:
“How to recover data when a PC cannot boot effectively and quickly?”
MiniTool Power Data Recovery, a professional file recovery software developed by a famous software development company based in Canada, has a built-in tool named Bootable Media Builder, which can help you recover data when your PC cannot boot and reports diagnosing your PC error message. There are many benefits of this software:
- It is a read-only tool, meaning it recovers lost data without affecting the original data.
- It offers wizard-like interfaces as well as simple operations to help you effectively recover lost data without any difficulty.
- It supports various operating systems including Windows 7, Windows 8, Windows 10, etc.
Now, let’s see how to recover data when a PC reports “Preparing Automatic Repair” or “Diagnosing your PC”.
Tip: The Free edition of MiniTool Power Data Recovery doesn't offer MiniTool Bootable Media Builder. It is recommended to choose the Personal and above versions. Here, we take the Personal Ultimate version for example.
MiniTool Power Data Recovery TrialClick to Download100%Clean & Safe
Process 1. Create a bootable USB disk or CD/DVD using MiniTool Bootable Media Builder.
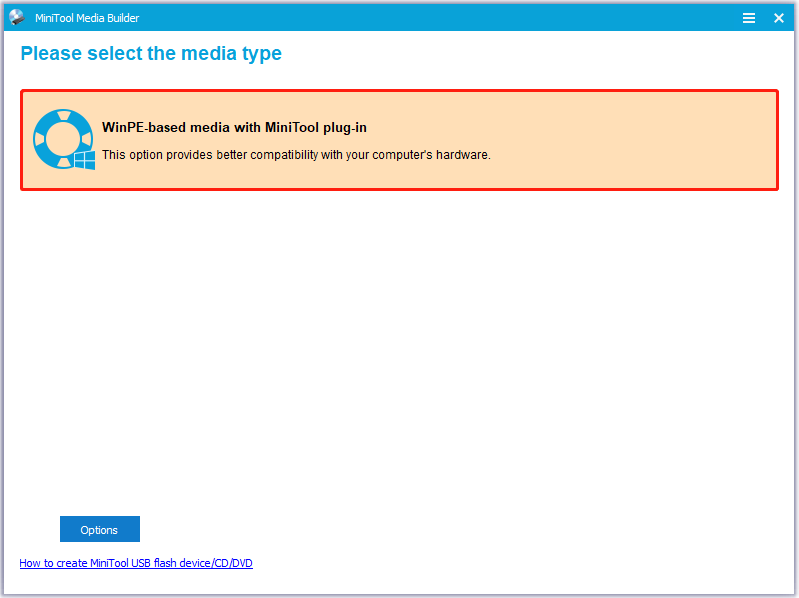
Step 1: Download and install the MiniTool Power Data Recovery Personal Edition on a functioning computer, and then click the Bootable Media icon next to the Register icon at the top toolbar.
Step 2: Click on WinPE-based media with MiniTool plug-in.
Step 3: Choose a media destination to create a bootable CD, DVD, or USB flash drive.
Tip: MiniTool Bootable Media Builder will format the USB flash drive or CD/DVDs while building MiniTool Bootable Disc. Please make sure to back up all important data on the USB drive or CD/DVD before burning.
Step 4: Click on Finish after successful burning.
Process 2. Boot your PC from the bootable disk.
Step 1: Connect the bootable disk to your computer, and then boot from it.
Step 2: Enter the BIOS to set Bootable Disc as the 1st boot device. Then save configuration changes.
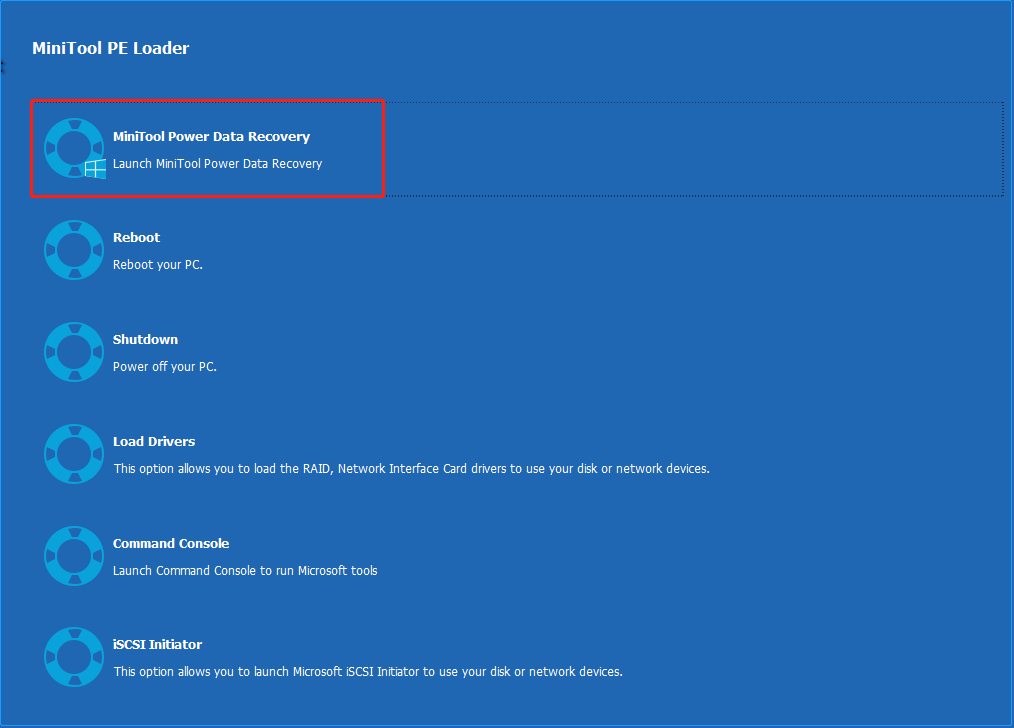
Step 3: Select MiniTool Power Data Recovery when you enter into the MiniTool PE Loader interface.
Process 3. Recover data from the PC that has the “Preparing Automatic Repair” or “diagnosing your PC” error message.
On the main interface of MiniTool Power Data Recovery, select the hard drive you want to scan and click the Scan button (Here, you can click the Scan Settings button in the left panel to specify the file types and file systems you want to recover).

The software will begin to scan the selected drive and you would better wait for the process to finish (If you have found the files you want during the scan, you can pause or stop at any time).
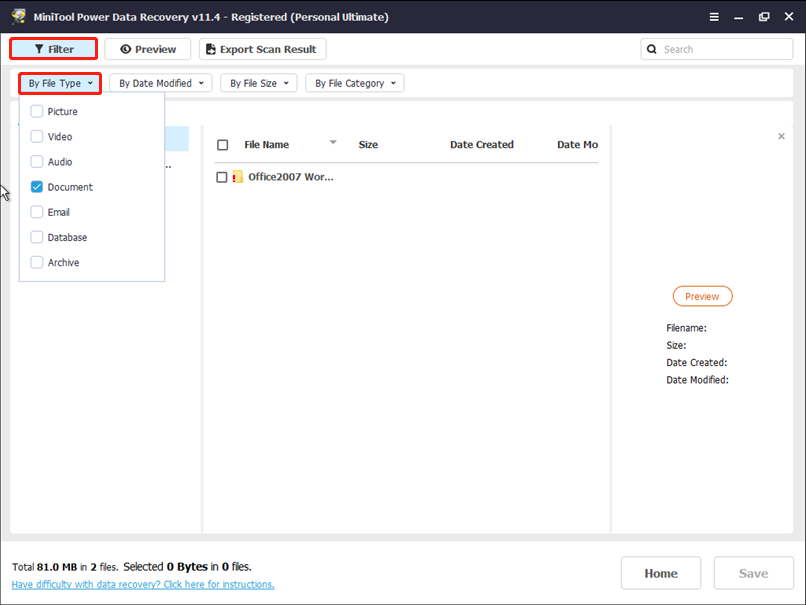
MiniTool Power Data Recovery will list all scanned files after scanning. You can use the Filter feature to quickly find the files you need not only by the file size but also by the file type and modification date.
For instance, if you only want to quickly find needed lost documents, you can click on Filter. Then choose Document from the drop-list of By File Type as shown below. Besides, you can preview your needed documents before saving them.
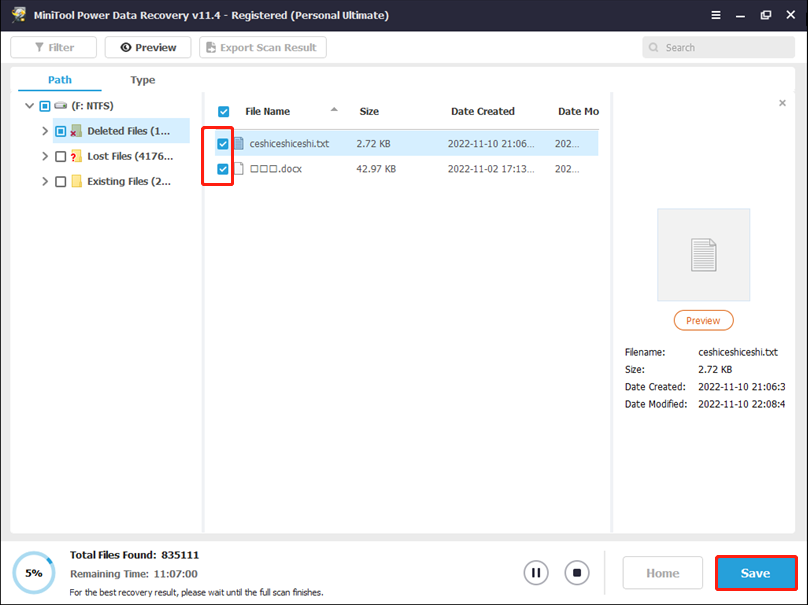
Finally, select all needed files, and then click Save to store them in a location of your choice. It is recommended to store important files on a drive other than the one you recovered from. Otherwise, the lost data could be overwritten and there is no way to recover them.
Solution 8: Check the Hardware
If you still receive the “Preparing Automatic Repair” or “diagnosing your PC” error message after reinstalling Windows, this issue might be related to your computer’s hardware.
For instance, the Preparing Automatic Repair error in Windows 10 happens because this PC has a failed or failing HDD or SSD. It is recommended to check whether your HDD or SSD has failed or is failing. Additionally, check your RAM to make sure it is working properly as well.
Bottom Line
Are you still worrying about this problem – the laptop stuck on Preparing Automatic Repair during startup? Please try the above solutions to solve your issue. If you have found other ways to fix “Preparing Automatic Repair error in Windows 10”, please feel free to leave your comments below and we will update this guide.
If you have any questions about recovering lost data using MiniTool Power Data Recovery, please feel free to contact us via [email protected]. Thanks for your reading.
About The Author

Position: Columnist
Shirley graduated from English major and is currently an editor of MiniTool Team. She likes browsing and writing IT-related articles, and is committed to becoming a professional IT problem solver. The topic of her articles are generally about data recovery, data backup, and computer disk management, as well as other IT issues. In spare time, she likes watching movies, hiking and fishing.