How to fix the “Your PC did not start correctly” issue? How to recover data from an unbootable computer efficiently and safely. Now, try the following 7 solutions to fix your PC when it is continuously not being able to start correctly and use the best file recovery software to recover lost data in advance.
In previous blog update we have talked about several Automatic Repair errors including “Windows didn’t load correctly” and “Automatic Repair couldn’t repair your PC“.
Here this article talks about the “Automatic Repair, Your PC did not start correctly” error as shown below.
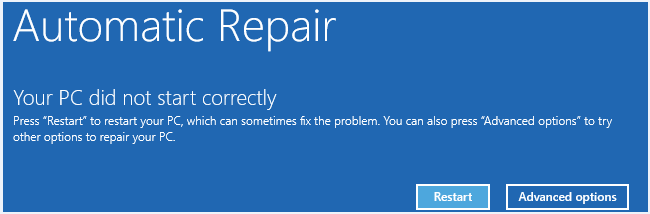
Let’s see a true example from answers.microsoft.com:
I received a message that there is a problem with my computer and Windows 10. I left the computer to do its work but it gave a blue screen and a message reading "Automatic Repair, Your PC did not start correctly, press " Restart" to restart your PC, which can sometimes fix the problem. You can also press "Advanced options" to try other options to repair your PC." What can I do!!!!!
answers.microsoft.com
While looking for the answer in Google, we find that many users are also talking about the same error message in Windows 10 – “Automatic Repair, your PC did not start correctly”.
There are several ways to address the “Your PC did not start correctly error message in Windows 10”. But before you start fixing this problem, you should recover your lost data first.
PART 1. Recover Lost Data When the PC Did Not Start Correctly
To recover data when Windows cannot start successfully because of the “Automatic Repair, your PC did not start correctly” error, you can try using MiniTool Power Data Recovery.
This professional, simple, and read-only data recovery software offers MiniTool Bootable Media Builder which can help you effectively recover lost data when Windows did not start.
The detailed tutorial is as follows:
Step 1: Create a MiniTool Bootable Disk.
1. Download and launch the MiniTool Power Data Recovery Personal edition (Check out which edition has the built-in bootable media buider) on another working computer.
MiniTool Power Data Recovery TrialClick to Download100%Clean & Safe
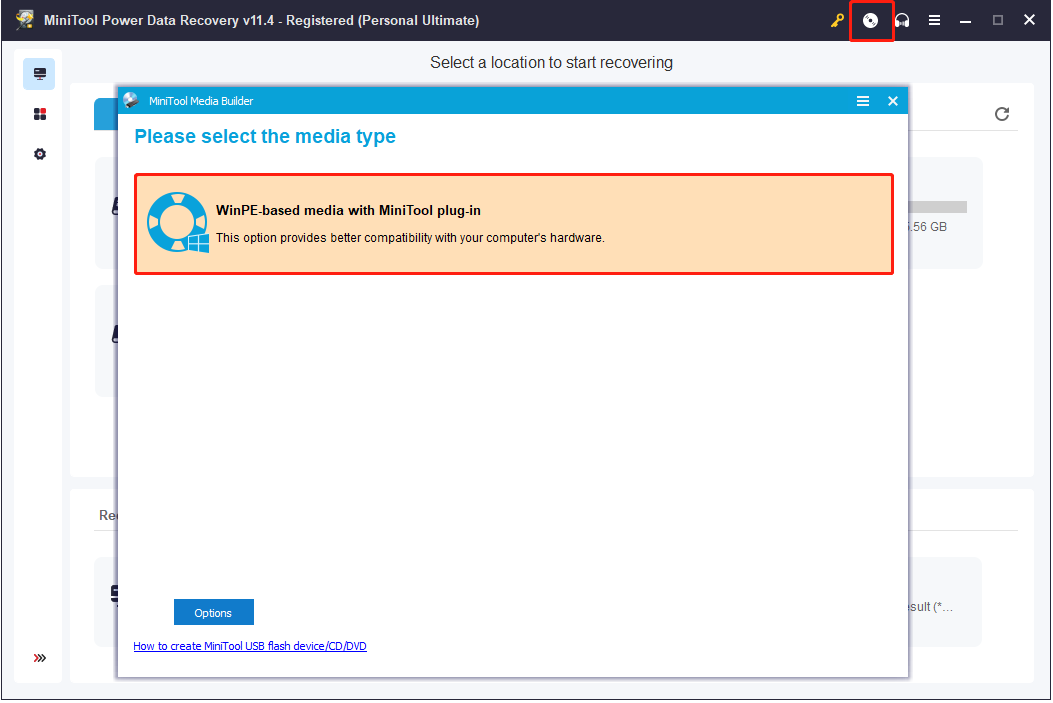
2. Click the Bootable Media icon at the top menu of the main interface, and then select “WinPE-based media with MiniTool plug-in” to continue.
 3. Choose a media destination to create a bootable disk by referring to this post: Create a Bootable CD/DVD/USB Drive with Bootable Media Builder.
Tip: Please wait patiently while MiniTool Bootable Media Builder is generating boot files on the bootable disc.
4. Finally, click “Finish” after successful burning.
Step 2: Boot Windows 10 From the MiniTool Bootable Disk.
1. Connect the bootable disk to the computer that cannot start properly, and boot the computer from this bootable drive.
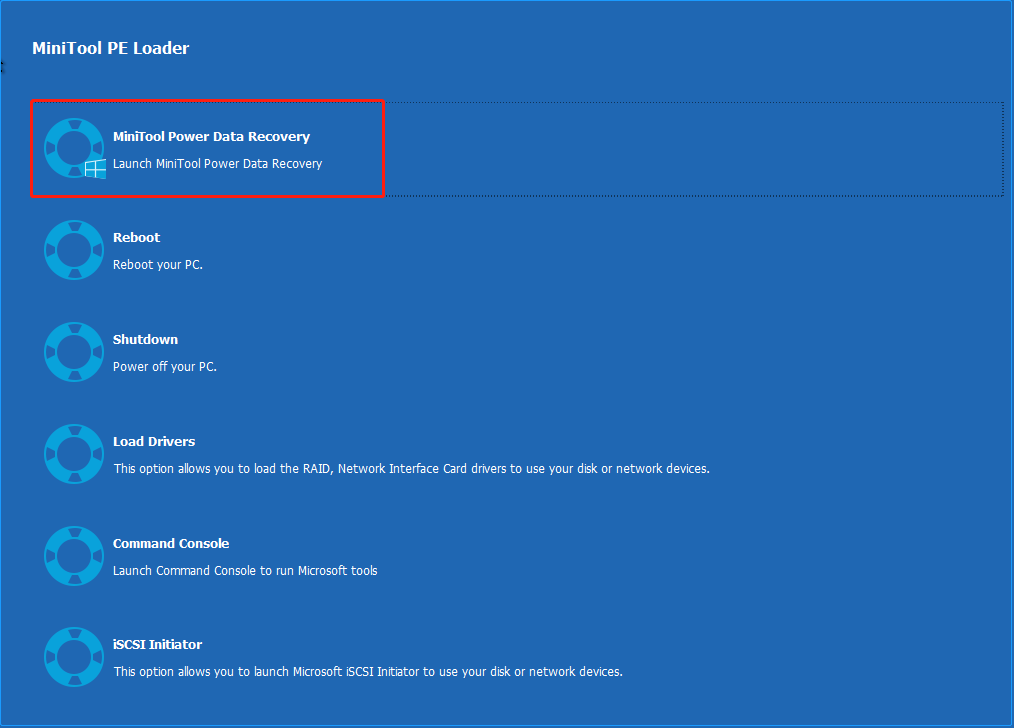
2. Click MiniTool Power Data Recovery in the main interface of the MiniTool PE Loader interface.
Step 3: Recover Lost Data.
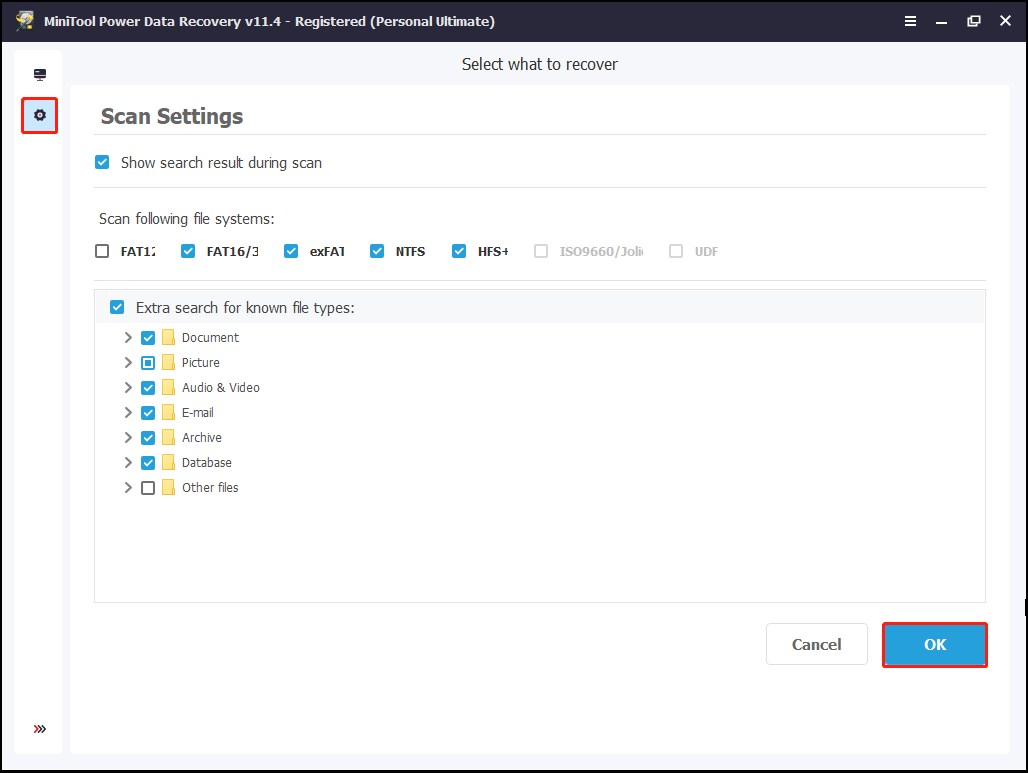
1. In the main interface of MiniTool Power Data Recovery, you can click Scan Settings in the left panel to specify needed file types and file systems before scanning a drive.
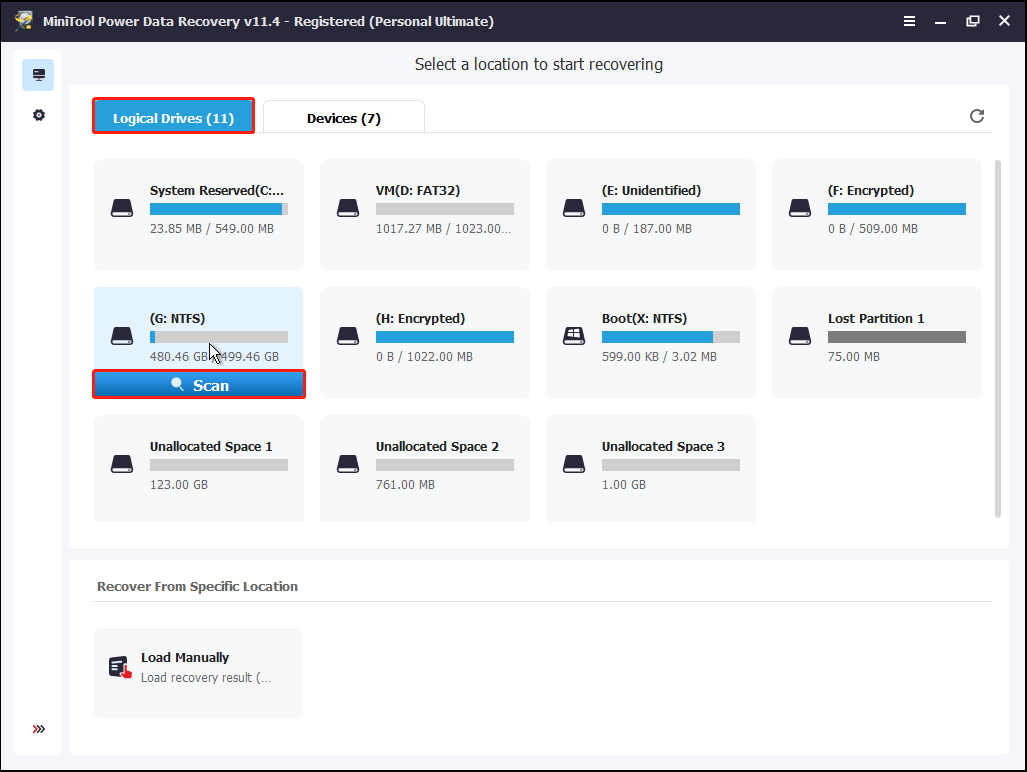
2. Under the Logical Drives tab, select the drive you want to recover lost data from and click Scan. Or you can go to the Devices tab next to Logical Drives, and select the whole disk to scan.
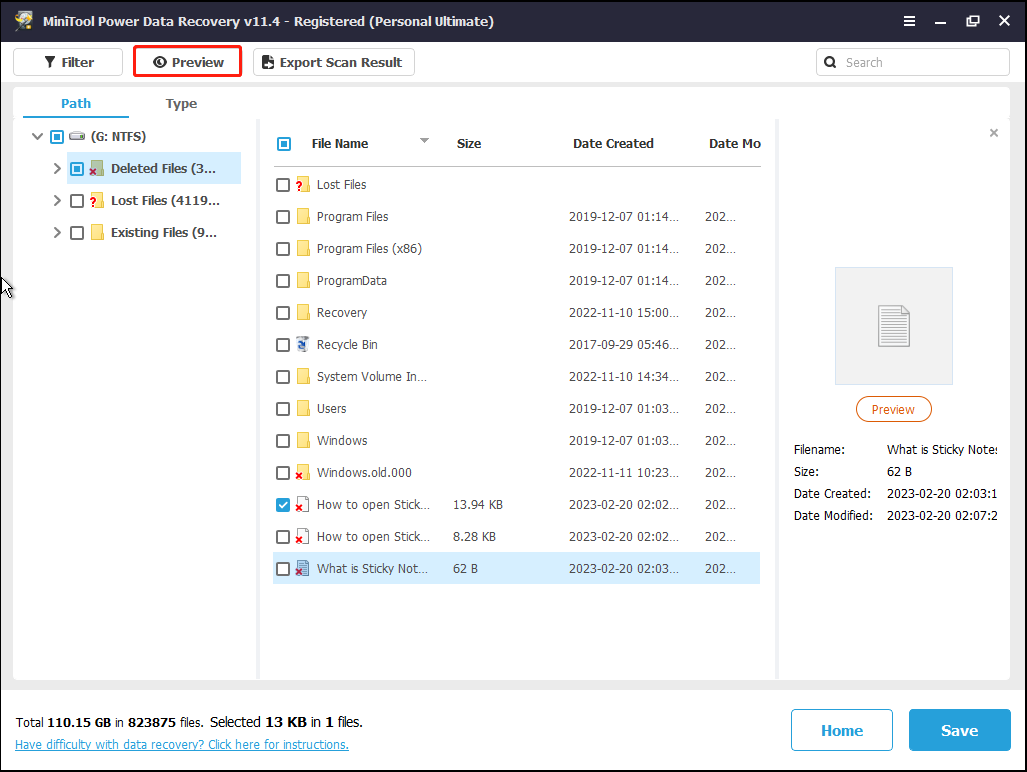
While scanning, you can click the Preview button to preview the found files. If you see that all the needed files have already been found, you can click the Stop icon to stop the scanning process. However, to get the best result, it is recommended to wait until the full scan finishes.
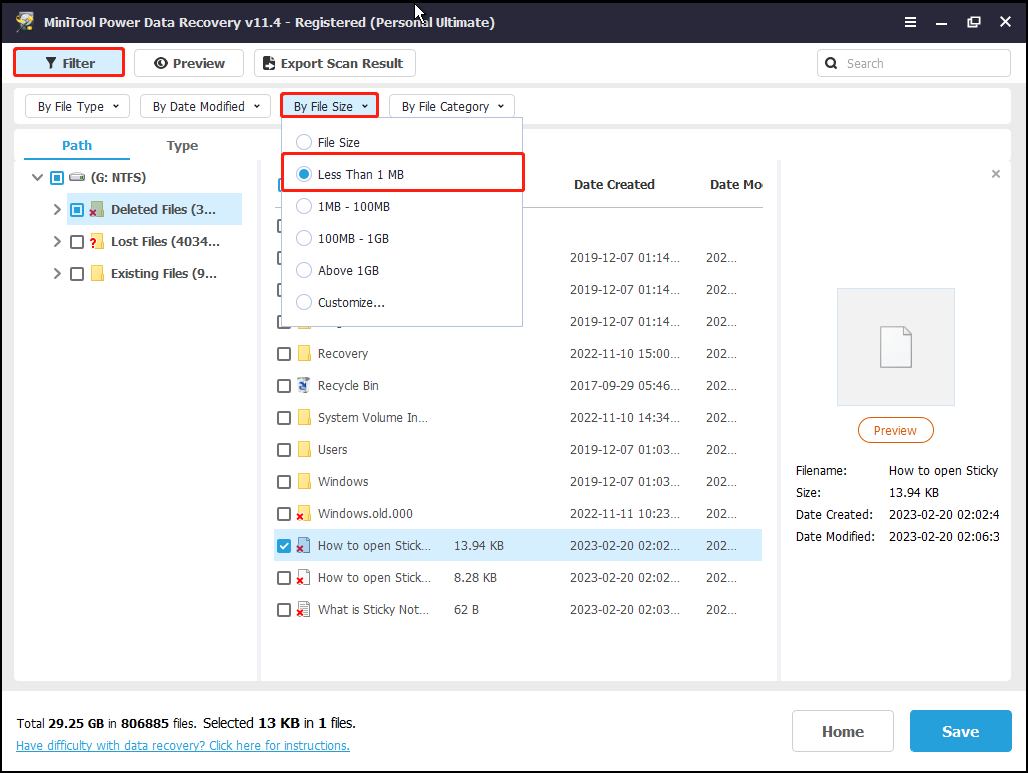
After scanning, MiniTool Power Data Recovery will list a lot of files. You can make use of the Filter feature to filter them by file size, file types, file categories, and date modified.
For instance, if you only want to find files less than 1 MB, you can filter files by file size.
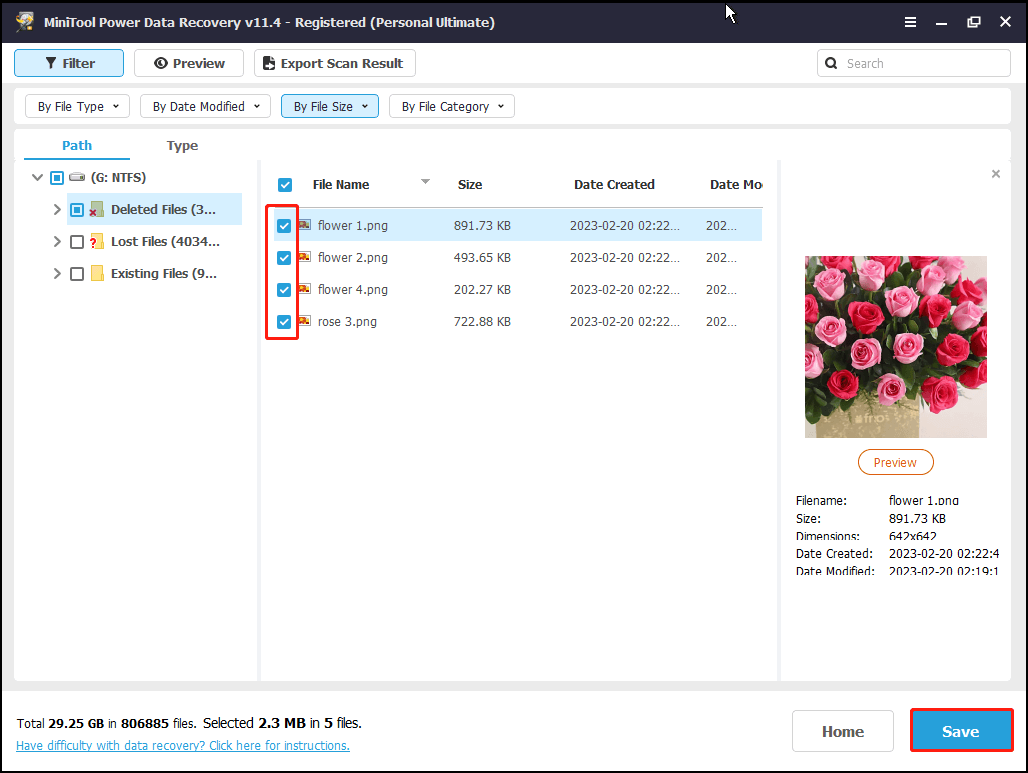
3. Now, you can select all the files you need, and then click Save to store them. It is recommended to store all files in another drive that works properly.
PART 2. 7 Solutions to Fix Your PC Did Not Start Correctly
Method 1: Open Command Prompt and Run System File Checker
You can try running the sfc /scannow command in the Command Prompt to fix your PC when it runs into the looping issue of not starting correctly.
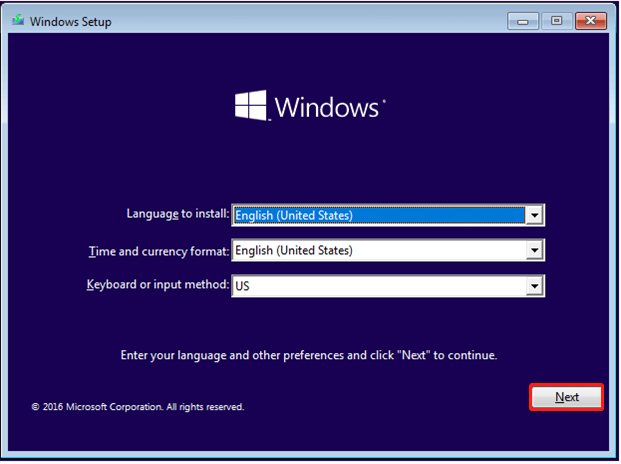
1. Use Windows Media Creation Tool to create an installation media refer to this post: A Complete Guide to Windows 10 Media Creation Tool: How to Use
2. Insert the Windows installation media and boot from it.
3. Select your language preferences, and click Next.
4. Click Repair your computer.
5. Click Troubleshoot.
6. Click Command Prompt.

7. Type sfc /scannow and hit Enter to run the System File Checker.

8. Type exit and press Enter.
9. Restart your PC and check whether the “Your PC did not start correctly” error still exists.
Method 2: Remove Incompatible Software in Safe Mode
Installing new software or drivers may cause the issue of the “Automatic Repair error”. In this situation, you can boot your computer in Safe Mode to troubleshoot the system that failed to boot correctly.
1. Insert the Windows installation media and boot from it.
2. Select your language preferences, and click Next.
3. Click Repair your computer > Troubleshoot > Startup Settings > Restart.
4. Press the F4 key to boot Windows into Safe Mode.

5. Remove the problematic driver or software in Safe Mode.
6. Wait for the system to restart and check if it successfully boots.
Method 3: Rebuild BCD | Boot Configuration Data
If you are unable to boot your PC normally after trying the above two solutions, there is a chance that the Boot Configuration Data (BCD) is corrupted.
BCD is a firmware-independent database for boot-time configuration data. It is used by Microsoft’s new Windows Boot Manager and replaces the boot.ini that was used by NTLDR.
Now, you can rebuild BCD to fix your PC start-up issue by following the steps below.
1) Insert the Windows installation media and boot from it.
2) Select your language preferences, and click Next.
3) After selecting language, press Shift + F10 to open Command Prompt.
4) Type bootrec /fixmbr and press Enter.
5) Type bootrec /fixboot and press Enter.
6) Type bootrec /rebuildbcd and press Enter.

7) Finally, type exit and press Enter.
8) After that, restart the PC to check if the “Automatic Repair, Your PC did not start correctly” error has been resolved. If not, keep reading.
Method 4: Disable Antivirus
Some reports suggest that your antivirus could cause the error “Automatic Repair, Your PC did not start correctly”. Therefore, you need to disable the early launch anti-malware protection option.
The steps are:
1) Select Restart when you see the following error message:
Automatic Repair.
Your PC did not start correctly.
2) If the problem still exists, you need to click on Advanced options > Troubleshoot > Startup Settings > Restart Advanced options when you see the error message.
3) When you see some options as shown in the image, press 6 or F6 on your keyboard to disable early launch anti-malware protection.
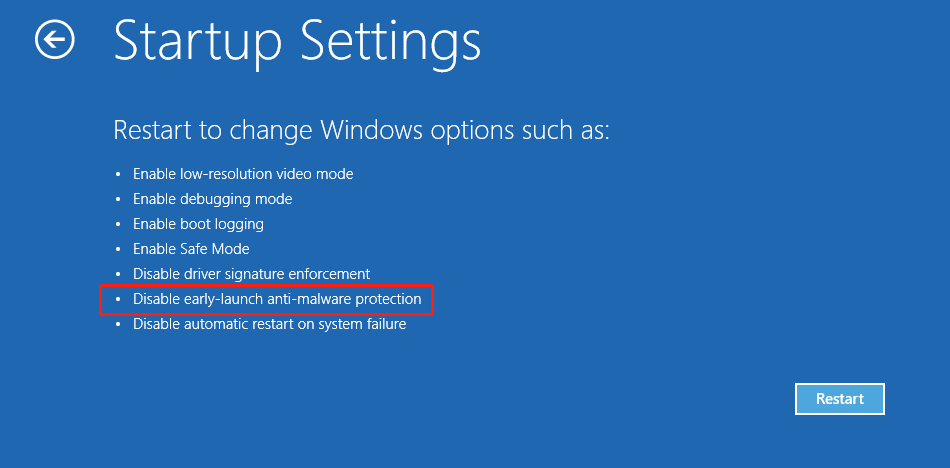
4) Then, restart your computer and check if the issue has been resolved.
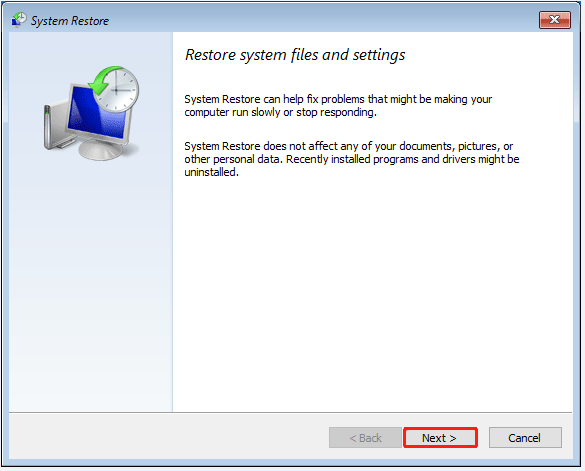
Method 5: Restore the System Files and Settings
Some users say they have successfully dealt with the automatic repair error message in Windows 10/8/7 by restoring the system. Here are the steps:
1. In the “Your PC did not start correctly” interface, go to Advanced options > Troubleshoot > Advanced options > System Restore.
2. Choose a target operating system.
3. Then, you will see the System Restore interface as follows. Now, click the Next button to continue.
4. After that, you will be given detailed system restore points for you to select. Just follow the prompts to restore the operating system.
Method 6: Fix the Corrupted Master Boot Record
Master Boot Record (MBR) is a special boot sector that saves the boot configuration and information on your computer’s hard disk. You won’t be able to boot your PC normally if the MBR is damaged, and you would receive the “Automatic Repair, your PC did not start correctly” error.
Now, fortunately, MiniTool Partition Wizard can help you effectively rebuild MBR with ease. Works when your system is installed on an MBR disk.
Note: Since your PC did not start correctly, you should try the MiniTool Partition Wizard Pro edition because the free edition doesn't provide Bootable Media Builder.
1. Download, install and launch MiniTool Partition Wizard Pro on a working computer.
MiniTool Partition Wizard DemoClick to Download100%Clean & Safe
2. Click the “Bootable Media” feature in the main interface to create a bootable CD, DVD, or USB flash drive.
3. Insert the bootable disk into your unbootable PC and start from it. Then, choose the first option “Partition Wizard” to enter the main interface of MiniTool Partition Wizard.
4. Now, select the target disk and click “Rebuild MBR” from the left panel.
5. Click the “Apply” button to apply the changes.
Finally, quit MiniTool Partition Wizard, restart the computer and you will find the “your PC did not start correctly” issue should be resolved.
Helpful post: Step-by-Step Guide to Repair and Fix MBR Windows 7/8/8.1/10
Method 7: Reset Your PC
If your PC still cannot start correctly after trying the above 6 solutions, you might have to try performing a Reset or Refresh to troubleshoot the issue.
1. In the Windows troubleshoot menu, choose to Troubleshoot > Reset this PC.
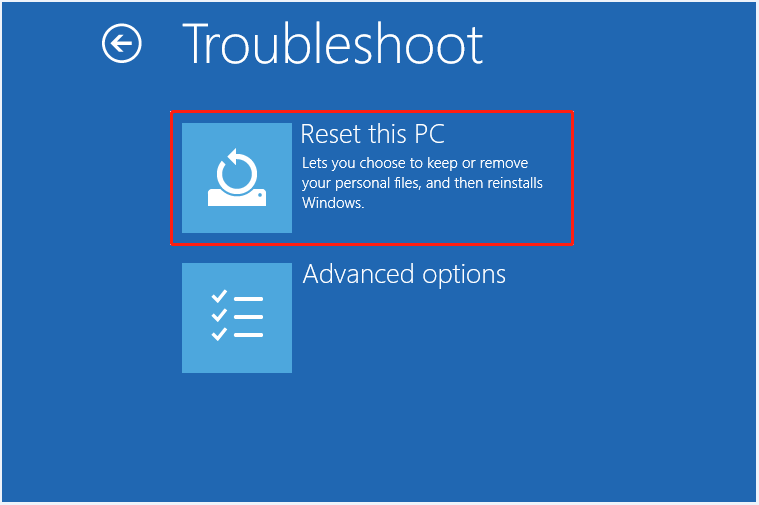
2. Follow the wizard instruction to complete this process. Be careful when choosing any options because some of them will erase your personal files.
Bottom Line
Here, 7 solutions to the “Your PC did not start correctly in Windows 10/8/7” issue are offered. If your Windows is stuck on a black screen with the error message “Automatic Repair, your PC did not start correctly”, you can try the above solutions one by one.
If you have any other solutions to fix the “Your PC did not start correctly in Windows 7” issue, welcome to share your solutions in the comment section.
If you have any questions about recovering lost data with MiniTool Power Data Recovery, please feel free to contact us via [email protected]. Thanks!
About The Author

Position: Columnist
Shirley graduated from English major and is currently an editor of MiniTool Team. She likes browsing and writing IT-related articles, and is committed to becoming a professional IT problem solver. The topic of her articles are generally about data recovery, data backup, and computer disk management, as well as other IT issues. In spare time, she likes watching movies, hiking and fishing.