This post mainly tells you some information about Windows boot manager and how to enable and disable it. Besides, you will get some extra information about it.
What Is Windows Boot Manager
Windows Boot Manager (BOOTMGR), a small piece of software, is loaded from the volume boot code that is a part of the volume boot record. It enables you to boot Windows 10/8/7 or Windows Vista operating system. Besides, MiniTool will offer more information to you.
The configuration data that BOOTMGR requires can be found in the Boot Configuration Data (BCD) store, which is a registry-like database. The database replaces the boot.ini file used in old Windows versions like Windows XP.
The BOOTMGR file itself is both read-only and hidden, which is located in the root directory of the partition. It is marked as “Active” in Disk Management. In most Windows PCs, this partition is labelled as “System Reserved” without hard drive letter.
If there’s no the “System Reserved” partition, probably the BOOTMGR is located on the primary hard drive (in most cases it’s C drive). The boot manager will execute winload.exe, which is the system loader that is used to continue the Windows boot process.
How to Enable/Disable Windows 10 Boot Manager
Based on the above description, you can know that Windows boot manager Windows 10 is beneficial to your computer. Additionally, if you have multiple operating systems, you can choose the target operating system and enable Windows Manager when booting your computer.
However, as it can unnecessarily slow down the boot process when it waits to ask you which operating system to boot to, you may want to disable it.
Actually, you are unable to delete Windows boot manager. What you can do is to reduce the time that it waits on the screen for your answer which operating system you would like to start. You can utilize the given methods to enable/disable Windows 10 boot manager.
Method 1: Utilize Command Prompt
To enable/disable BOOTMGR via Command Prompt, you need to have administrator privilege to perform. If you don’t have this access, it is suggested that you use Renee PassNow to create one before following the steps below.
Step 1: Type cmd in the search box, and then right click Command Prompt and choose Run as administrator.
Step 2: Type the following commands in the Prompt and hit the Enter key after typing each one command.
- bcdedit / set {bootmgr} displaybootmenu yes
- bcdedit / set {bootmgr} timeout 30
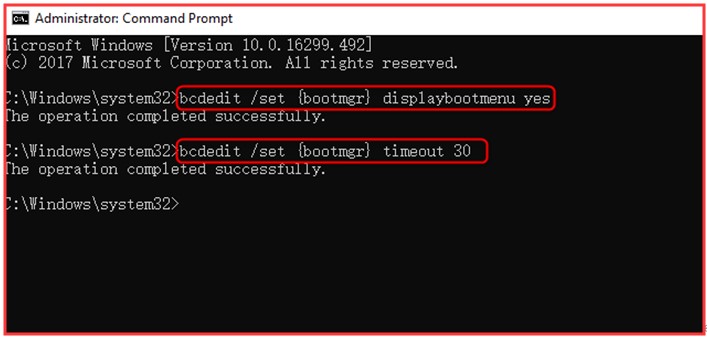
Step 3: If you want to disable Windows Boot Manager, you need to type bcdedit / set {bootmgr} timeout 0 and hit Enter.
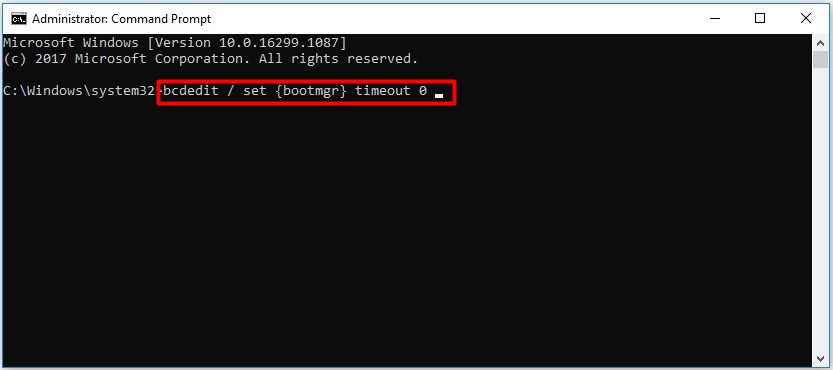
You can also use the bcdedit / set {bootmgr} displaybootmenu no command to disable BOOTMGR, but by doing so you cannot use the Method 2.
Method 2: Change System Properties
Alternatively, you can change system properties to enable or disable Windows Boot Manager. Here are steps for you.
Step 1: Open the Run dialog window by pressing Win plus R keys.
Step 2: Type sysdm.cpl and click OK to continue.
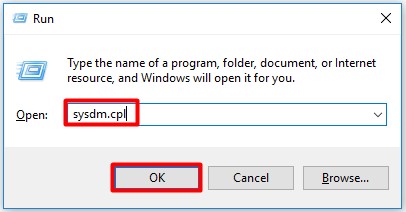
Step 3: When the System Properties window pops up, choose the Advanced option. Then click on the Settings under the Startup and Recovery option.
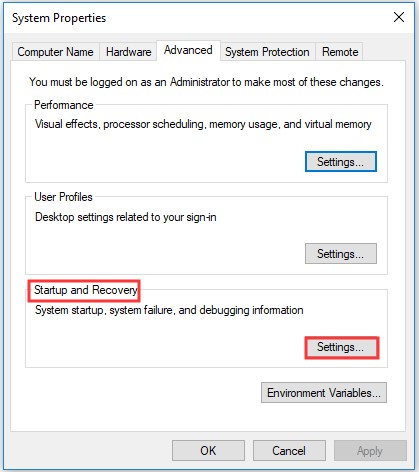
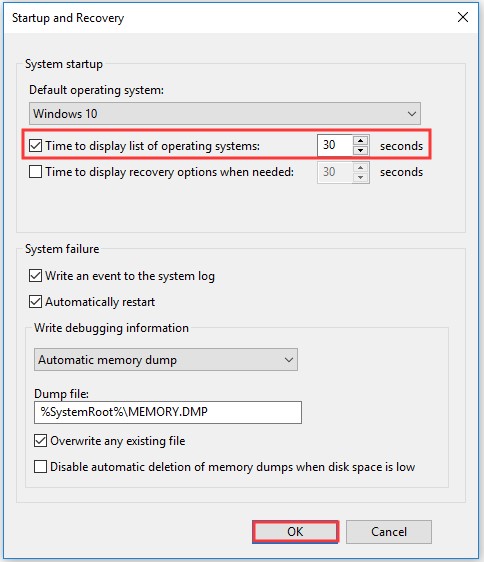
Step 4: In the pop-up window, select the Time to display list of operating systems box and set the time value. After that, click OK to save the changes.
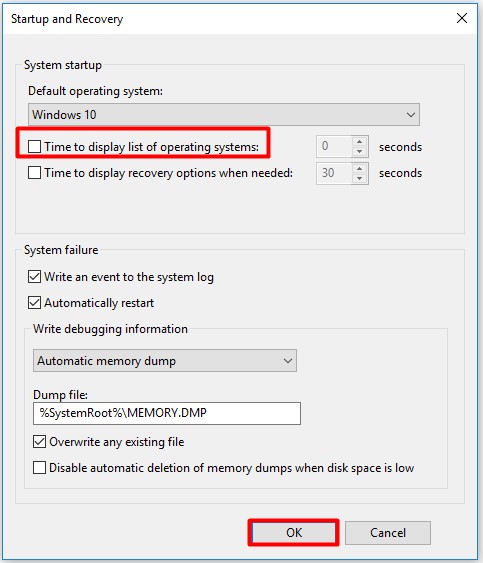
Step 5: If you want to disable BOOTMGR, cancel Time to display list of operating systems box or set the time value as 0 and click OK to finish the operation.
Extra Information about BootMGR
The common boot error in Windows is the BOOTMGR is missing error. The Boot Configuration Data store is safer than the boot options in previous. That is because it enables users who are in Administrator group to lock the BCD store partition and gives some rights to other users to decide which ones can manage boot options.
Only if you are in the Administrators group, you can edit the boot options in Windows Vista and more advanced Windows versions utilizing BCDEdit.exe tool included in those versions of Windows. On the contrary, if you’re using older versions of Windows, use the Bootcfg and NvrBoot tools instead.