If the original files and folders in Windows 10 are deleted, lost, or damaged, you can restore them from File History in Windows 10 on condition that the File History feature has been enabled. Check what File History backs up, how to restore files with File History, how to turn on File History, etc. in this tutorial. A top free data recovery program from MiniTool is also available.
The File History feature is introduced in Windows 8 and is improved in Windows 10. If you have enabled File History on Windows 10, it will automatically back up various files and folders. When needed, you can access File History backups to restore your files and folders.
In this tutorial, you’ll first learn how to restore files with File History, how to set a drive to back up files with File History, how to enable File History, etc. in Windows 10.
Besides, in case you haven’t turned on File History in Windows 10 but unexpectedly deleted or lost some files, the best free data recovery software – MiniTool Power Data Recovery – is also introduced with a detailed user guide to help you easily recover deleted/lost files in Windows 10.
How to Restore Files with File History Windows 10
If you’ve enabled File History in Windows 10, it will make backups of selected files and folders, and check the changes of them. If you make some changes to those files, it will record them and back up the new versions to the designated device.
You can restore some files from File History backups in Windows 10 when you mistakenly deleted some files or lost some important files when something goes wrong with your computer. Check the detailed guide below.
Step 1. Access File History Backups in Windows 10
- You can click Start –> Settings or press Windows + I keyboard shortcut to open Windows Settings.
- Next you can click Update & Security, and click Backup in the left column.
- Then you can click More options link under Back up using File History
- In the pop-up window, you can click Restore files from a current backup link to enter into the File History backups window.

Step 2. Select the Desired Files and Folders to Restore
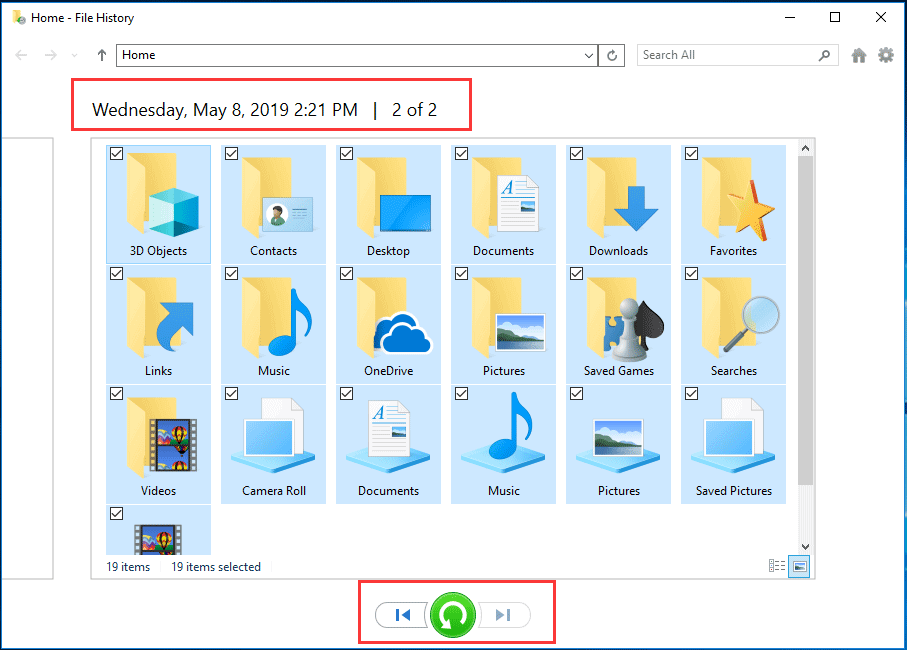
In the File History backups window, you can double-click the folders to check the files in it to find the file or folder you want to restore.
Step 3. Restore Files from File History
Then you can select the file or folder you want to restore, and click the green Restore button. If you are trying to restore a previous version of file, it will pop up a window asking if you want to replace the current file in the destination.
If you don’t want to overwrite the current version and want to save the previous version to another location, then you should right-click the green Restore button and select Restore to… to select a preferred destination path to store the file.
What Does File History Back Up?
Does Windows 10 File History backup everything? No.
Windows File History only backs up files in these folders on your computer, including Documents, Pictures, Music, Videos, and Desktop folders.
You can add other files and folders which you want to back up to one of these folders above and use File History to back up them. You can also exclude folders to be backed up.
Therefore, File History doesn’t back up everything on the hard drive. It only backs up the contents you selected. It is not a Windows image backup which can restore Windows 10 system.
Alternative Way to Recover Deleted/Lost Files in Windows 10
If you haven’t enabled File History in Windows 10 or there is no backup of the deleted/lost file in File History, how to get back the deleted/lost file in Windows 10? The solution is to utilize the best data recovery software.
MiniTool Power Data Recovery is a professional data recovery software program compatible with Windows 10/8/7 and Windows Servers.
It can help you recover any deleted files or lost data from Windows 10/8/7 computer, external hard drive, SSD, USB flash/pen/thumb drive, phone SD card, camera SD memory card, and more. It offers a free edition that allows you to recover up to 1GB data for free.
If your computer has some problems like system crash, malware/virus infection, system error, hard drive failure, etc. you can use MiniTool Power Data Recovery to easily restore files and data from your computer.
Free download and install MiniTool Power Data Recovery on your Windows computer, and follow the simple steps below to retrieve deleted/lost files from PC if you can’t restore files from File History backup in Windows 10.
MiniTool Power Data Recovery FreeClick to Download100%Clean & Safe
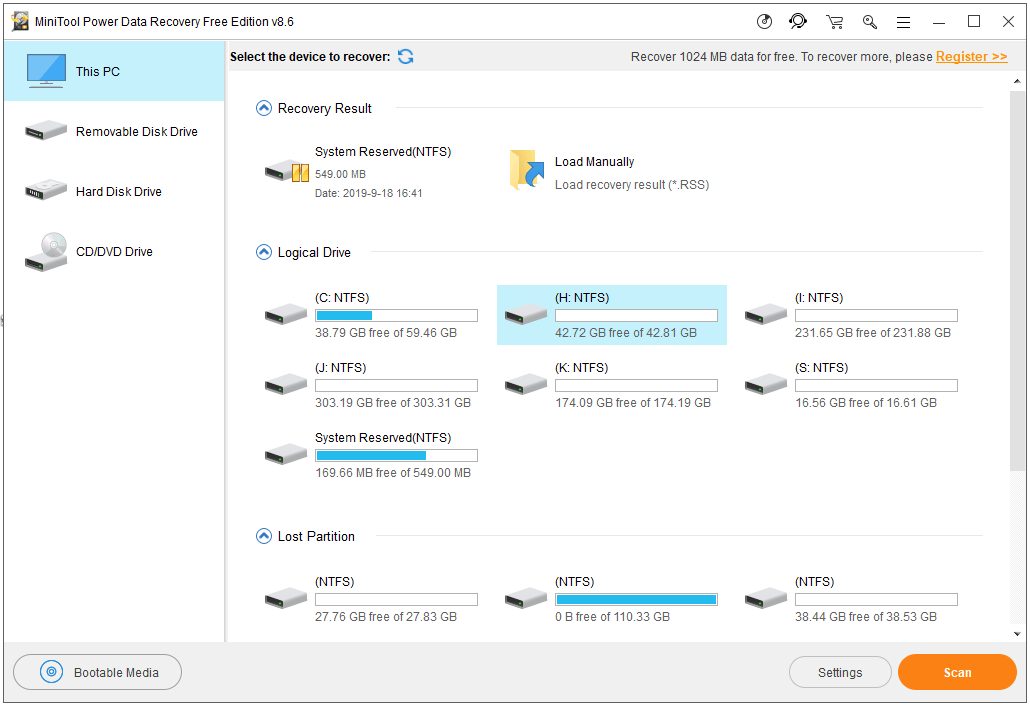
Step 1. Select the device to scan
- Open MiniTool Power Data Recovery to enter into its main interface.
- Then choose the target device which contains your deleted/lost files. Here we choose This PC. If you’d like to recover data from USB pen drive, external hard drive, SD card, etc. please select the corresponding main category from the left pane.
- After you choose the main device category, you can continue to select the specific device or partition in the right window.
- Then you can click Scan button, and MiniTool Power Data Recovery will start scanning all data incl. deleted/lost files on the chosen device.
Step 2. Restore deleted/lost files
After it finishes the scan, you can check the scan result to find your deleted/lost files, tick them and click Save button to specify a new destination path to store the recovered files.
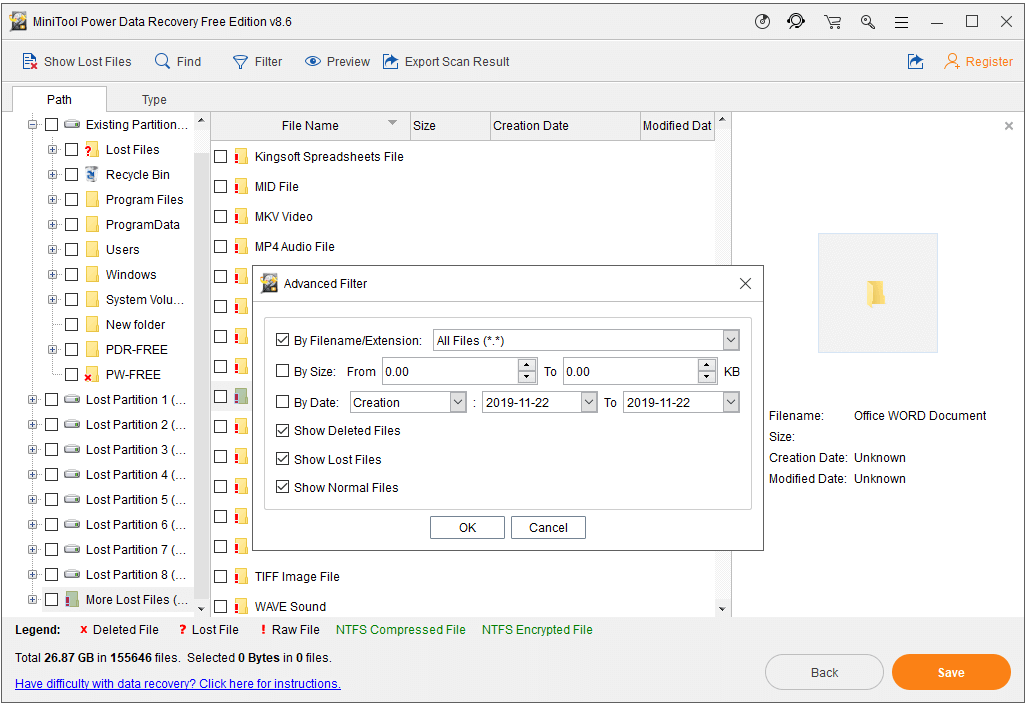
Tip: You can utilize the Find, Filter, Show Lost Files, Preview functions to quickly find the target files. You should also set a new drive or device to store the recovered files to avoid data overwriting since it’s nearly impossible to recover overwritten files.
How to Back up Files Using File History
As for how to turn on File History and use it to back up files in Windows 10, you can check the detailed instructions below.
How to Enable File History in Windows 10
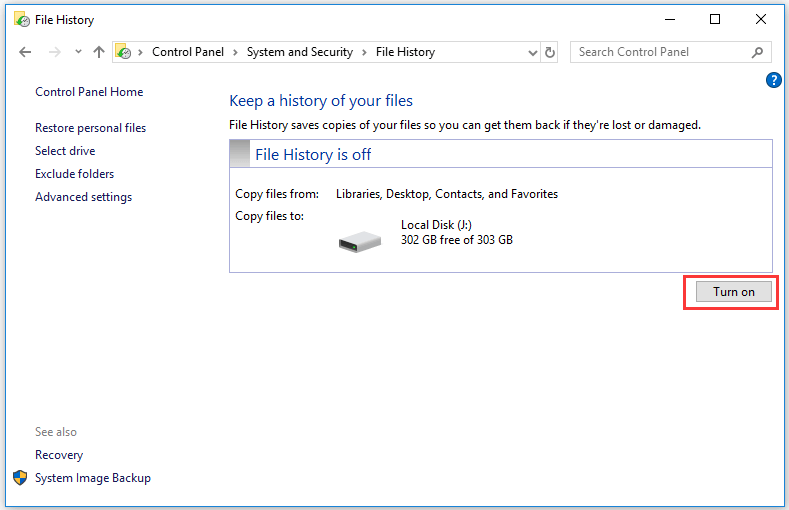
- You can open Control Panel in Windows 10, and click System and Security -> File History.
- Click Turn on button to turn on File History feature in Windows 10.
How to Back up Files with File History
Step 1. Select a drive to store the backups
After you turned on File History in Control Panel, you can click Select drive in the left pane to select where you want to save the backups.
You can back up your files to an external hard drive, USB drive, or network drive like NAS, etc.
If you want to back up files to an external drive, you should connect it to your computer first.
Step 2. Select files and folders to backup
By default, File History will copy all files from Libraries, Desktop, Contacts and Favorites folders.
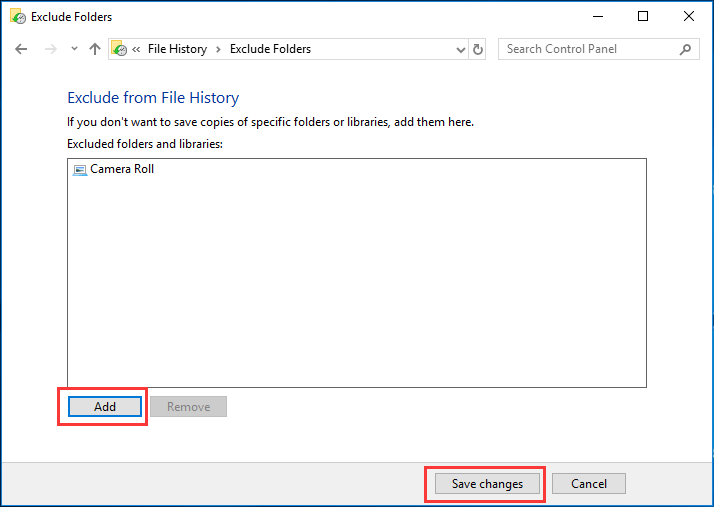
If you want to exclude some folders, you can continue to click Exclude folders in the left pane, and click Add button to add the folders which you don’t want to back up with File History.
Step 3. Set how often File History backs up files
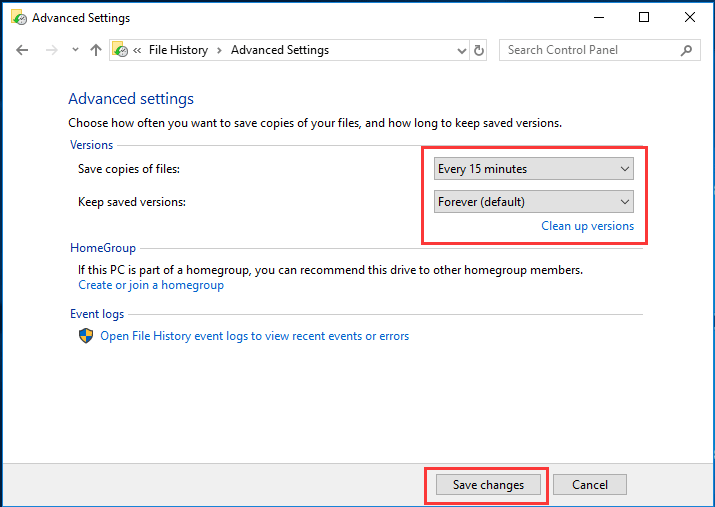
At last, you can click Advanced Settings link in the left pane to open File History Advanced Settings. Here you can set how often you want to save copies of your files, and how long to keep save versions.
If you want to clean up older versions of File History backups, you can click Clean up versions link.
As you can see, Windows 10 File History only backs up partial files on your Windows 10 computer. Instead of backing up and restoring files with File History, you can use a securer way to back up any desired files/folders and create a Windows 10 system image to keep your system and files safe.
Alternative Way to Back up Files in Windows 10
MiniTool ShadowMaker is a professional free PC backup software for Windows 10/8/7. It can not only back up files but also backup and restore Windows system. Check what it can do for you below.
- Back up selected files and folders to other partition of computer, external hard drive, USB, network drive, etc.
- Back up Windows OS and restore system to a previous state with a backup when needed.
- Back up the content of whole disk or specific partition to other storage devices.
- MiniTool ShadowMaker provides two file backup methods: backup and sync. You can also sync files and folders to other locations or devices.
- You can freely set a backup schedule to automatically back up files on a regular basis.
- It also allows you to create incremental backup scheme so as to keep the latest backup version and delete previous backups to save disk space.
- This top free backup software provides a WinPE Bootable Media Builder to help you create a bootable USB drive/disk. When your computer won’t boot, you can use it to boot your computer into WinPE to perform a system restore or back up data.
Free download and install MiniTool ShadowMaker, and check the easy user guide below. Here we take backing up files and folders as example.
MiniTool ShadowMaker TrialClick to Download100%Clean & Safe
Step 1. Run MiniTool ShadowMaker
Launch MiniTool ShadowMaker, and click Keep Trial button to enter into its Trial Edition which allows 30-day free trial. Click Connect button under This Computer to enter into the main interface.

Step 2. Choose source files
Next you can click Backup module and click Source section. In the pop-up window, click Folders and Files option to select preferred files and folders you’d like to back up.
Step 3. Select a destination path
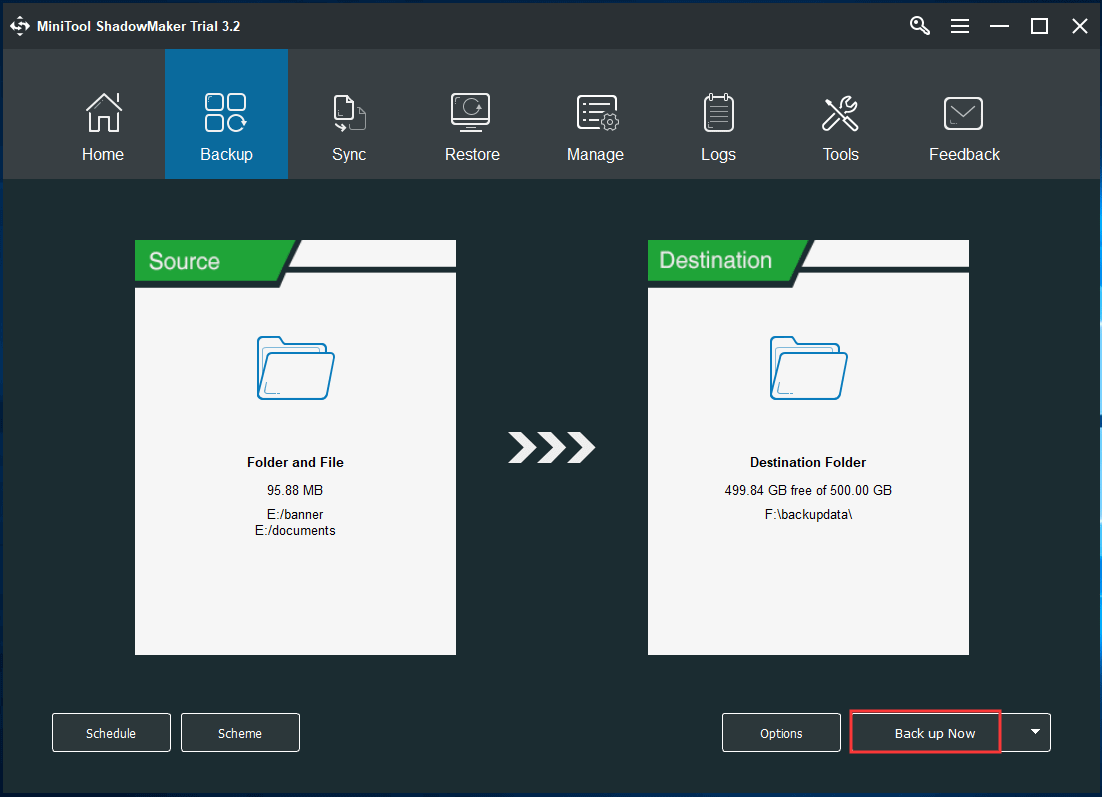
Go back to main UI and click Destination section to choose a destination path or device to store the backups. After this, you can click Back up Now button to begin backing up the selected files and folders to the target device.
Unlike Windows File History, MiniTool ShadowMaker allows you to select any preferred files to back up and also allows you to back up and restore system. MiniTool ShadowMaker is more flexible and user-friendly.
Conclusion
Now you know how to restore deleted/lost files from File History backups in Windows 10. If you haven’t turned on File History or can’t find a backup in File History backups, you can use MiniTool Power Data Recovery to recover any deleted/lost files from Windows 10 PC or other storage devices.
Besides, if you think backing up and restoring files with File History is complicated and restricted, you can use MiniTool ShadowMaker which is more powerful and easy-to-use than File History. It works in Windows 10/8/7.
Should you have any problems with how to use MiniTool Power Data Recovery or MiniTool ShadowMaker, you can contact us via [email protected].
Restore Files with File History FAQ
- You can click Start, type control panel, and choose Control Panel to open Control Panel.
- Next click System and Security -> File History to enter into File History window.
- Then you can click Turn on button to enable File History feature in Windows 10.
- At first, press Windows + R, type control panel, and hit Enter to open Control Panel in Windows 10.
- Click System and Security -> File History to enter into File History window.
- Next click Advanced settings in the left column.
- Click Clean up versions link.
- At last, choose the time you want to delete the versions of files and folders from the drop-down list, and click Clean up button.
Also read: Learn the best trick for data recovery hard drive on Windows 11/10/8/7