This article described on MiniTool official web page mainly introduces a kind of database protection service point-in-time recovery. It elaborates on how this feature is applied in Amazon Dynamodb, MySQL server, and Microsoft Azure. Besides, it teaches you how to restore your computer to an earlier point in time with the recovery point created in advance.
What Is Point-in-Time Recovery?
In the context of computers, point-in-time recovery (PITR) involves systems, usually databases (DBs), whereby an administrator can recover or restore a set of data or a particular setting from a time point in the past. Once PITR logging starts for a PITR-capable database (Oracle, Amazon DynamoDB, SQL Server, Microsoft Azure, etc.), a database administrator can recover that database from backups to the state that it had at any time since.
A point in time recovery example is Windows XP’s capability to restore operating system (OS) settings from a past date (before data is lost or damaged). Another example of point-in-time recovery is Mac OS X’s Time Machine.

DynamoDB Point-in-Time Recovery
Amazon DynamoDB point-in-time recovery offers automatic backups of your DynamoDB table data. let’s see how it works.
#1 Turn on DynamoDB Point-in-Time Recovery
You can enable point-in-time recovery via the DynamoDB API (application programming interface), AWS (Amazon Web Services) Management Console, or AWS CLI (Command Line Interface). Once switched on, point-in-time recovery provides continuous backups until you turn it off explicitly.
#2 Restore a Table by DynamoDB Point-in-Time Recovery
With the point-in-time recovery service running, you can restore to any point in time you within LatestRestorableDateTime and EarliestRestorableDateTime. Usually, the former is five minutes before the current time.
For EarliestRestorableDateTime, you recover our table to any point during the last 35 days. The retention period is fixed to 35 days (5 calendar weeks) and it cannot be changed. Any number of users can run at most 4 concurrent recoveries (any type of restoration) in a given account.
Recovering using point-in-time recovery utility, DynamoDB restores your table to the state of your selected date and time, day:hour:minute:second to a NEW table. The restoration will not consume any provisioned throughput on the table. You can perform a full table recovery or configure the destination table settings listed below.
- GSIs (global secondary indexes)
- LSIs (local secondary indexes)
- Billing mode
- Provisioned read and write capacity
- Encryption settings
If you choose a full table restoration, all table settings for the restored table come from the current settings of the source table at the time of the recovery. For instance, suppose the target table’s provisioned throughput is currently 50 read capacity units. If you restore its state to a month ago when its provisioned throughput was 100 read capacity units, you will get a new table with a state of a month ago but with provisioned throughput of 50 read capacity units.

Besides, you are able to recover DynamoDB table data across AWS Regions such that the restored table is created in a different region from where the source table locates. You can conduct cross-region recovery between two among AWS commercial Regions, AWS China Regions, and AWS GovCloud (US) Regions.
As for DynamoDB point in time recovery cost, you are only charged by the data you transfer out of the source Region and for recovering to a new table in the destination Region.
The time to recover a table varies based on many factors. The point-in-time recovery times are not always correlated directly to the size of the table. If you exclude some or all indexes from being created on the restored table, restorations can be faster and more cost-efficient. You have to manually set on the recovered table the following items.
- Point-in-time recovery settings.
- Stream settings
- TTL (Time to Live) settings.
- Tags
- Auto-scaling policies.
- AWS Identity and Access Management (IAM) policies.
- Amazon CloudWatch metrics and alarms.

#3 Delete a Table with DynamoDB Point-in-Time Recovery Enabled
If you delete a table that has point-in-time recovery service enabled, DynamoDB will automatically create a backup that is called a system backup and retains it for 35 days at no additional cost. You can take advantage of the system backup to restore the deleted table. All system backups are named following a standard naming convention of table-name$DeletedTableBackup.
Point-in-Time Recovery MySQL
Point-in-time recovery in MySQL means recovery of data changes up to a given point in time. Typically, this kind of recovery is conducted after restoring a full backup that brings the server to its state of the time the backup was created. It brings the server up to date incrementally from the time of the full backup to a more recent time.
In this part, we will talk about point-in-time recovery relying on binary logs produced by mysqlbinlog. If your binary log contains \0 (null) characters, it won’t be parsed by mysql until you invoke it with the –binary-mode option.
The source of info for point-in-time recovery is the set of binary log files generated subsequent to the full backup operation. So, to enable a server to be recovered to a point in time, binary logging must be enabled on it, which is the default setting for MySQL 8.0.
To recover data from the binary log, you have to know the name and location of the current binary log files. By default, the server creates binary log files in the data directory. Yet, the pathname can be specified with the –log-bin option to place the files in a different location.
To see a listing of all binary log files: mysql> SHOW BINARY LOGS
To determine the name of the current binary log file: mysql> SHOW MASTER STATUS
Applying events from the binary log causes the data modifications they represent to be re-executed, which enables data change recovery for a given period. To apply events from the binary log, process mysqlbinlog output with the mysql client:
$> mysqlbinlog binlog_files | mysql -u root -p
If you have multiple binary logs to apply on the MySQL server, use a single connection to apply the contents of all binary log files that you want to process. One statement to achieve that is:
$> mysqlbinlog binlog.000001 binlog.000002 | mysql -u root -p

Azure SQL Point-in-Time Restore
Point-in-time restore (PITR) is very useful in recovery scenarios for Microsoft Azure SQL database, such as data deletion, incorrect data loading, and data errors. You can also apply it for testing and auditing.
PITR creates a database as a copy of another database from some time in the past. The backup copy is maintained for 7 – 35 days, depending on your database settings. Let’s see how to do a point-in-time restore of a database in Azure SQL Managed Instance.
#1 Restore an Existing Database
You can use Azure portal, Azure CLI, or PowerShell to restore an existing database to the same SQL Managed Instance; or, use Azure CLI or PowerShell to restore an existing database to a different SQL Managed Instance to specify the properties for the target SQL Managed Instance and resource group. If you do not customize those parameters, the database will be restored to the existing SQL Managed Instance.
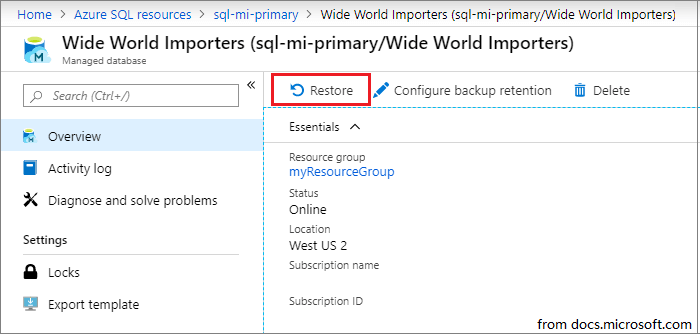
Restore an Existing Database via Azure Portal
- Sign in to the Azure portal.
- Go to your SQL Managed Instance and choose the target database.
- Click Restore on the database page.
- On the Restore page, select the point for the date and time that you want to restore the database to.
- Click Confirm to start the restoring.
Restore an Existing Database with Azure CLI
First of all, specify your values for the parameters in the following command. Then, run the command.
az sql midb restore -g mygroupname –mi myinstancename |
-n mymanageddbname –dest-name targetmidbname –time “2022-01-19T15:17:38”
To restore the database to another SQL Managed Instance, also, you need to specify the names of the target resource group and SQL Managed Instance.
az sql midb restore -g mygroupname –mi myinstancename -n mymanageddbname |
–dest-name targetmidbname –time “2022-01-19T15:17:38” |
–dest-resource-group mytargetinstancegroupname |
–dest-mi mytargetinstancename
Restore an Existing Database by Azure PowerShell
Firstly, you need to specify your values for the parameters in the below command-line and then run it.
$subscriptionId = “<Subscription ID>”
$resourceGroupName = “<Resource group name>”
$managedInstanceName = “<SQL Managed Instance name>”
$databaseName = “<Source-database>”
$pointInTime = “2022-01-19T15:17:38.3882806Z”
$targetDatabase = “<Name of new database to be created>”
Get-AzSubscription -SubscriptionId $subscriptionId
Select-AzSubscription -SubscriptionId $subscriptionId
Restore-AzSqlInstanceDatabase -FromPointInTimeBackup `
-ResourceGroupName $resourceGroupName `
-InstanceName $managedInstanceName `
-Name $databaseName `
-PointInTime $pointInTime `
-TargetInstanceDatabaseName $targetDatabase `
To restore the database to another SQL Managed Instance, you also need to specify the names of the target resource group and target SQL Managed Instance.
$targetResourceGroupName = “<Resource group of target SQL Managed Instance>”
$targetInstanceName = “<Target SQL Managed Instance name>”
Restore-AzSqlInstanceDatabase -FromPointInTimeBackup `
-ResourceGroupName $resourceGroupName `
-InstanceName $managedInstanceName `
-Name $databaseName `
-PointInTime $pointInTime `
-TargetInstanceDatabaseName $targetDatabase `
-TargetResourceGroupName $targetResourceGroupName `
-TargetInstanceName $targetInstanceName

#2 Restore Deleted Database
To restore a deleted database to the same instance, use either Azure Portal or PowerShell. To restore a deleted database to another instance, use Azure PowerShell.
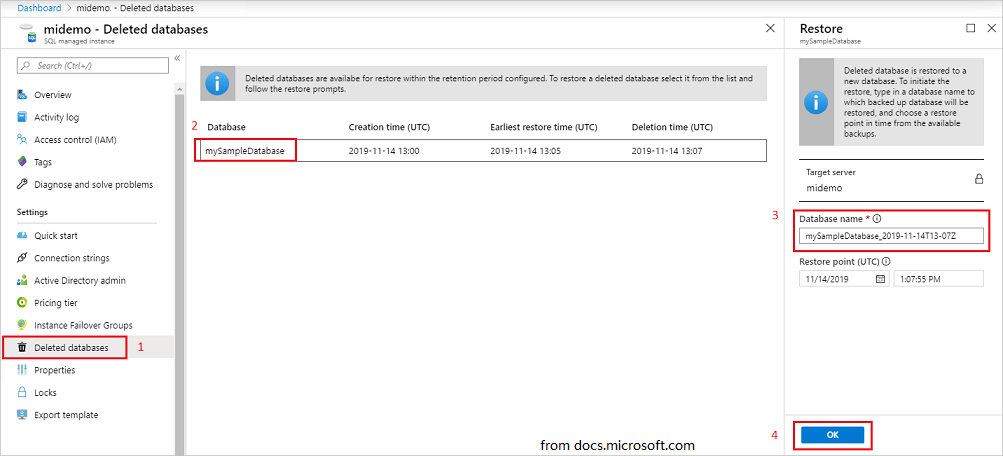
Restore Deleted Database Using Azure Portal
- Go to SQL Managed Instance overview page.
- Click Deleted databases.
- Select a deleted database that you would like to restore.
- Specify the name for the new database or just keep the default name.
- Finally, click OK.
Restore Deleted Database Through PowerShell
Use the following command to restore a deleted database to the same instance. It will also update the parameter values.
$subscriptionId = “<Subscription ID>”
Get-AzSubscription -SubscriptionId $subscriptionId
Select-AzSubscription -SubscriptionId $subscriptionId
$resourceGroupName = “<Resource group name>”
$managedInstanceName = “<SQL Managed Instance name>”
$deletedDatabaseName = “<Source database name>”
$targetDatabaseName = “<target database name>”
$deletedDatabase = Get-AzSqlDeletedInstanceDatabaseBackup -ResourceGroupName $resourceGroupName `
-InstanceName $managedInstanceName -DatabaseName $deletedDatabaseName
Restore-AzSqlinstanceDatabase -FromPointInTimeBackup -Name $deletedDatabase.Name `
-InstanceName $deletedDatabase.ManagedInstanceName `
-ResourceGroupName $deletedDatabase.ResourceGroupName `
-DeletionDate $deletedDatabase.DeletionDate `
-PointInTime UTCDateTime `
-TargetInstanceDatabaseName $targetDatabaseName
For restoring the database to another instance, you need to specify the names of the target resource group and instance.
$targetResourceGroupName = “<Resource group of target SQL Managed Instance>”
$targetInstanceName = “<Target SQL Managed Instance name>”
Restore-AzSqlinstanceDatabase -FromPointInTimeBackup -Name $deletedDatabase.Name `
-InstanceName $deletedDatabase.ManagedInstanceName `
-ResourceGroupName $deletedDatabase.ResourceGroupName `
-DeletionDate $deletedDatabase.DeletionDate `
-PointInTime UTCDateTime `
-TargetInstanceDatabaseName $targetDatabaseName `
-TargetResourceGroupName $targetResourceGroupName `
-TargetInstanceName $targetInstanceName
![[Full Review] Mirroring Harddrive: Meaning/Functions/Utilities](https://images.minitool.com/minitool.com/images/uploads/2021/07/mirroring-harddrive-thumbnail.png)
#3 PITR to Azure SQL Managed Instance Limitations
Point in time restore to SQL Managed Instance has some limits. On the one hand, currently, it does not support cross-subscription or cross-region restore. On the other hand, it can only restore a database hosted on SQL Managed Instance and can’t restore a whole SQL Managed Instance.
Below is a table comparing the status of point-in-time restore via different platforms.
| Azure portal | Azure CLI | Azure PowerShell | |
| Restore existing DB to the same instance of SQL Managed Instance | Yes | Yes | Yes |
| Restore existing DB to another SQL Managed Instance | No | Yes | Yes |
| Restore dropped DB to same SQL Managed Instance | Yes | No | Yes |
| Restore dropped DB to another SQL Managed Instance | No | No | Yes |
Also read: How to do point-in-time recovery in Oracle?
Windows PC Point-in-Time Recovery
How to restore your PC to an earlier point in time? Firstly, you should have the restore points of your computer. If not, you need to create them for future PC point-in-time recovery.
#1 How to Create Restore Points for Windows?
There are many programs and services that you can rely on to make computer data restore points like System Restore, Backup and Restore, File History, and MiniTool ShadowMaker. Here, we will take MiniTool ShadowMaker, a professional and reliable files/folders/system/partitions/disk backup software, for example to show you how to build Windows restore points.
MiniTool ShadowMaker TrialClick to Download100%Clean & Safe
1.Download, install, and launch MiniTool ShadowMaker on your computer.
2.Click the Keep Trial option if it requires purchase.
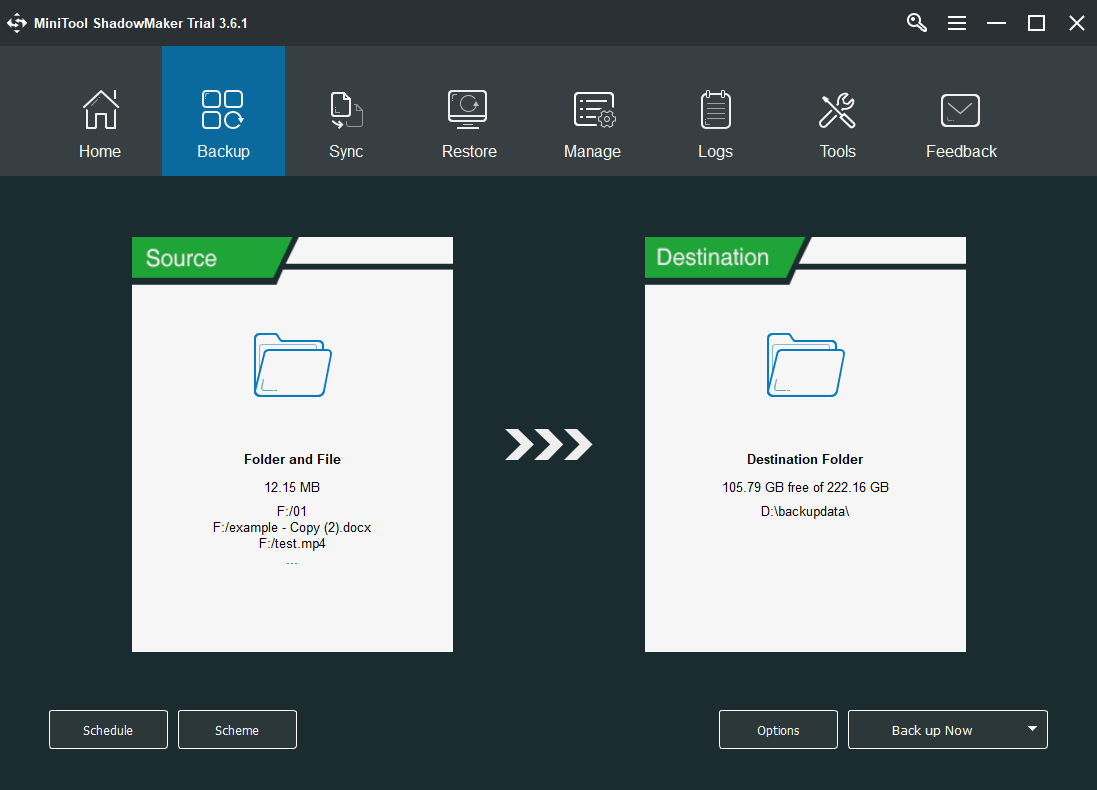
3. In its main interface, choose the Backup tab from the top menu.
4. In the Backup tab, it will automatically select system-related items as the source. If you don’t want to create a system restore point, you can manually change the selection by clicking on the Source
5. Click on the Destination module to define the target place.
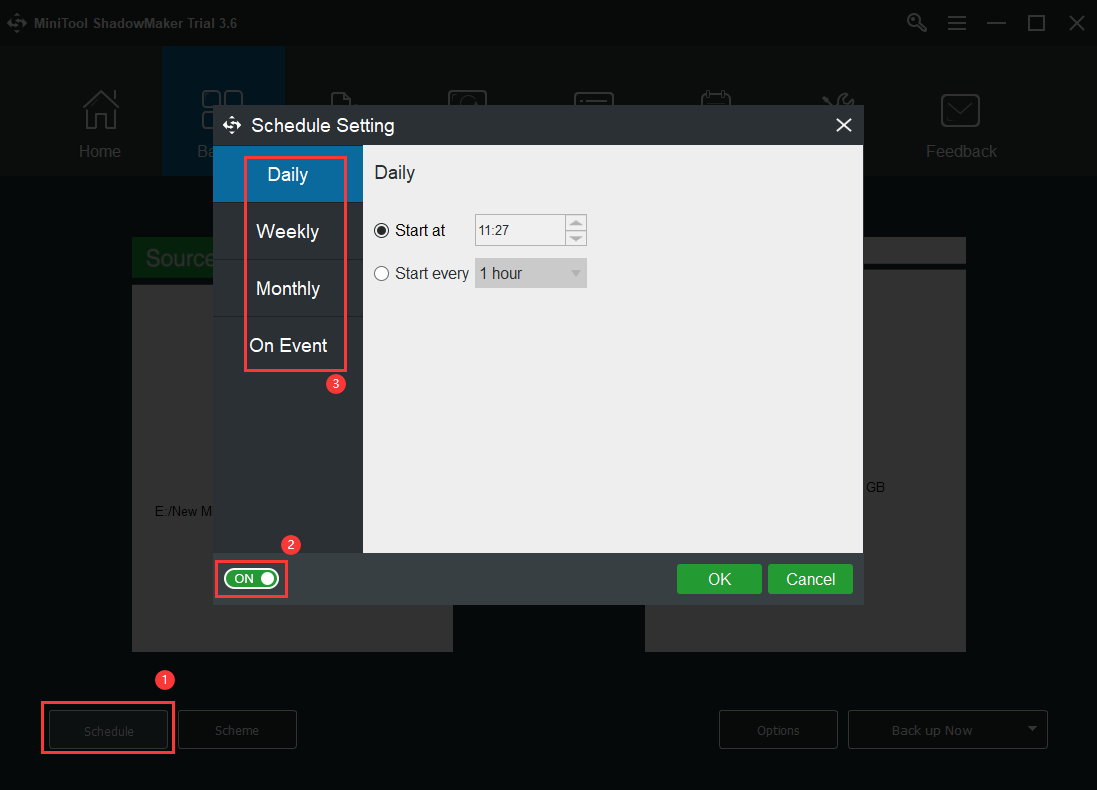
6. Click on the Schedule button below to trigger the automatic restore point creation.
7. Switch on the schedule settings in the popup and specify a proper schedule, daily, weekly, monthly, or on event.
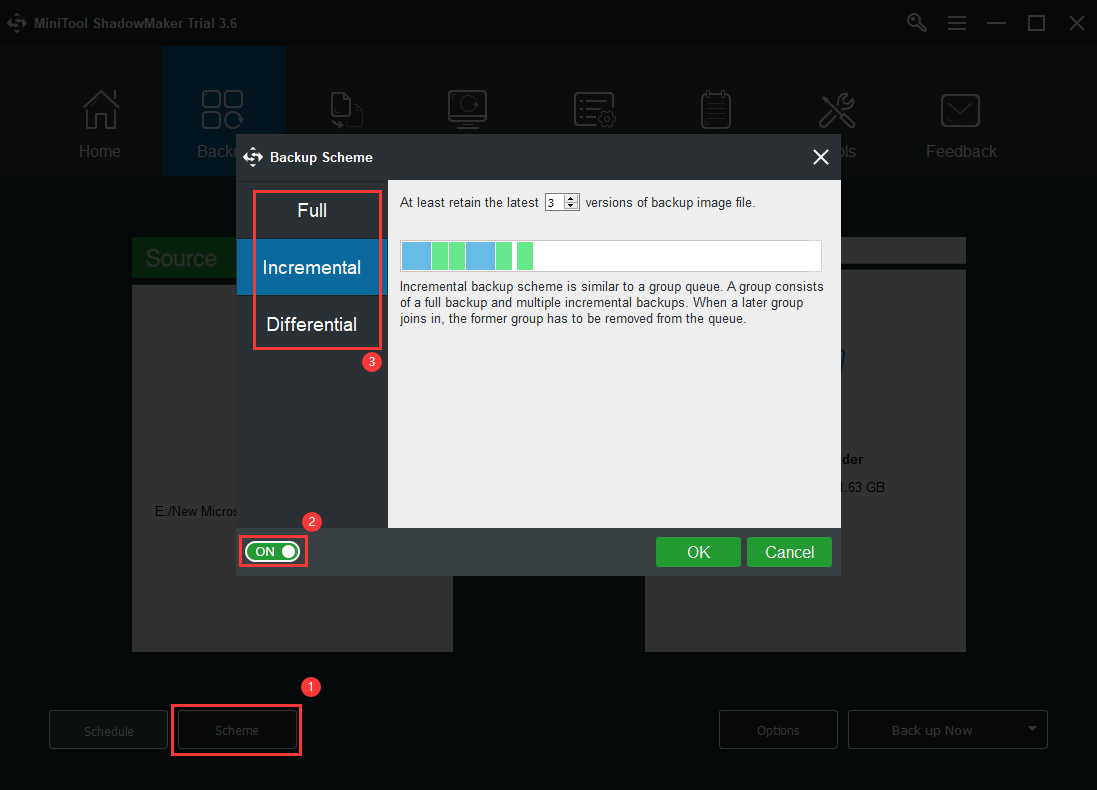
8. Click on the Scheme button to determine the future backup type, full, incremental, or differential backup.
9. Finally, click Back up Now to perform the initial full backup.
After the first full backup, it will perform the defined backup type and cycle in the future automatically.
#2 How to Restore Windows 10 to an Earlier Point in Time?
To restore this computer to an earlier point in time, you need to rely on the program that you use to create the restore point.
1. Open MiniTool ShadowMaker and go to its Restore
2. Find the full backup task you used to create the initial restore point. If you accidentally deleted the full task but you still can find where the recovery points are, you can manually add it by clicking the Add Backup button in the upper-right.
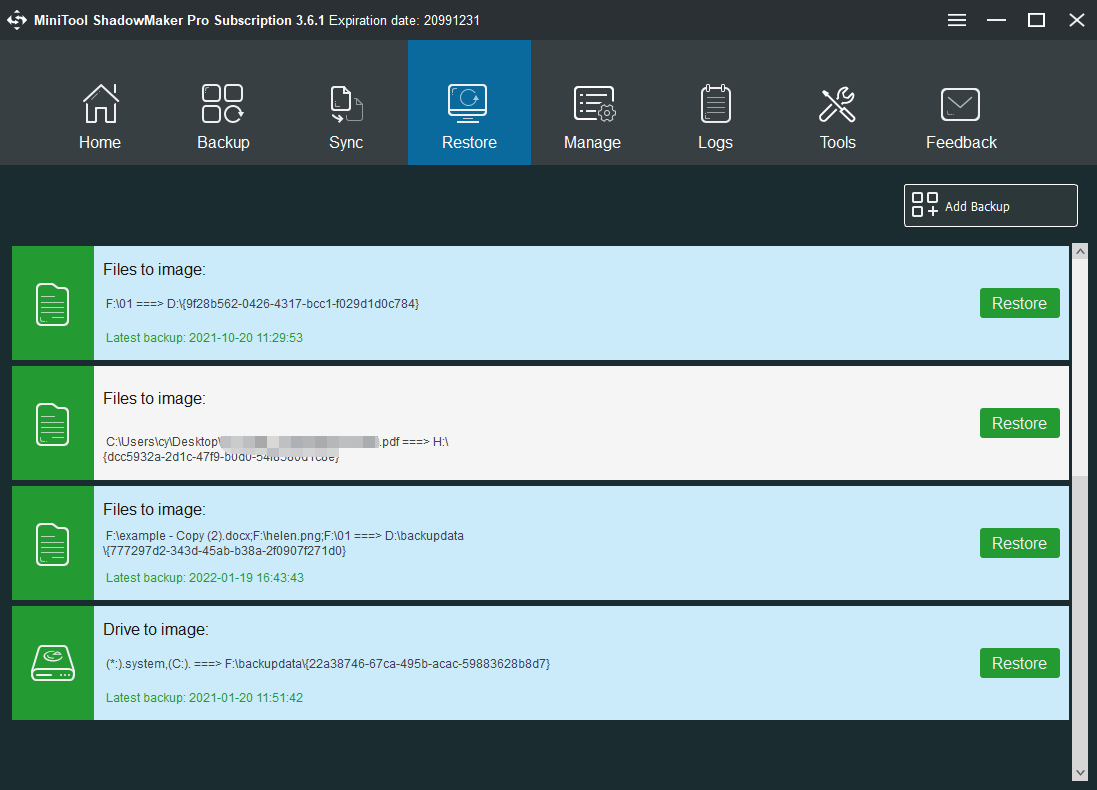
3. Click the Restore button for the target backup task.
4. In the next window, select a restore point to proceed.
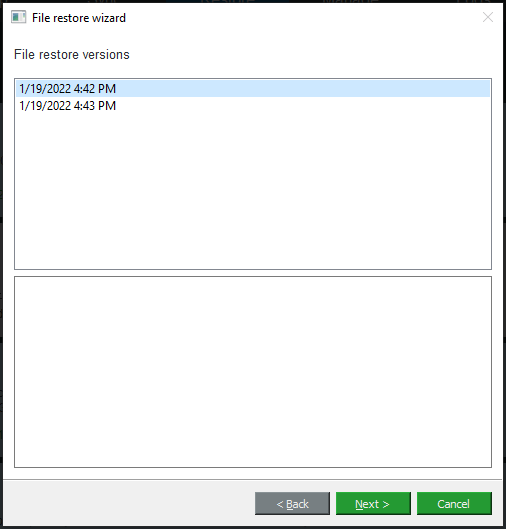
Then, just follow the on-screen instruction to complete the restoration.
Conclusion
That is all we’d like to share about point-in-time recovery. If you have additional information to share or want to say something about the content in this article, feel free to leave a comment below. If you encounter any problem using MiniTool ShadowMaker, just contact [email protected].
About The Author

Position: Columnist
Helen Graduated from university in 2014 and started working as a tech editor in the same year. Her articles focus on video creation, editing, and conversion. She also has a good knowledge of disk management and data backup & recovery. Through an in-depth exploration of computer technology, Helen has successfully helped thousands of users solve their annoying problems.