You try to turn on your laptop to work, only to find you can’t make it happen. How disappointing it is! MiniTool found many people complained HP laptops won't turn on now and then, so it decided to provide a guide on how to check HP laptops and fix the problem. You can also find a data recovery tool to help rescue your files.
My HP Laptop Won’t Turn on
It’s nothing worse than getting a black screen after pressing the power button to try to turn on your laptop. A lot of HP laptop users said they have had a similar experience – their HP laptop won’t turn on due to unknown reasons.
If you take a look at the power/charging light when your HP laptop won’t boot, you’ll find yourself in one of the following situations:
- HP laptop won’t turn on any lights
- HP laptop won’t turn on but the charging light is on
- HP laptop won’t turn on and the power light flashes
Top Reasons for HP Laptop Won’t Turn on
Here are 8 most possible reasons for an HP laptop not turning on.
- Running out of battery or a damaged battery
- CMOS battery malfunctioning
- A broking operating system or hardware component
- New hardware or software installed
- External hardware or software conflicts
- BIOS settings problems
- HP laptop screen issues
- Virus attack or malware infection
Many of you are concerned about how to fix HP laptops not turning on, so in the next part, we collect nine useful methods for troubleshooting this problem. Please try them to find one that can help you turn on your computer.
Method 1: Check the Battery and Power Supply
If your HP laptop won’t power on, check the battery and power supply first. In most cases, failing to start your computer is caused by insufficient power supply. If you’re sure an outlet works well, you can follow these steps to check whether it is a battery issue.
Step 1: Shut down your HP laptop and remove the battery from the laptop.
Step 2: Find an outlet that is functioning properly.
Step 3: Plug your laptop into the outlet using the power cable. If your laptop turns on, it means your battery has a problem. You need to buy a new battery for your computer.
What about the CMOS battery which stores the BIOS settings in the motherboard? It could also be the reason why your HP laptop can’t boot. Thus, you should use a new CMOS battery to replace the old one on your unbootable HP laptop. Please make sure the cables are connected in the right manner.
If you want to know more about CMOS battery, please read this passage:

Method 2: Remove External Disks and Devices
Step 1: Turn off the HP laptop.
Step 2: Remove all external disks and devices connected to the laptop.
Step 3: Try to turn on your laptop by pressing the power button.
- If it starts normally, you can confirm that a problematic external disk/device is making your HP laptop unbootable. You should turn off the laptop again > connect one hardware device each time > turn on the laptop to see what happens. Please repeat this process until you find which hardware/device is
- However, if your HP notebook won’t turn on, you should turn to other solutions.
Method 3: Diagnose Screen Issues
If you turn on your computer and find its screen is dark but the fan and power light is working, the problem may be caused by the screen. At this time, you need to check your screen with the following steps.
Step 1: Disconnect all the external devices to prevent them from interfering with the computer startup process.
Step 2: Turn off the light to see whether the screen displays very faintly. If yes, you can try to turn up your laptop screen’s brightness. If this doesn’t work, your screen’s inverter may have a problem.
To examine whether the screen has an issue or not, you can connect your laptop to an external monitor using a VGA, HDMI, or DisplayPort connection. Read the passage to know how to connect the laptop to a TV without an HDMI cable.
Then hold an Fn key and press the F4 to switch between the laptop display and the external monitor. If your computer works well with the external monitor but doesn’t with its screen, you need to send it to repair.
Method 4: Hard Reset Your HP Laptop
How to Hard Reset an HP Notebook with a Removable Battery
Step 1: Power off your HP notebook.
Step 2: Remove all the unnecessary external hardware and devices from it.
Step 3: Make sure there is no power charger/AC adapter connected and remove the battery from the notebook.
Step 4: Press and hold the power button for at least 15 seconds to drain the residual electrical charge.
Step 5: Put the battery back and re-connect the power charger/AC adapter. (Don’t connect other external devices to the notebook until it boots up.)
Step 6: Power on your HP notebook by pressing the Power button.
Step 7: Click Continue if you are brought to the Options window.
Step 8: Look for the Start Windows Normally option and select it.
Step 9: Press Enter and then wait for your notebook to start successfully.
What if your laptop contains a sealed or non-removable battery? Please don’t try to remove this type of battery from your laptop; it can void your warranty and ruin your device.
How to Hard Reset an HP Notebook with a Sealed or Non-removable Battery
Step 1: Turn off the HP notebook completely.
Step 2: Remove all port replicators or docking stations from your notebook. Also, disconnect all the external peripheral devices from the notebook.
Step 3: Make sure the AC adapter or power charger is not plugged in.
Step 4: Press the Power button and then hold it for 8-10 seconds.
Step 5: After a while, reconnect the AC adapter to the HP notebook. Don’t connect any peripheral devices, port replicators, or docking stations.
Step 6: Press the Power button as you usually do to turn on the notebook.
Step 7: Locate and select Start Windows Normally if you see a startup menu on the screen and press Enter to restart your notebook.
For more information: Reset HP Laptop.
Method 5: Try Component Tests
Step 1: Press the Power button.
Step 2: Keep pressing Esc on your keyboard until a menu appears.
Step 3: Then, press the F2 key and select Component Tests.
Step 4: Choose the components you want to test: processor, hard drive, keyboard, memory, network, etc.
Step 5: Follow the instructions if any bugs are found.
Running component tests can identify what problems cause your computer can’t turn on and fix it.
Method 6: Refresh or Reset HP Laptop
Step 1: Choose one method below to open Windows Recovery Window.
- Restart your computer and press F11.
- Press and hold Shift and select Restart in the Start menu. Keep holding the Shift key when the computer restarts.
Step 2: Choose Troubleshoot on the Choose an option window.
Step 3: Select Reset This PC on the Troubleshoot screen.
Step 4: Follow the instructions to reset your computer.
Method 7: Boot in Safe Mode
Step 1: Select Troubleshoot on Choose an option window.
Step 2: Navigate to Advanced options > Startup Settings.
Step 3: Select Enable Safe Mode / Enable Safe Mode with Networking with your keyboard.
- Safe Mode starts Windows with a minimal set of drivers and services.
- Safe Mode with Networking starts Windows in Safe Mode and allows access to the internet.
Step 4: When finishing the troubleshooting, click Start to exit Safe Mode.
Step 5: Click Power and Restart to restart your computer.
Method 8: Restore BIOS Settings to Default
Step 1: Press and hold the Power button for about 15 seconds.
Step 2: Press Esc or F10 to enter the BIOS Settings menu.
Step 3: Select the restore to default option and press Enter.
Step 4: Exit BIOS and restart your laptop.
Method 9: Update BIOS on HP Laptop
Step 1: Connect the HP laptop to a working power source using the adapter.
Step 2: Press and hold the Windows + B keys simultaneously.
Step 3: While performing step 2, please press and hold the Power button for 1 second.
Step 4: Release all the keys and the power light should back on.
Step 5: The laptop screen will remain blank for about 40 seconds. You may also hear the beep sounds.
Step 6: The HP BIOS Update screen will appear and the updating process will begin.
Protect Your Data on Your HP Laptop
If the above methods resolve your problem, what do you need to do after that? We suggest you back up your data to avoid unexpected loss. If, accidentally, your data is lost from the computer, we also provide the best free data recovery software for you to restore data.
Backup Data in Windows 10/11
MiniTool ShadowMaker is a reliable choice to back up data in Windows 10/11. It backs up files, folders, partitions, systems, and disks to internal/external hard drives or USB drives and shared folders. MiniTool ShadowMaker also offers a safe disk clone for you to upgrade the hard drive without OS reinstallation. If you want to use it to back up data, please read this passage: How to Back up Files on Win11/10/8/7 Using MiniTool ShadowMaker.
Step 1: Download and install MiniTool ShadowMaker.
MiniTool ShadowMaker TrialClick to Download100%Clean & Safe
Step 2: Launch MiniTool ShadowMaker to enter its main interface.
Step 3: Click the Backup tab on the left penal.
Step 4: Click on SOURCE to select what you want to back up, including systems, disks, files, and folders. Then click OK to back to this interface.
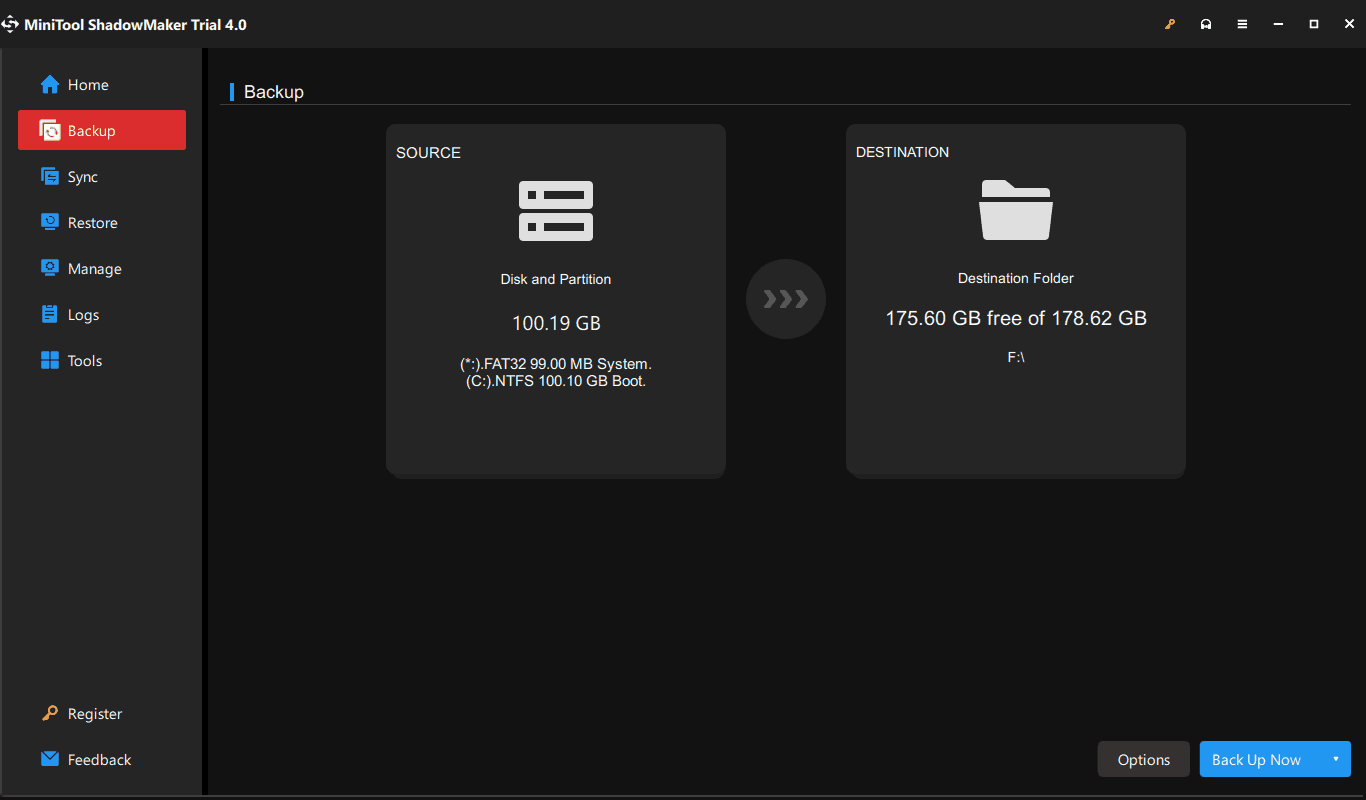
Step 5: Click DESTINATION to choose the place you want to back up, then click OK.
Step 6: After going back to the Backup window, click the Back Up Now button to start the process.
Restore Deleted Files in Windows 10/11
Way 1: Recover Data with File History
If you have backed up your files using File History, you can restore files using this Windows snap-in File History tool.
You can use it to recover data with these steps.
Step 1: Press Windows + S and type restore files in the search bar.
Step 2: Select Restore your files with File History.
Step 3: Browse the list and view all its versions using the arrows.
Step 4: Select the file you need and click Restore. This will restore the file to its original location.
Step 5: You can also right-click on Restore and select Restore to to choose a new location for it.
Way 2: Restore Data with MiniTool Power Data Recovery
But you may find no files displayed with File History. Here MiniTool Power Data Recovery should be mentioned. This is a powerful free data recovery software, which is efficient in recovering deleted/lost files, pictures, videos, audio, and so on from both internal and external hard drives.
As a functional data recovery software, MiniTool Power Data Recovery allows you to scan data from the desktop, recycle bin, specific folder, or selected partition. This helps reduce scanning time. The following part gives detailed instructions to help you recover data with it.
Step 1: Download and Install MiniTool Power Data Recovery.
MiniTool Power Data Recovery FreeClick to Download100%Clean & Safe
Step 2: Launch MiniTool Power Data Recovery to enter the main interface.
Step 3: Choose a partition and click the Scan button.
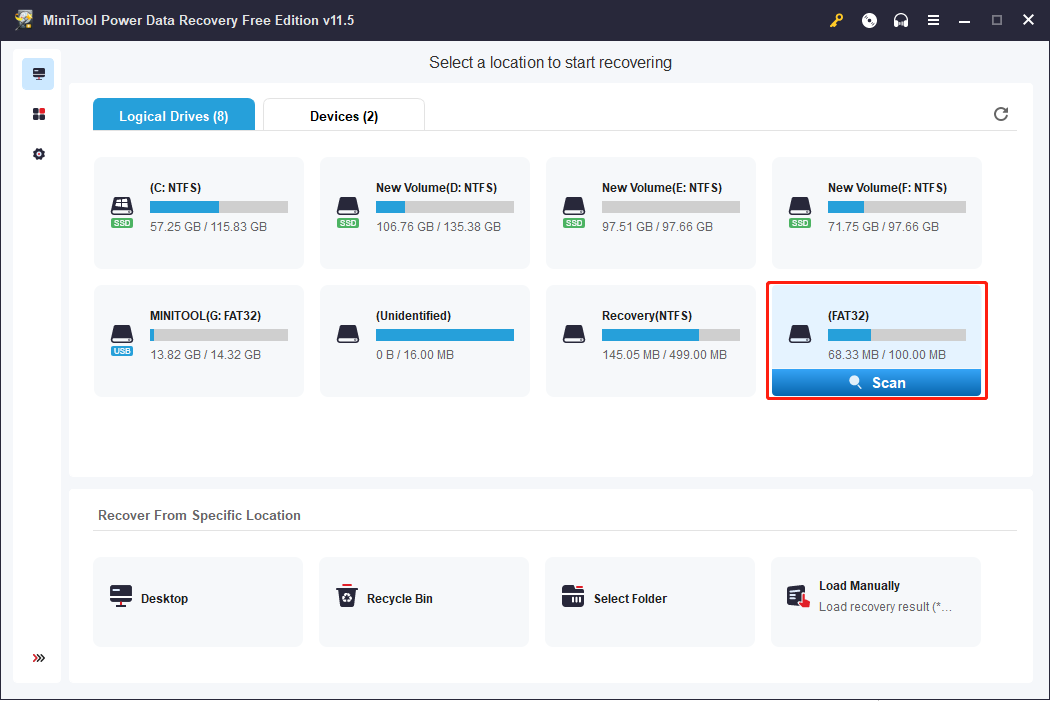
If you remember where the wanted data locates, you can scan a specific location by selecting Desktop, Recycle Bin, or Select Folder choice.
Step 4: Wait until the scanning process ends, and select the files you want to recover. If you remember the name of the file, you can type it in the Search bar on the top right of the window. You can also use the Type and Filter functions to locate aim files quickly and select Preview to check whether the file is what you want.
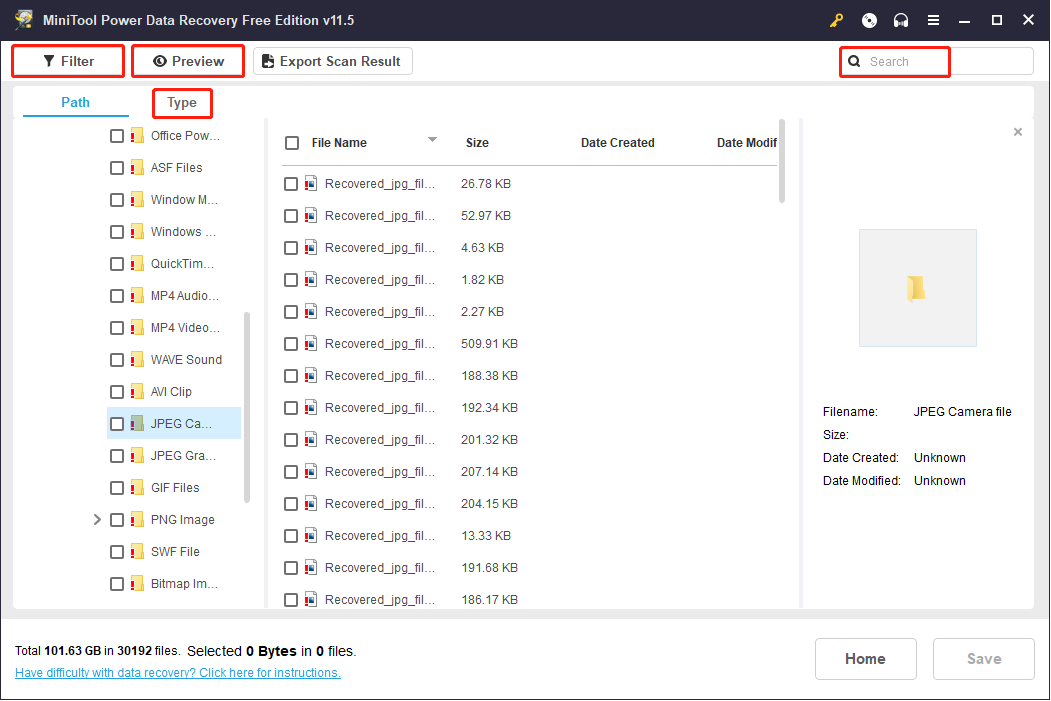
Step 5: Click on the Save button and choose the right save path to restore files.
Learn more methods to recover deleted data from computers from this article:

Recover Data from HP Laptop That Won’t Turn on
If your HP laptop not turning on but there are essential data stored in it, MiniTool Power Data Recovery can help a lot.
You can use MiniTool’s WinPE Bootable Builder to create a bootable disk, then boot your HP laptop from the created Bootable Media. You can select a suitable edition that contains a snap-in WinPE Bootable Builder through the page. If you’re a personal user, the Personal Ultimate edition is the most economical choice.
Here is how to use this MiniTool data recovery software to recover data from an HP laptop that won’t turn on.
Step 1: Create a bootable disc.
1.Download MiniTool Power Data Recovery on a well-performing computer.
MiniTool Power Data Recovery FreeClick to Download100%Clean & Safe
2.Click on the Bootable Media button on the top right, and follow the instructions to get the full edition which has a snap-in WinPE Bootable Builder.
3.Register with your license key by clicking the key icon.
4.Click on the Bootable Media button again, then follow the on-screen instructions to create a bootable USB flash drive.
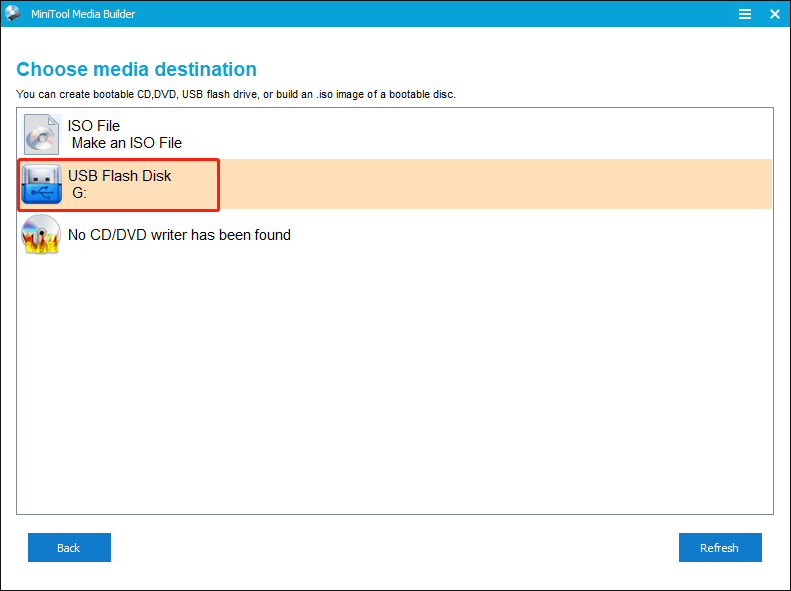
5.Remove the bootable disc properly from the current computer.
Step 2: Change the boot order on the HP laptop.
- Press the Power button.
- Press Esc/F10 to enter the BIOS settings menu.
- Go to Storage > Boot Options.
- Change the boot order to make the bootable disc the first boot device.
- Press F10 and Enter to save the change.
- Restart the computer, then your PC will boot from the bootable disc.
Step 3: Recover data from a non-bootable HP laptop.
- Connect a removable disk to the laptop to save recovered data.
- Please wait a while, the MiniTool Power Data Recovery will open automatically after your PC boot.
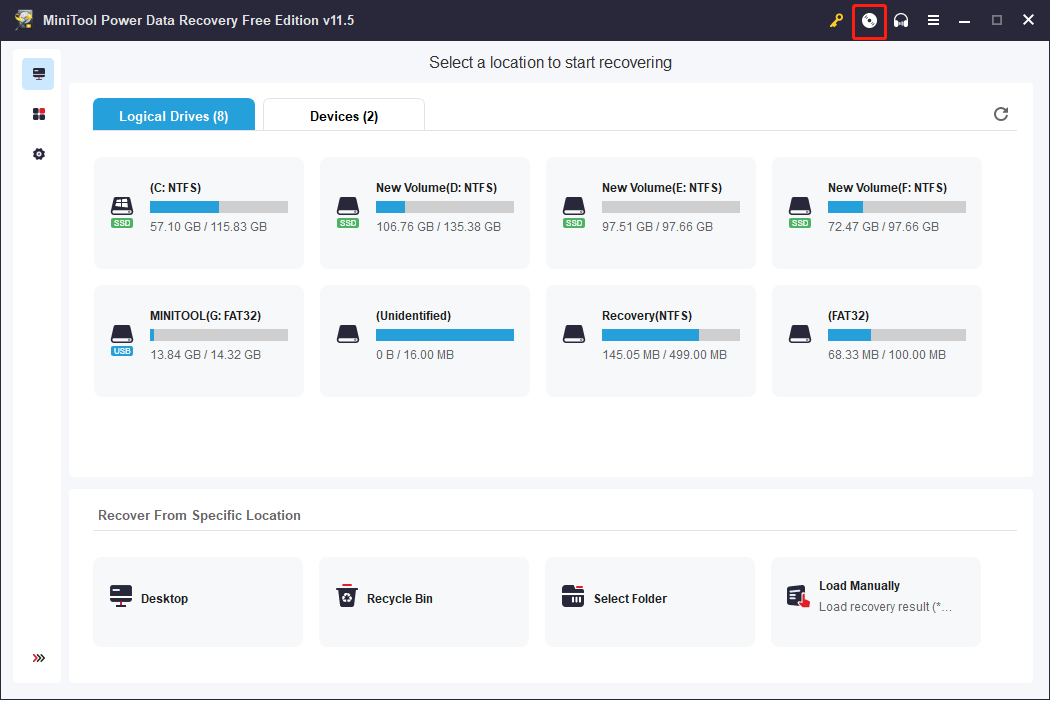
- Choose a partition to scan or select a whole drive to scan by switching to the Devices tab.
- Wait for the scan and browse the results. Check what you want to recover.
- Click on the Save button and select the external disk as the storage location. Click OK.
- Wait for the recovery process to complete.
After that, you should close the software and change the boot order back.
If you search for a secure data recovery on different devices, please read this post: Secure Data Recovery - How to Restore Files via MiniTool.
Conclusion
Don’t be freaked out when finding your HP laptop won’t turn on. It’s not a rare situation; many people are suffering from or have ever been bothered by the same trouble. This page introduces the possible reasons for this problem and the useful solutions to solving it. Besides, it shows you how to recover your important data from an HP laptop even if it won’t boot using the MiniTool data recovery service. Any questions are welcome to discuss via [email protected].
About The Author

Position: Columnist
Andrea graduated in English and has a keen interest in the IT industry and questions that arise when computers are used. She is passionate about new things and challenging things and has a wide range of interests like playing guitar, gaming, and crafting.