It is important to have a Windows 10 backup because it can help you to recover from any system crashes, malware attacks, hard drive failures and so on. Do you know how to backup Windows 10 easily? This guide on MiniTool Website will demonstrate 2 ways to perform a system backup.
Windows 10 Backup
Since more and more work or study needs accomplishing on digital devices, data loss or computer errors are not new. Therefore, creating a backup to secure your data and system is becoming increasingly popular and necessary. When it comes to backup, you have two options: back up the individual files stored on your computer or back up a snapshot or image of the entire system or disk.
File backup can help you to restore your lost or corrupted files while system backup and recovery can restore your computer to a normal state. When your computer goes through malware attacks, system crashes, hard drive failures or other severe issues, you can restore your computer to the early healthy state easily with a system backup copy in hand. As long as you create a system image in advance, you can perform a system recovery rather than spending much time reinstalling the system from scratch.
This guide is aimed at providing you with a comprehensive tutorial on how to perform a Windows 10 backup & restore via the inbuilt tool and third-party software. Scroll down to get more details now!
How to Perform Windows 10 Backup via Third-Party Program?
To create a backup of your system, it is wise of you to rely on some third-party software. The Windows backup software – MiniTool ShadowMaker might be the top choice for you. Compared to other similar backup tools, it is well-designed and easy to use. This free tool can make compact, speedy and reliable backups for files, systems, disks and selected partitions on Windows 11/10/8/7.
MiniTool ShadowMaker TrialClick to Download100%Clean & Safe
Also, it offers you some recovery solutions when there is something wrong with your files, disks, or systems. What’s more, this tool has other useful functions such as file sync, disk clone, backup encryption, bootable media creation, scheduled backup and more.
Back up Windows 10 with MiniTool ShadowMaker
In this part, we will show you how to create a system image of Windows 10 with MiniTool ShadowMaker. The steps are self-explanatory:
Step 1. Launch MiniTool ShadowMaker and hit Keep Trial.
Step 2. In the Backup page, you can see that all the system-related partitions are selected by default in SOURCE, so you only need to choose a path to store the Windows 10 system image in DESTINATION.
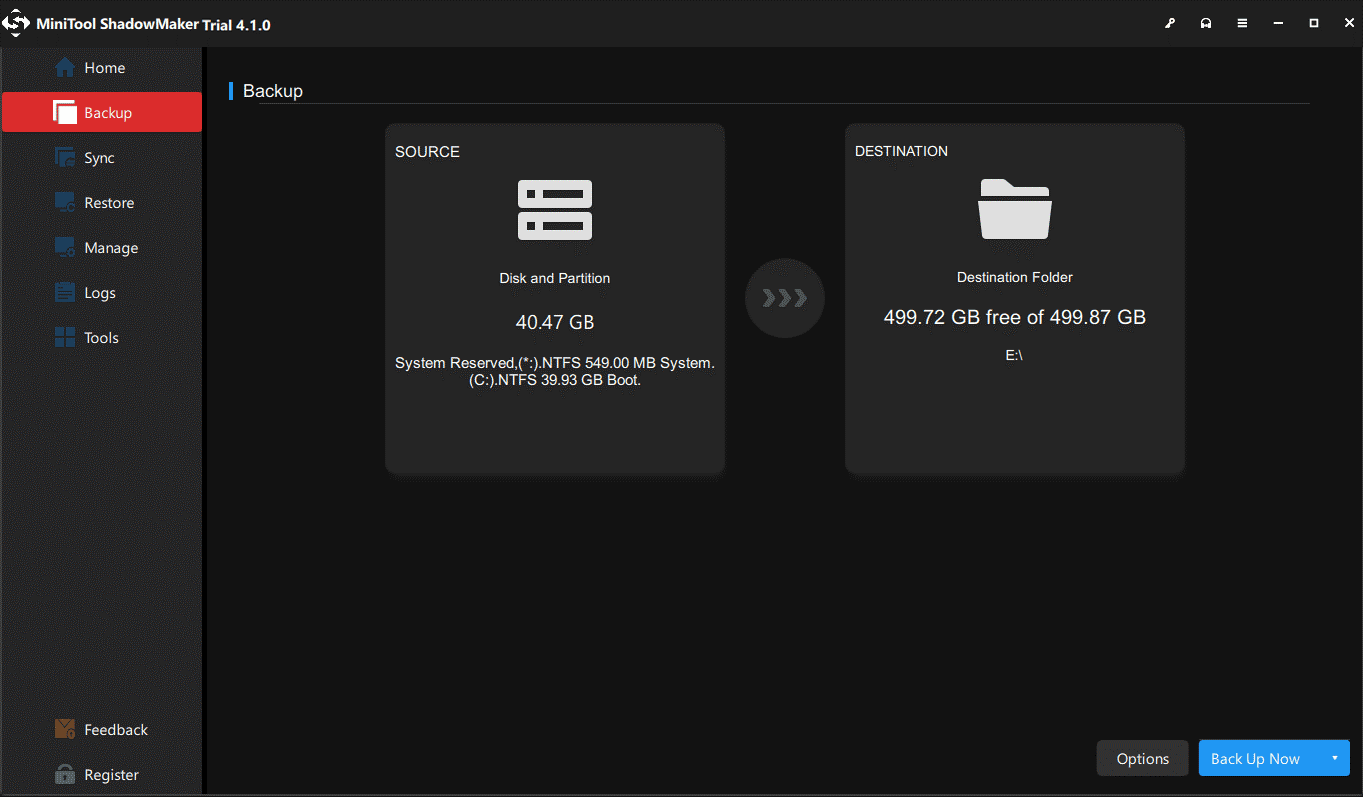
You can choose to back up Windows 10 to a USB flash drive, external hard drive, Network drive, as well as a shared folder.
Step 3. At last, click on Back Up Now to start the system backup operation at once.
Back up Files with MiniTool ShadowMaker
In addition to system backup, creating a backup of your files and folders is also very important. If you want to create a file backup, here’s the tutorial:
Step 1. Launch this free tool.
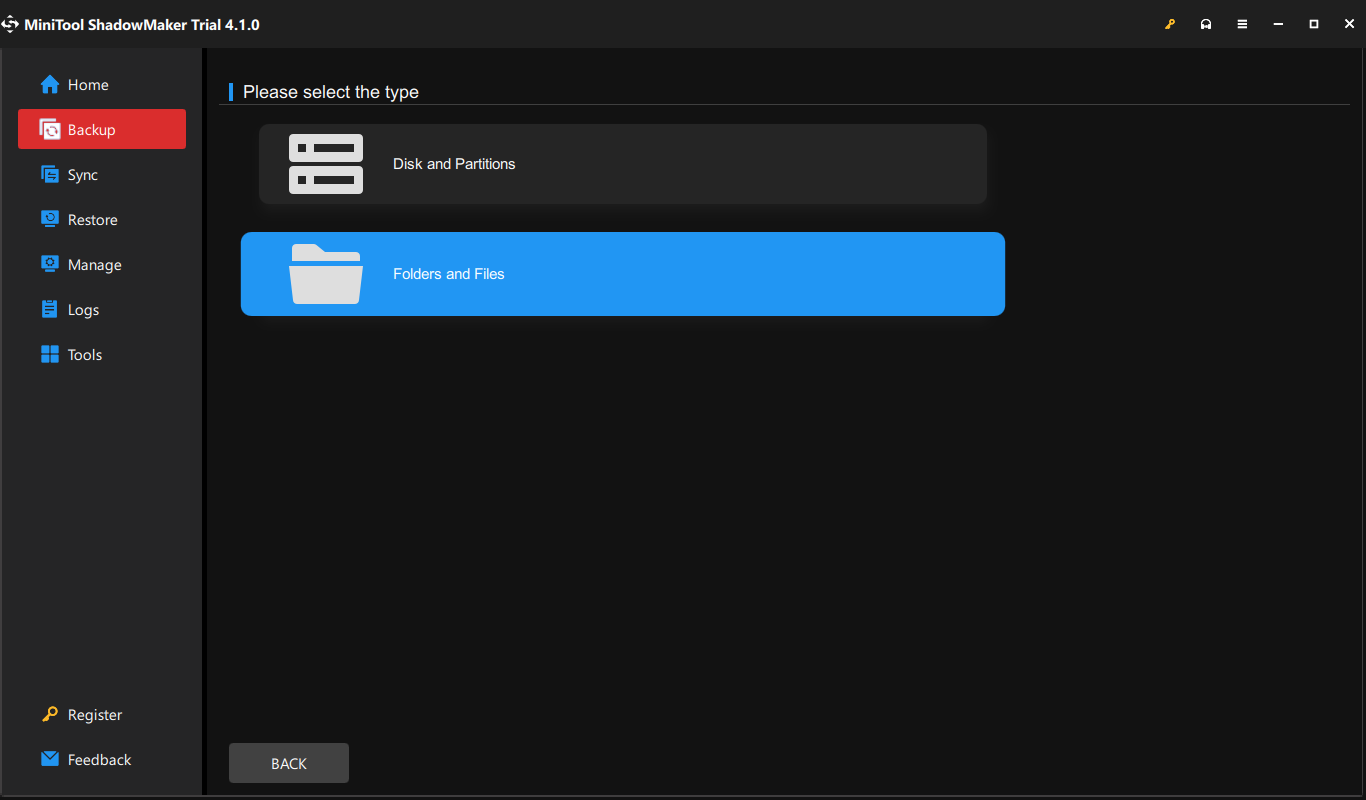
Step 2. In the Backup page, go to SOURCE > Folders and Files to tick the files you want to back up. As for choosing a storage path for the backup tasks, go to DESTINATION.
Step 3. After making your choice, click on Back Up Now to start the process.
# Additional Advanced Features
Automatic Backup
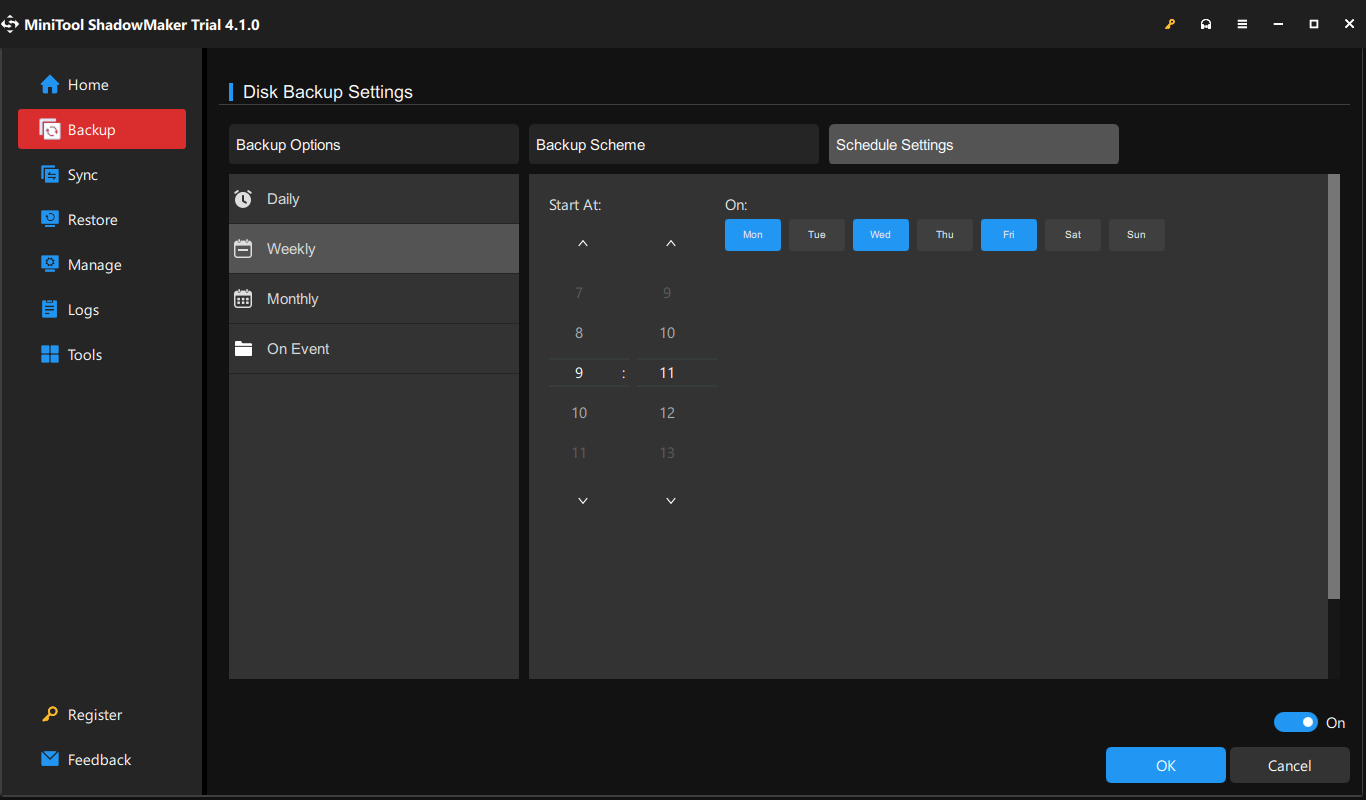
Compared to creating a backup task manually, scheduled backups can help you to save more time. In MiniTool ShadowMaker, you can choose a specific time point of multiple days within a week, or a month to perform the backup. Also, MiniTool ShadowMaker has an additional schedule called On Event which starts a backup automatically when logging on or off the system.
To create a scheduled backup: go to Options > Schedule Settings > toggle it on > set a daily, weekly, monthly or on-event backup.
Backup Scheme
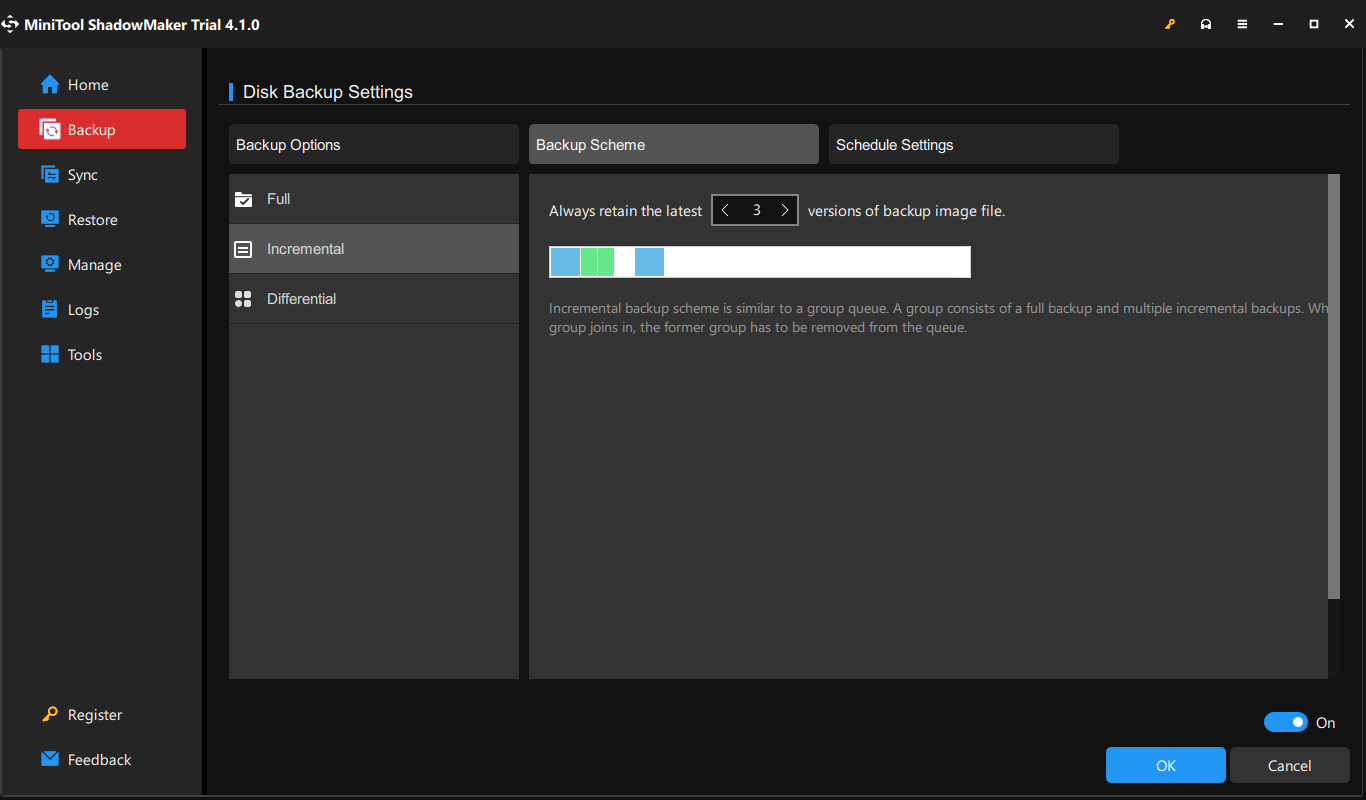
MiniTool ShadwoMaker enables you to define the backup scheme as full, differential, or incremental backup as per your needs. To customize the backup schemes: click on Options in the Backup page > Backup Scheme > turn it on manually and then you can choose from the three backup modes.
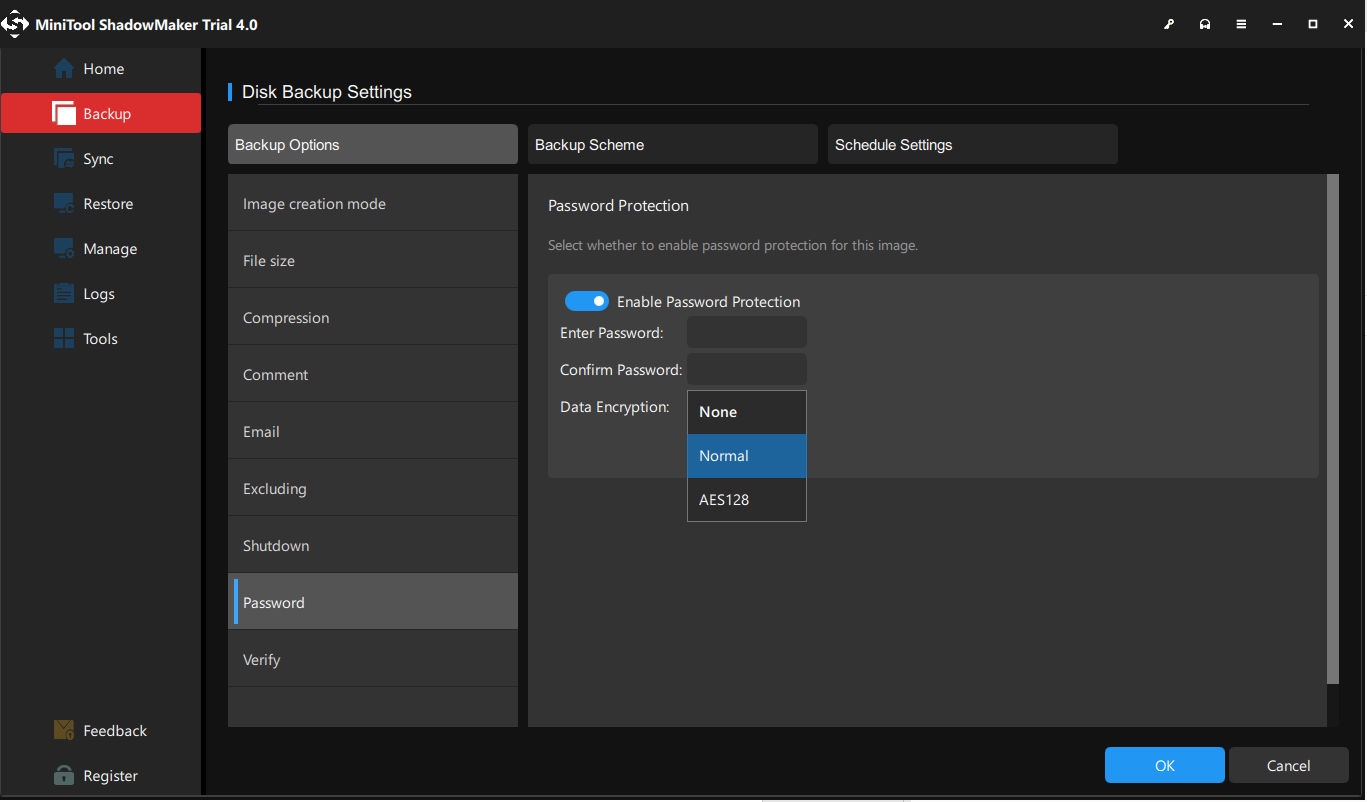
Backup Encryption
If you need to encrypt your backup, MiniTool ShadowMaker allows you to add password protection to a specific backup. Three data encryption levels are available: None, Normal, and AES128.
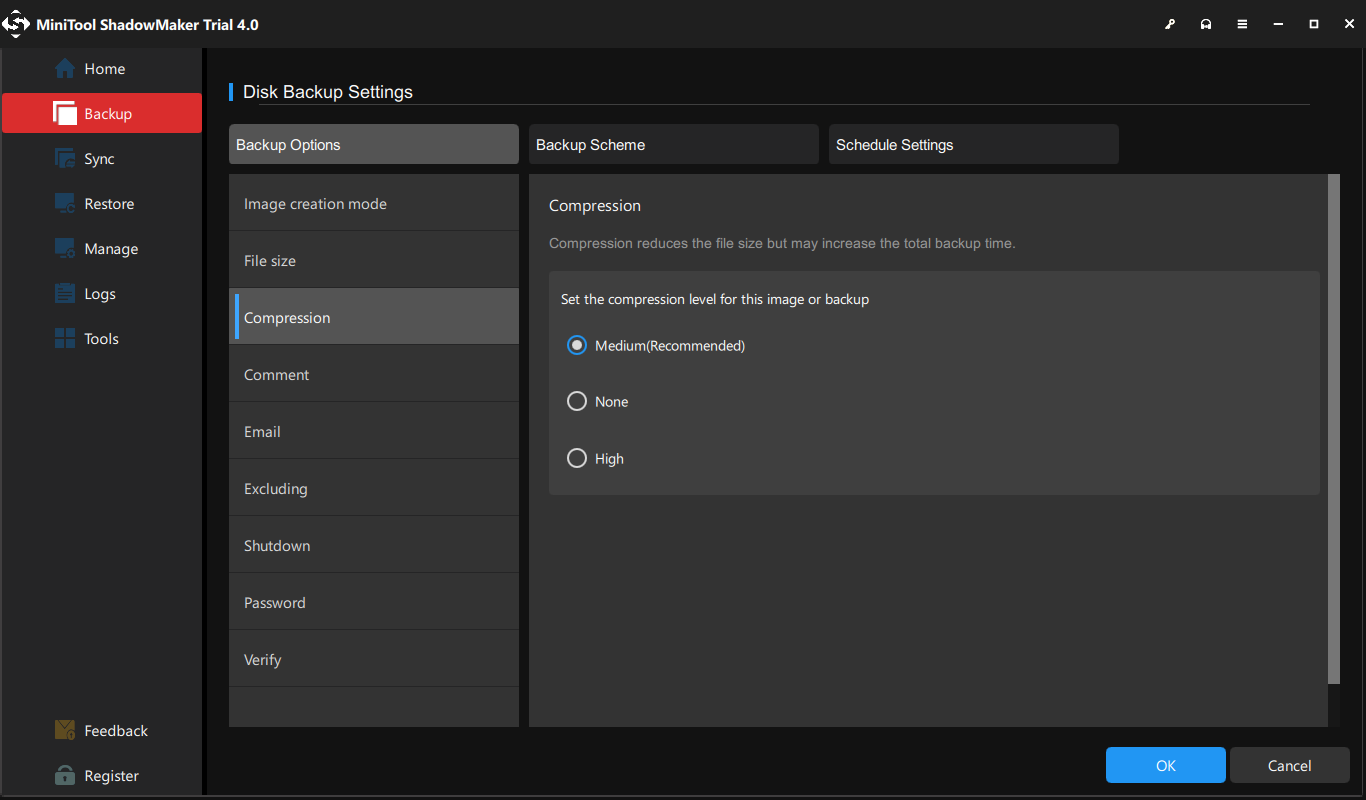
Backup Compresssion
MiniTool ShadowMaker enables you to compress the file size to save storage space. There are three compression levels for you: Medium, None, and High. It is noted that although the compression can reduce the file size, it will also increase the backup time.
Create A Bootable Media with MiniTool ShadowMaker
After finishing the system image backup, you can create a bootable USB drive with MiniTool ShadowMaker in case your computer fails to boot. The steps are pretty easy:
Step 1. Prepare an empty USB drive and plug it into your computer.
Step 2. Launch MiniTool ShadowMaker > go to the Tools page > hit Media Builder.
Step 3. Click on WinPE-based media with MiniTool plug-in and then choose a USB flash drive as the media destination.
MiniTool ShadowMaker supports creating 4 types of bootable media:
- ISO File – You can use it on a virtual machine without burning it.
- USB Flash Disk – This type of bootable media is usually used on a physical machine.
- USB Hard Disk – It refers to hard drives with USB ports.
- CD/DVD writer – It is only applicable to some old machines because now most computers don’t contain an optical drive any longer.
Step 4. Then, you will be prompted by a message saying that all the data on the USB disk will be destroyed. Tap on Yes to confirm your action.

Perform System Recovery with MiniTool ShadowMaker
After the process is done, you can boot your PC from this bootable drive to enter the recovery environment when your system has boot issues and then perform a system recovery in it.
Step 1. Change the boot order in BIOS and reboot your computer from the bootable device you have made to enter MiniTool Recovery Environment.
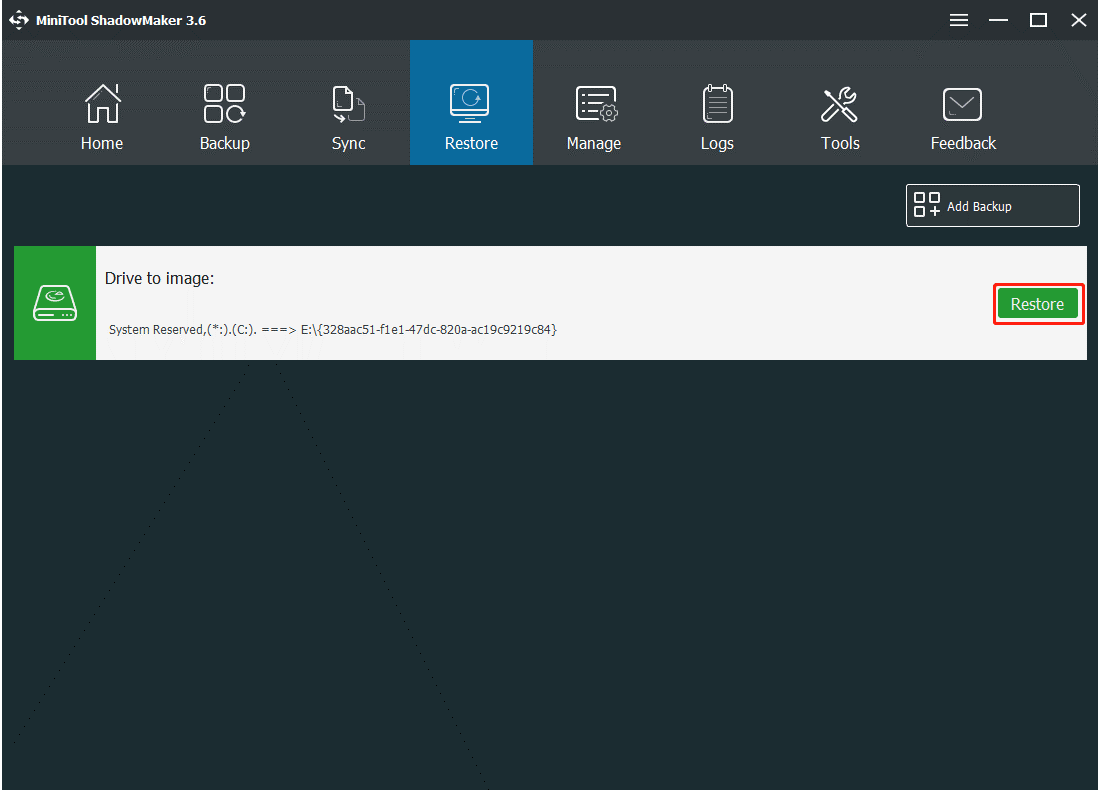
Step 2. In the Restore page, find the created system image and click on the Restore button.
Step 3. Select the backup version to continue and then choose the partitions to restore from the selected backup file.
MBR and Track 0 must be ticked, or your computer won’t boot after recovery.
Step 4. Decide which disk you want to restore the system image backup to and click on Next to continue.
Step 5. Then, you will see a warning showing the partitions that will be overwritten during the restoring process. Click on OK to confirm this action and wait for the process to complete. The time that the restoration takes depends on the amount of data and hardware configuration of your PC.

How to Perform Windows 10 Backup via Inbuilt Tool?
Also, you can resort to inbuilt backup software in Windows 10. There are two useful inbuilt Windows 10 backup software: one is File History, and the other is Backup and Restore (Windows 7). The former allows you to create a history of key files on your computer including Desktop, Documents, Downloads, One Drive, Pictures, saved games, videos and more; the latter is used to create a system image, create a recovery disk, set up a selective backup, and restore specific files. Obviously, to create a full backup of Windows 10, you can utilize Backup and Restore (Windows 7).
Create a System Image with Backup and Restore (Windows 7)
With the help of Backup and Restore (Windows 7), you can create a Windows 10 system image on hard disks and other storage devices. Here’s how to do it:
Step 1. Press Win + I to open Windows Settings.
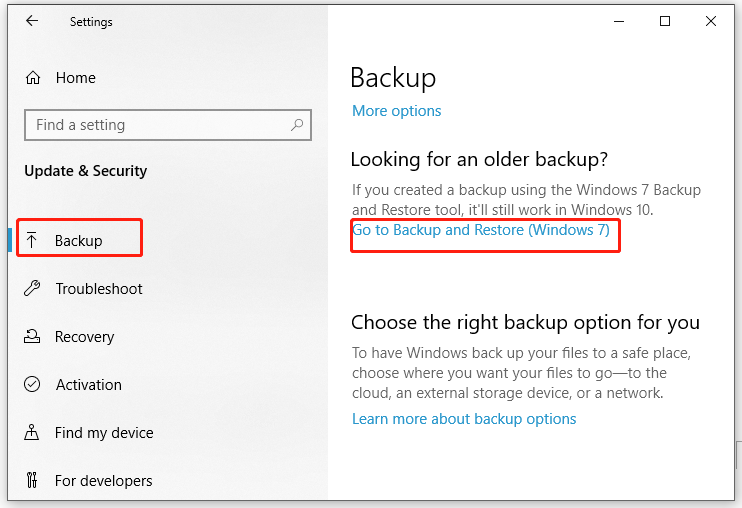
Step 2. Go to Update & Security > Backup > Go to Backup and Restore (Windows 7) under Looking for an older backup.
Step 3. From the left pane, click on Create a system image.
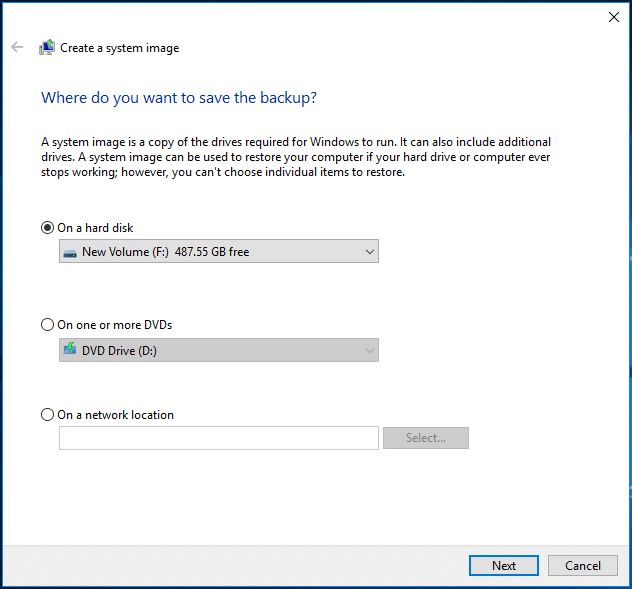
Step 4. Under On a hard disk, you can select a hard disk, DVD, or network location from the drop-down menu to save the system image and then hit Next to continue.
Step 5. By default, Backup and Restore (Windows 7) only backs up your system drive. If you want to add other drives, tick them and hit Next.
Step 6. In the confirmation screen, check the backup settings you have made and click on Start backup.
Back up Files with Backup and Restore(Windows 7)
Step 1. Open Backup and Restore (Windows 7) and hit Set up backup.
Step 2. Choose where you want to save your backup > tick Let me choose > select the files you want to back up > hit Save settings and run backup.
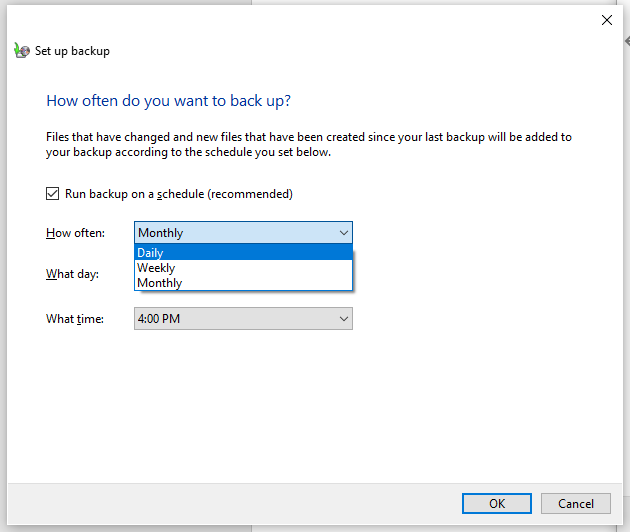
If you need to create a scheduled backup, hit Change schedule to set up a daily, weekly or monthly automatic backup at an integer hour of a single day.
If you find Backup and Restore (Windows 7) fails to back up the system, don’t worry! With the guidance of this article - Windows 10 Backup Not Working? Top Solutions Here, you can handle this issue easily.
Create a Recovery Drive with Backup and Restore (Windows 7)
After completing the Windows 10 backup, you are supposed to create a system recovery drive. When your system is experiencing some severe errors or even cannot boot, you can boot from this drive and recover your system with it. Here’s the tutorial:
Step 1. Plug your USB flash drive into your Windows 10 device.
Step 2. Type create a recovery drive in the search bar and hit Enter.
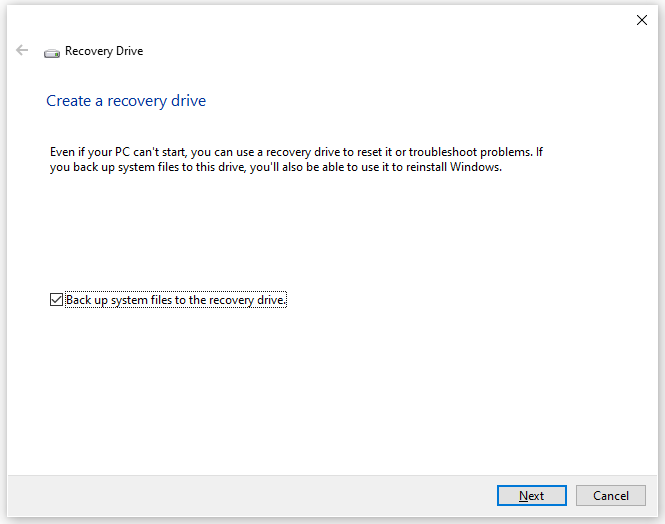
Step 3. Check the box beside Back up system files to the recovery drive and click on Next.
Step 4. Select your USB flash drive and hit Create to start the process.
Also see: Can’t Create Recovery Drive Windows 10? Solutions Here
How to Restore Windows 10 in 2 Cases?
Typically, you need to restore Windows 10 in 2 conditions as follows.
Case 1: Can Boot into Windows 10
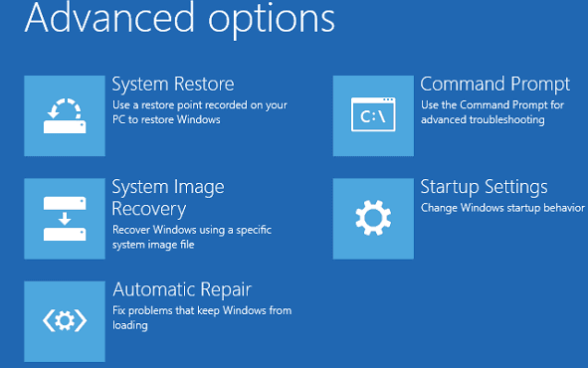
Go to Windows 10 Settings > Update & Security > Recovery > Restart now under Advanced startup > Troubleshoot > Advanced Options > System Image Recovery > select the specific system image to start the process.
Case 2: Cannot Boot into Windows 10
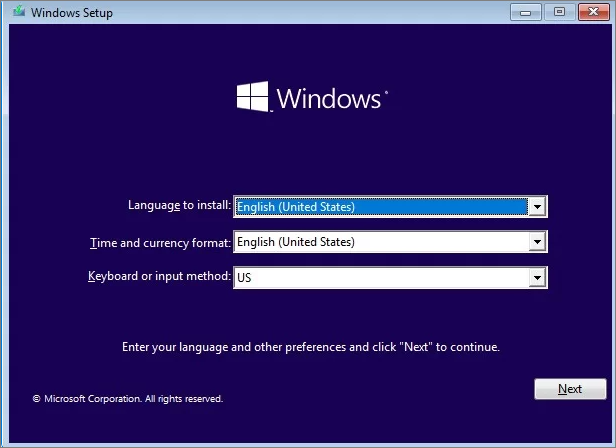
Connect the recovery disk to your computer > boot into the Windows Setup interface > enter your preferences > hit Next > hit Repair your computer > Troubleshoot > Advanced Options > System Image Recovery.

MiniTool ShadowMaker vs Backup and Restore (Windows 7)
In summary, both MiniTool ShadowMaker and Windows inbuilt backup tool are very useful to perform a Windows 10 backup. MiniTool ShadowMaker is more preferred because it is more flexible and it owns more powerful features than the latter such as backup compression, backup encryption and so on.
MiniTool ShadowMaker has more detailed settings for scheduled backup than Windows inbuilt backup tool. Backup and Restore (Windows 7) is to set incremental backup as the default backup mode while MiniTool ShadowMaker allows you to choose the backup types according to your need.
Meanwhile, you are easily to encounter errors or make mistakes when using Backup and Restore (Windows 7) if you are not a tech savvy. MiniTool ShadowMaker is both easy to follow for most normal users and professional enough for computer experts.
MiniTool ShadowMaker TrialClick to Download100%Clean & Safe
We Need Your Voice
Data loss & system damage are very common and they might cause unrecoverable damage. That’s why making a Windows backup is a good choice for you to minimize the loss in time and money when unexpected data accidents occur.
Now, I’m sure you have mastered how to backup Windows 10 computer after reading this guide. For further queries or suggestions about backup software for Windows 10, you can either leave your comment below or contact our support team via [email protected]. Once we receive the feedback, we will rack our brains to figure out solutions for you!
Windows 10 Backup FAQ
Launch MiniTool ShadowMaker > go to Backup > select a USB flash drive in DESTINATION > hit Back Up Now.
Although Windows 10 inbuilt backup tools can satisfy your backup needs, there’s a better choice for you. Some third-party backup software such as MiniTool ShadowMaker is more flexible and user-friendly. With this tool, you can make a Windows 10 backup within just a few simple steps.
About The Author

Position: Columnist
Aurelie is a passionate soul who always enjoys researching & writing articles and solutions to help others. Her posts mainly cover topics related to games, data backup & recovery, file sync and so on. Apart from writing, her primary interests include reading novels and poems, travelling and listening to country music.