Alt + Tab is a keyboard shortcut for switching between open programs in Microsoft Windows. It is popular among Windows users, especially gamers, for its convenience. However, some users reported that they encountered a black screen after exiting full-screen mode by pressing Alt + Tab key combination.
Before troubleshooting the Alt + Tab black screen, it is necessary to understand why your screen goes black when pressing Alt + Tab.
Why Does My Screen Go Black When I Press Alt + Tab Windows 11/10
Various reasons can lead to the Alt + Tab black screen. Listed below are the most common causes.
- The app is not compatible with your display settings.
- The GPU driver is outdated.
- Your display settings are misconfigured.
- There are too many programs running at the same time.
- Your computer is infected by viruses or malware.
Next, proceed with the solutions below to get rid of the black screen.

How to Fix an Alt + Tab Black Screen
Top Recommendation
Although the operation methods we list below will generally not affect your computer files, just in case, it is recommended that you back up important data first. You can use MiniTool ShadowMaker, a professional data backup software to make a copy of your files, folders, partitions, and disks.
MiniTool ShadowMaker TrialClick to Download100%Clean & Safe
Fix 1. Perform Basic Troubleshooting Steps
When facing computer-related issues, the first thing you need to do is to perform basic troubleshooting steps.
To be specific:
- Restart the computer and try pressing Alt + Tab again to see if the black screen problem reappears.
- Make sure the power cord is properly connected and not loose.
- Exclude the problem of the computer display device itself. If the display is broken, you need to replace it with a new one. Here this post may be helpful: How to Repair Laptop Screen? Here’s a Laptop Screen Repair Guide.
- Remove all devices connected to the computer, such as USB drives, CDs/DVDs, etc.
- Close all running software.
- Check and update the operating system to the latest version.
Fix 2. Run the Program in Windowed Mode
As mentioned above, incompatibility between the running app and computer display settings is an important reason for the Alt + Tab black screen problem, especially for gaming software. In this situation, you can go to the game settings and adjust the display mode to the Windowed mode.
Related post: How to Set up Steam Launch Options Windowed Mode [Full Guide].
Fix 3. Change the Monitor Refresh Rate
The refresh rate of a monitor refers to the number of times per second that the image on the screen is refreshed. For example, when you set the refresh rate to 60Hz, the monitor will update the screen 60 times per second. For game users or graphic designers, a higher refresh rate can provide a better experience.
However, if your refresh rate is out of sync with your computer hardware configuration, you may experience a black screen after exiting full-screen mode by pressing Alt + Tab. In this case, following the steps below to change the refresh rate may solve the problem.
Tip: The steps vary for different versions of Windows, please operate according to the actual situation. Here we take Windows 10 for example.
Step 1. Press Windows + I key combination to open Windows Settings. In the settings window, select System.
Step 2. In the Display tab, click Display adapter properties.
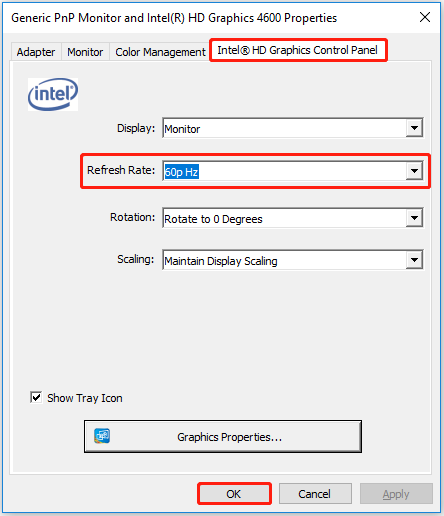
Step 3. Move on to the graphics control panel section, set up the refresh rate to 60p Hz, and click OK to save this change.
Fix 4. Reset the Graphics Driver
According to user experience, resetting the graphics driver is also an effective way to get rid of the black screen after pressing Alt + Tab.
Note: Before proceeding with the steps below, make sure you have saved all the current work. This is because resetting the graphics driver will make your screen turn black for a second. In addition, do not reset the graphics driver frequently by using the following way.
The steps to reset the graphics driver are easy to operate. Just press the Windows + Ctrl + Shift + B key combination.
After that, wait for a few seconds until the display returns to normal.
Fix 5. Update Graphics Driver
As mentioned above, outdated or corrupted graphics drives may also make your screen goes black screen after exiting full-screen mode. Therefore, to resolve this issue, follow the steps below to update the graphics driver.
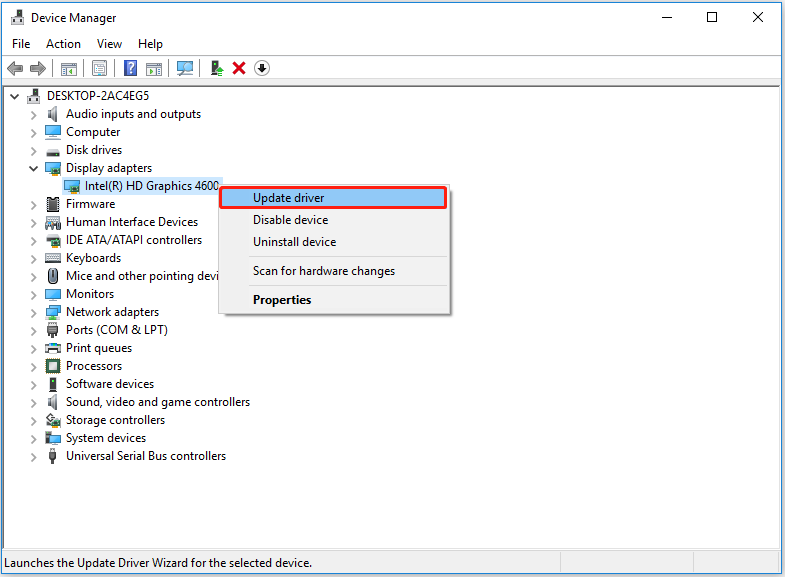
Step 1. Right-click the Windows logo button to select Device Manager.
Step 2. Find and expand Display adapters. Right-click the corresponding driver and select Update driver from the context menu.
Step 3. Next, follow the on-screen instructions to complete all the steps. For detailed information about graphics driver updates, you can refer to this article: How to Update Graphics Driver Windows 11 (Intel/AMD/NVIDIA)?
Fix 6. Change Graphics Settings
If the Alt + Tab black screen issue occurs on a specific program, you can try to change its graphics settings. Follow the steps below to complete the necessary actions.
Step 1. Press Windows + I key combination to open Windows Settings.
Step 2. Select System > Display > Graphics.
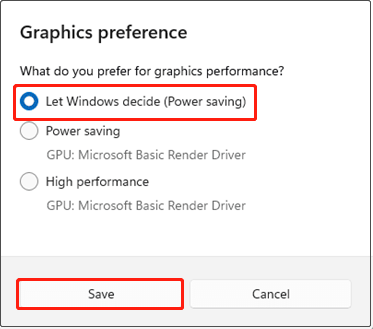
Step 3. Find and click the target program, then hit Options.
Step 4. In the pop-up window, check the option of Let Windows decide (Power saving). After that, click Save.
Fix 7. Disable Program Fullscreen Optimizations
Fullscreen optimizations is a Windows feature enabled by default that automatically adjusts application display settings for optimal performance and stability. Most of the time, it can make your program perform better. However, occasionally it causes an Alt + Tab black screen.
To fix the black screen issue, follow the guide below to disable fullscreen optimizations.
Step 1. Right-click the problematic program to select Properties.
Step 2. Move on to the Compatibility tab, and check the option of Disable fullscreen optimizations.
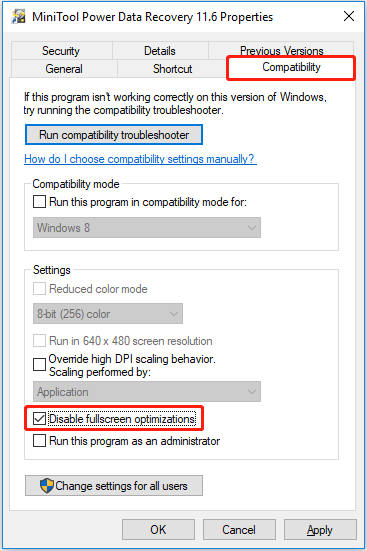
Step 3. Click Apply and OK sequentially to make this change take effect.
Fix 8. Scan for Viruses and Malware
Viruses and malware infection is also common reason for the occurrence of the Alt + Tab black screen. In this situation, you had better use antivirus software to scan for and kill the viruses. Windows Defender is the Windows built-in antivirus that can help to quickly scan or fully scan your computer for viruses.
Read this post to get the specific instruction on how to run a quick scan or full scan: How to Run Windows Defender Full/Quick/Custom/Offline Scan.

Recover Data From Black Screen Computer
That’s all the solutions listed for the Alt + Tab black screen. In general, you can successfully resolve this issue by doing the actions described above. However, unfortunately, maybe none of the above methods work for you, the black screen remains, and the computer won’t start normally. In this situation, retrieving data from your computer is the most important thing you need to do.
However, you may be wondering:
“How to rescue the data when I cannot boot into Windows?”
Keep reading to get the step-by-step guide.
To recover data from an unbootable computer, MiniTool Power Data Recovery is the best choice. It excels at recovering data from various Windows unbootable scenarios, such as recovering data after disk boot failure, recovering files from an invalid system disk, recovering data after BSOD, and more.
How MiniTool Power Data Recovery can recover data from an unbootable PC? It offers you a tool called Bootable Media Builder that can help to build a bootable data recovery disk.
Note: The Bootable Media Builder is only provided in advanced editions, such as MiniTool Power Data Recovery Personal Ultimate.
Major steps to create a bootable data recovery tool and recover data:
Before you do:
- Prepare a USB flash drive that does not contain any important files. Recommended USB drive size: 4 GB – 64 GB.
- Make sure you have a functioning computer.
Step 1. On a working computer, get MiniTool Power Data Recovery Free installed. Then you are able to upgrade it to a Personal Ultimate edition which provides the ability to make a bootable data recovery disk.
MiniTool Power Data Recovery FreeClick to Download100%Clean & Safe
Step 2. Launch the registered MiniTool Power Data Recovery to get its main interface. Click the Bootable Media icon to create a bootable disk by referring to this post: Create Bootable CD/DVD/USB Drive With Bootable Media Builder.
Step 3. Insert the created bootable disk into the computer that shows a black screen and boot Windows from the burned disk.
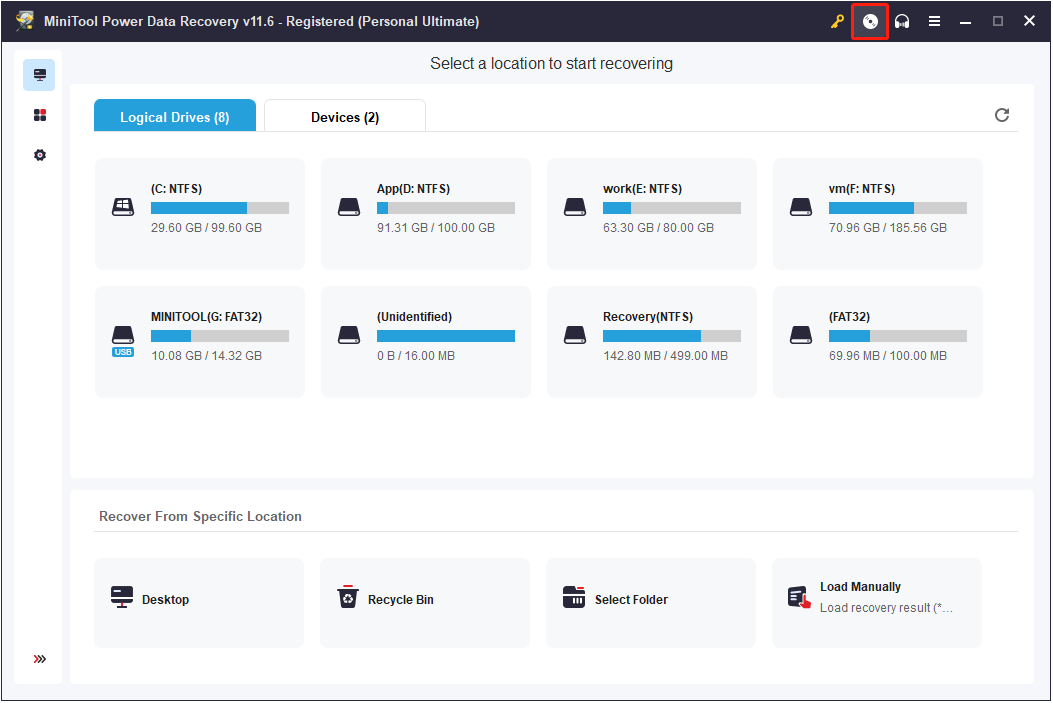
Step 4. Under normal circumstances, you will automatically enter the home page of MiniTool Power Data Recovery. If not, click the first option of MiniTool Power Data Recovery to launch this secure data recovery service, as shown in the figure below.

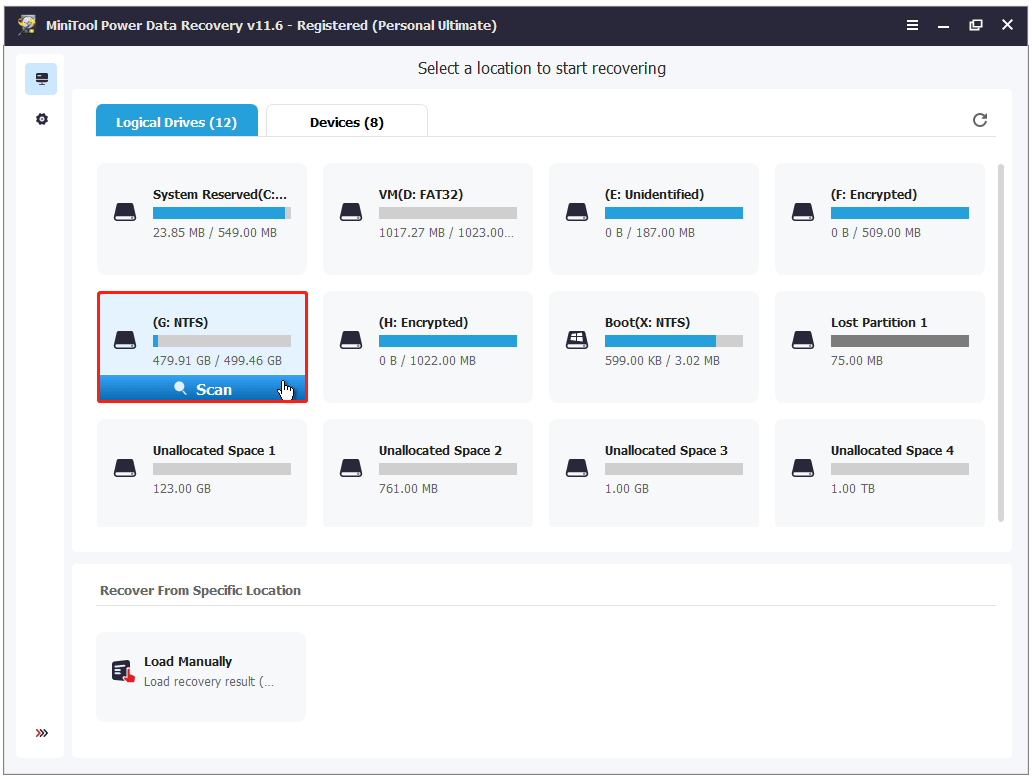
Step 5. On the home page of MiniTool Power Data Recovery, select the target drive that contains your data to scan. Since it is very important to restore the data of the C drive when the system cannot be started, here we take the system drive for example.
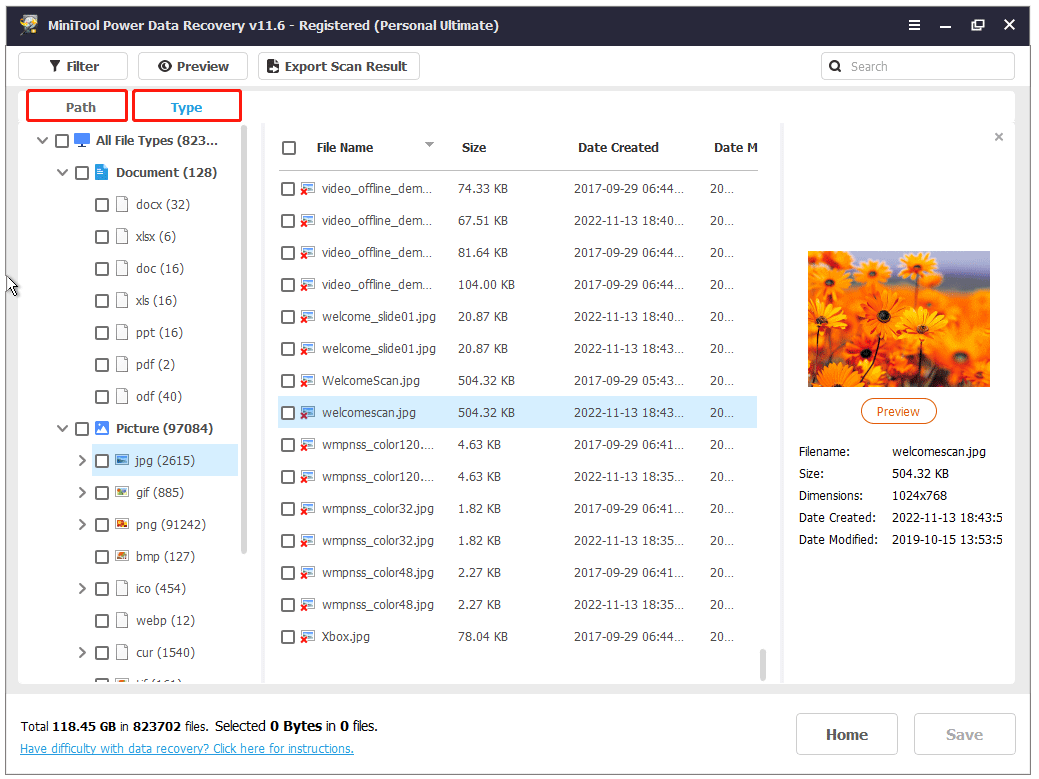
Step 6. Wait until the scanning process completes. Then MiniTool Power Data Recovery will list all files located in the system drive by the Path, and you can find the wanted ones by expanding the folder one by one.
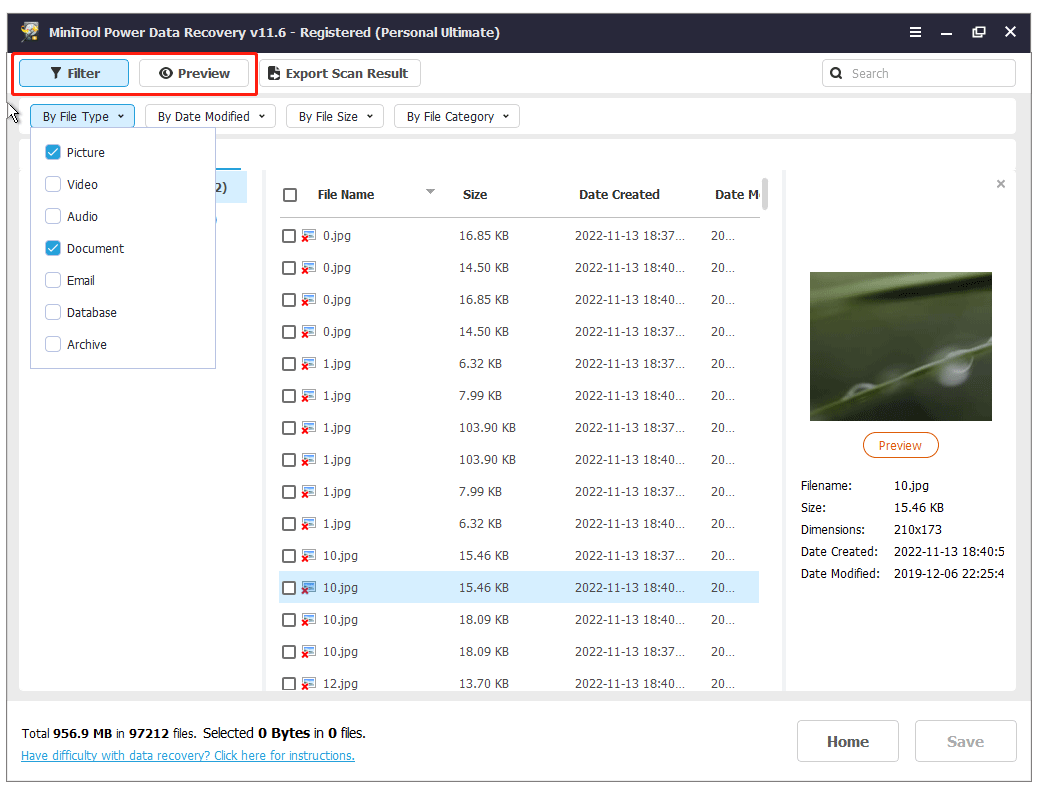
Here, to accelerate the speed at which you find the needed files, you can make use of the following features.
- Type: Apart from staying at the default category list Path, you can move on to the Type category list to view files by file type, such as Document, Picture, Audio & Video, etc.
- Filter: You are also allowed to filter out unwanted files by file type, file category, file size, and file modification date.
- Preview: To make sure the found items are what you want, you can preview them one by one. Multiple types of files are supported to preview, including pictures, Word documents, Excel spreadsheets, and more.
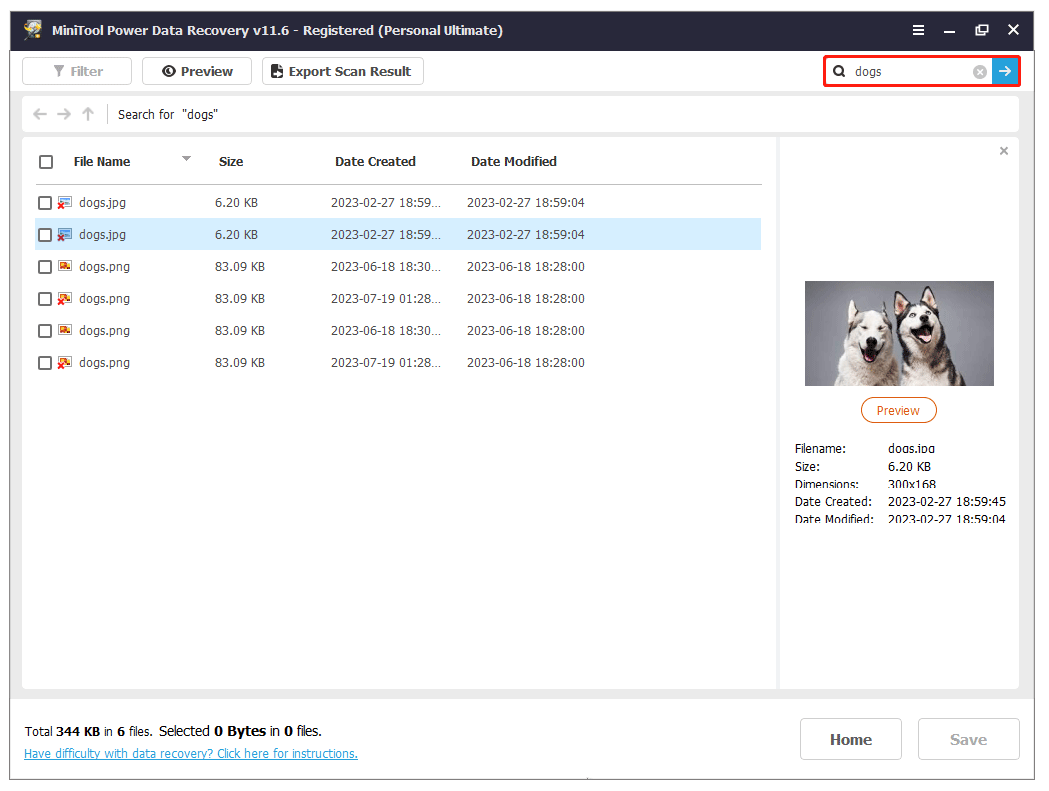
- Search: In addition, if you can remember the file name, you can input part or all of the name in the search box and press Enter to view that file only.
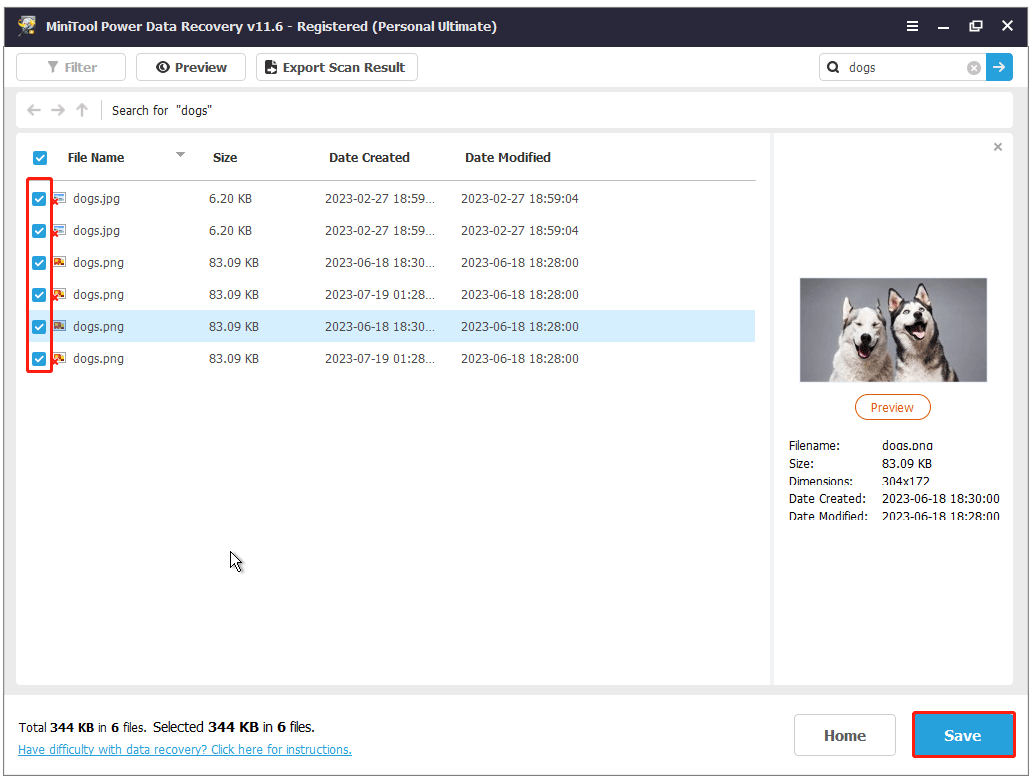
Step 7. Once you locate all the wanted items, select them all, click the Save button, then choose a location path to store them.
MiniTool Power Data Recovery FreeClick to Download100%Clean & Safe
Note: MiniTool Power Data Recovery Free is effective in recovering files (documents, videos, pictures, emails, audio, etc.) from a bootable computer. Various types of storage media are supported for data recovery, such as external hard drive recovery, SD card recovery, USB drive data recovery, and more.
After retrieving data, you can boot into safe mode and try some of the methods above or reinstall Windows to fix the black screen. And, for a more exhaustive guide, please read this post: Laptop Screen Goes Black Randomly? Fix the Black Screen Issue!
Final Words
To sum up, this article explains why your screen goes black when pressing Alt + Tab Windows 11/10 and provides you with a couple of effective solutions to help you get rid of the Alt + Tab black screen. Besides, MiniTool Power Data Recovery is introduced to help you recover files when you cannot exit the black screen.
MiniTool Power Data Recovery FreeClick to Download100%Clean & Safe
If you have come across any feasible solutions for this “black screen after pressing Alt + Tab” issue, welcome to share them in the comment zone to help more users.
If you need more help with MiniTool Power Data Recovery or MiniTool ShadowMaker, please feel free to contact us via [email protected] at any time.
About The Author

Position: Columnist
Shirley graduated from English major and is currently an editor of MiniTool Team. She likes browsing and writing IT-related articles, and is committed to becoming a professional IT problem solver. The topic of her articles are generally about data recovery, data backup, and computer disk management, as well as other IT issues. In spare time, she likes watching movies, hiking and fishing.