You probably know how to do settings to File History backup. Yet, do you know how to set up File History in Control Panel? Do you know that many additional advanced backup options can be assigned to a backup task? This article posted by MiniTool brand will tell you all the related information.
Usually, the Windows 10/11 backup options that we talk about refers to the backup options for Windows 10/11 File History. It offers many backup settings that allow you to specify your file backups and make them more suitable for yourself.
How to make use of the backup options for Windows 10/11? It is as easy as a piece of cake; all you need to do is follow the on-screen guide.
There are two places where you can set up File History: Windows Settings and Control Panel. We will focus on the backup options in Windows 10/11 Settings. Also, we will introduce how to set up File History in Control Panel.
Set up Backup Options Windows 10/11 in Windows Settings
If you haven’t yet created any File History task and are fresh new to it, or if you have ever tried File History but canceled it and now there is no file backup task, you can establish your new File History task right now with personalization.
Step 1. Find File History in Windows Settings
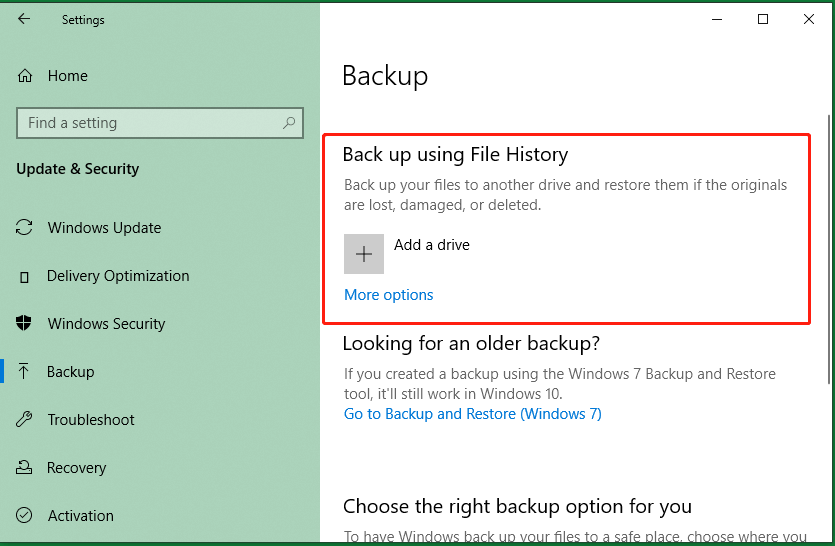
Click on the Win10 icon in the bottom left corner on the taskbar and select Settings (the cog icon) in the pop-up menu. Then, the Windows Settings window will appear, on the default main menu screen, find the last Update & Security option and click to choose it. On the next Windows Update screen, click Backup in the left panel. Finally, you can see Back up using File History at the top of the right area.
Step 2. Add a Drive
If you currently have no File History task on your computer, you will see an Add a drive option within the Back up using File History section. Just click on the plus icon and choose a hard drive as your backup destination. The disk where Windows is installed can’t be used as a backup destination.
If there is neither an extra internal hard drive nor an external hard disk connected to your machine, you have to first prepare one to make it your backup destination.

After you successfully add a backup drive, you will see the Automatically back up my files option is on. You can switch it off if you want to disable your File History backup.
Step 3. Manage Windows 10/11 Backup Options
Then, click More options to make special settings to your file backup.
#1. Backup Schedule
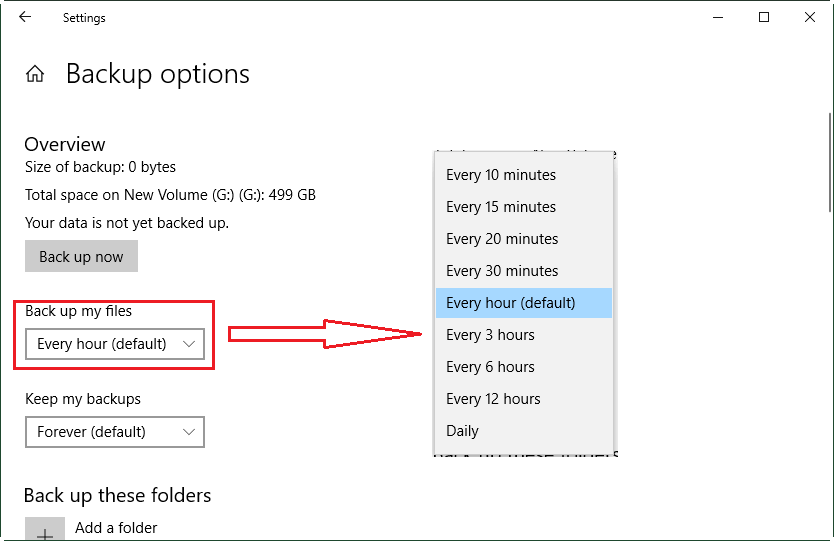
You are able to create a schedule to automatically back up your computer files at a set frequency in the future. How often do you want your files or folders to be backed up? Just pick one of the frequencies listed under Back up my files.
- Every hour (default)
- Every 10 minutes
- Every 15 minutes
- Every 20 minutes
- Every 30 minutes
- Every 3 hours
- Every 6 hours
- Every 12 hours
- Daily
#2. Backup Images Saving
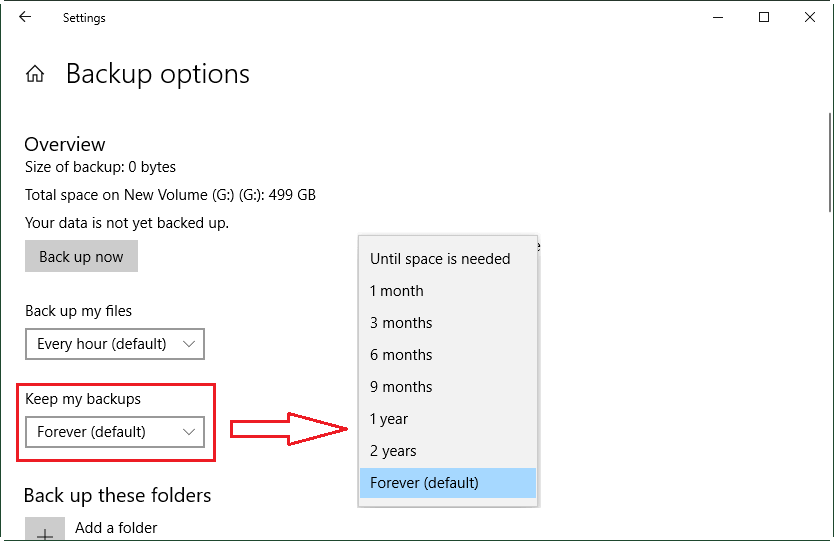
You can decide the backup images of which time interval to keep on your computer. How long do you want to keep your backups? Select a period under Keep my backups.
- Forever (default)
- Until space is needed
- 1 month
- 3 months
- 6 months
- 9 months
- 1 year
- 2 years
#3. Backup Source
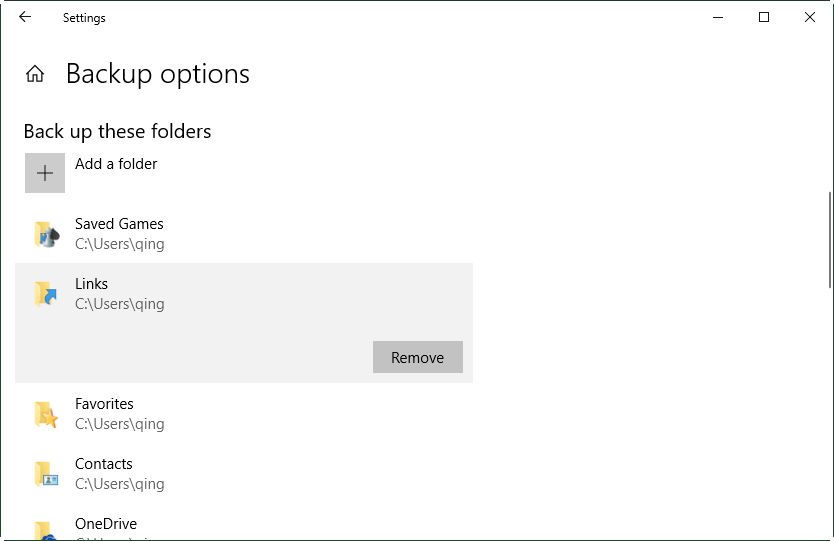
Of course, you need to determine which folders you’d like to copy. Windows 10/11 backup options list the common folders for you to choose from under the Backup these folders section; all of them locate in C:\Users\<username>. They are:
- Saved games
- Links
- Favorites
- Contacts
- OneDrive
- Desktop
- 3D objects
- Searches
- Downloads
- Pictures
- Documents
- Camera roll
- Videos
- Saved pictures
- Music
Your list may be different.
Also, you are allowed to add any other folders on your computer as your backup source. Just click the plus icon before Add a folder.
If you don’t want to image any folder in the above list, you can directly click on it and click the Remove button.
Moreover, you can exclude some folders from your backup source with Exclude these folders feature. Once you select those folders, they will disappear from the above list if they are originally there.
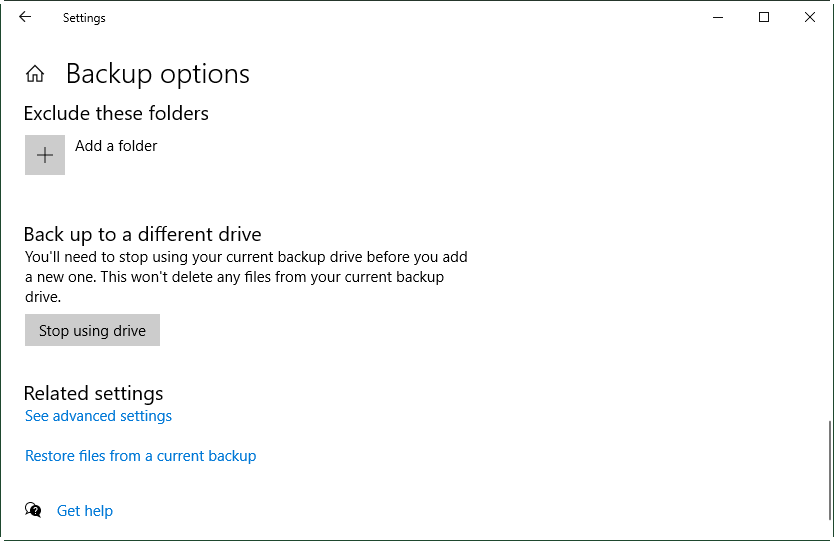
#4. Backup Destination
Still, you are enabled to change your backup target place. If you find another disk that is better to save the backup image files, you can alter your backup address. Yet, first of all, you have to click Stop using drive under Backup to a different drive to disconnect the current backup destination. Then, select the new disk.
Remove current backup drive won’t delete any files, so the previous backup images are still there. If you want to restore your files to the previous state that are saved on the removed disk, just reconnect it to your File History and carry out the restoration.
#5. Advanced Settings
You can do further settings to your File History task by clicking See advanced settings below the Related settings title. Then, you will enter the File History screen in Control Panel.
Next, we will switch to the next part.
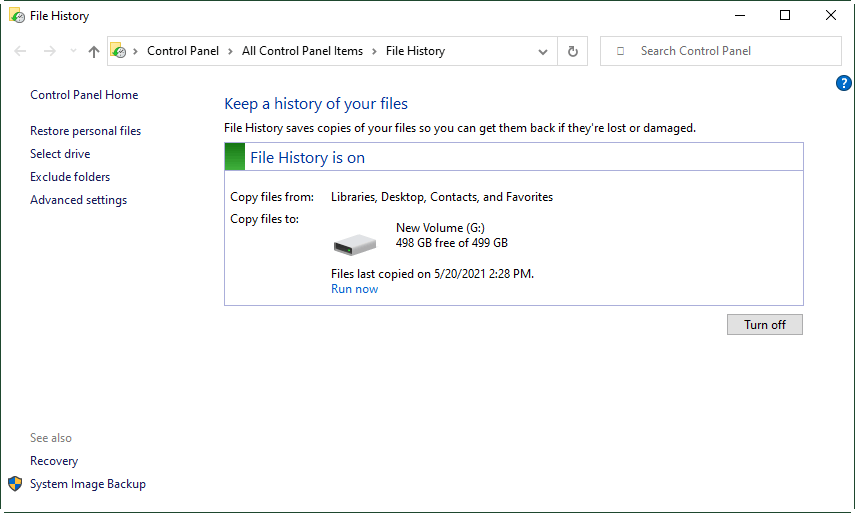
Set up Windows 10/11 Backup Options in Control Panel
On the File History screen in Control Panel, you can Run now or Turn off the set backup.
In Control Panel, you can also specify the same settings for File History as in Windows Settings.
1. Select Drive
Click Select drive in the left menu on the File History screen. In the new window, pick up a drive in the list.
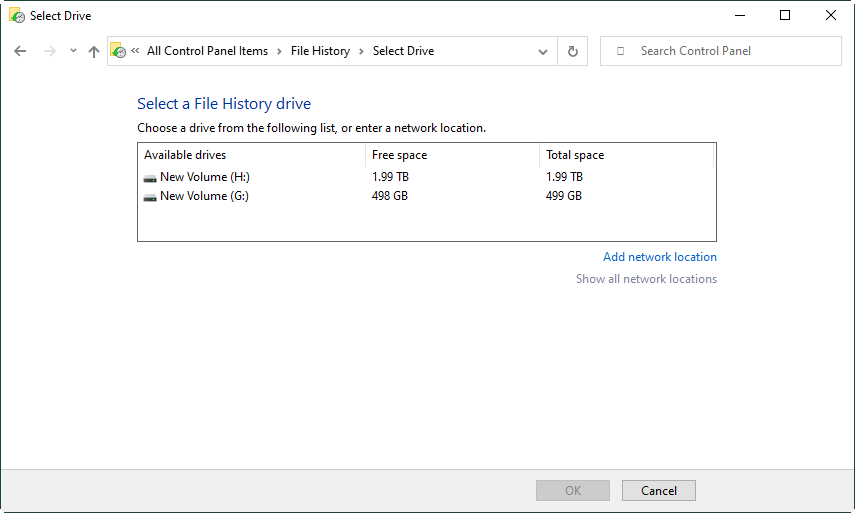
Or, you can choose a network location by clicking Add network location.
2. Exclude Folders
Select Exclude folders from the left panel of the File History screen. In the next window, click Add to add folders from your computer to the “blacklist” of File History backup.
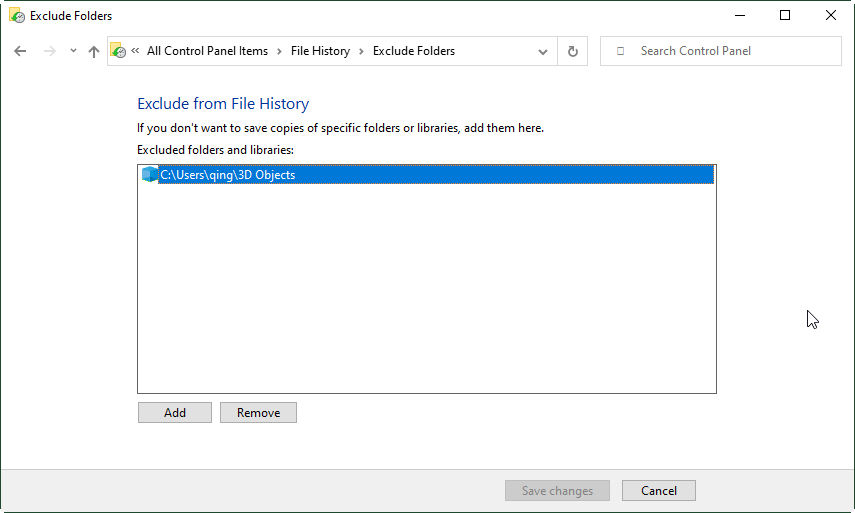
Or, if you change your mind and want to back up those folders again, just click on them and select Remove. Then, those folders will be removed from the “blacklist”. If they are originally from the backup source list, they will return to the backup list; if they are originally not in the backup list, remove them from the “blacklist” won’t put them in the backup list. To back up these folders, you need to manually add them to your current backup list.
Don’t forget to click Save changes before you leave this window.
3. File History Frequency
You can also set up a backup schedule by clicking Advanced settings in the left section on the File History screen in Control Panel. Then, you will be directed to this screen.
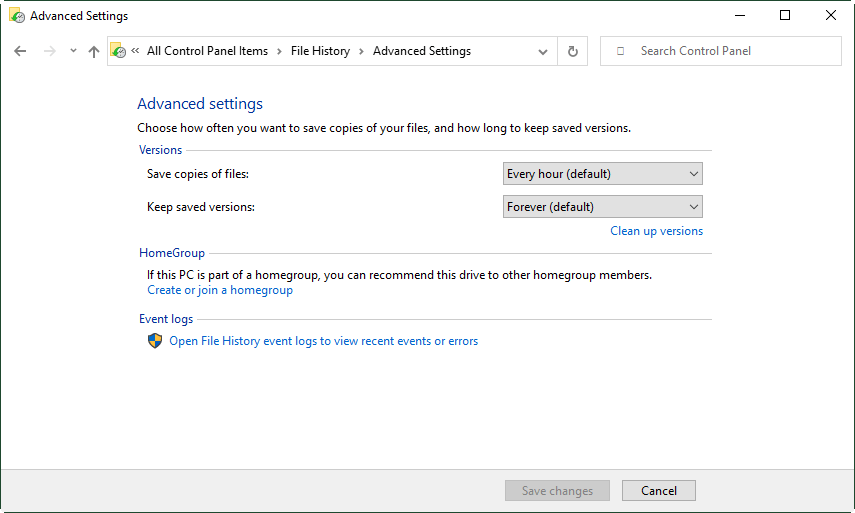
Click the down arrow behind Save copies of files and select the proper backup frequency that suits you. The Windows 10/11 schedule backup options here in the Control Panel are the same as those in Windows Settings.
4. File History Backup Versions
To continue, click the down arrow behind Keep saved versions and choose the period that matches your plan.
Here, it enables you to manage your old backup versions. Click the Clean up versions option and choose a time interval to delete.
- Older than 1 year
- All but the latest one
- Older than 1 month
- Older than 3 months
- Older than 6 months
- Older than 9 months
- Older than 2 year
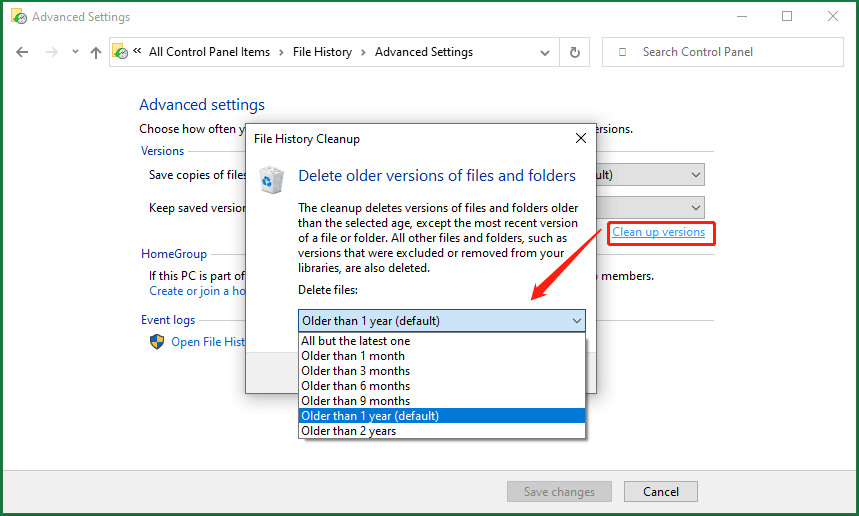
The cleanup deletes backup image versions of files and folders that are older than the selected age, except the most recent version of a file or folder. All other folders like versions that were excluded or removed from your libraries are also deleted.
- If your computer is part of a homegroup, you can recommend this drive to other homegroup members.
- You can also open File History event logs to view recent events or errors from this Advanced File History Settings screen in Control Panel.
Windows 10/11 Backup Options in MiniTool ShadowMaker
Besides the official File History, you can also choose to back up files/folders on your PC with the help of a professional and reliable third-party program such as MiniTool ShadowMaker. Being similar to File History, MiniTool ShadowMaker provides a lot of backup options to set up your file backup. Those options include all the settings offered by File History and many advanced management options that File History doesn’t have.
You can set up file backup while creating the backup task.
MiniTool ShadowMaker TrialClick to Download100%Clean & Safe
Step 1. Download and install MiniTool ShadowMaker on your computer.
Step 2. Launch the software and click Keep Trial on the first screen.
Step 3. Then, you will be shown its main interface. There, click the Backup tab in the top menu.
Step 4. In the Backup tab, select the backup Source and Destination.
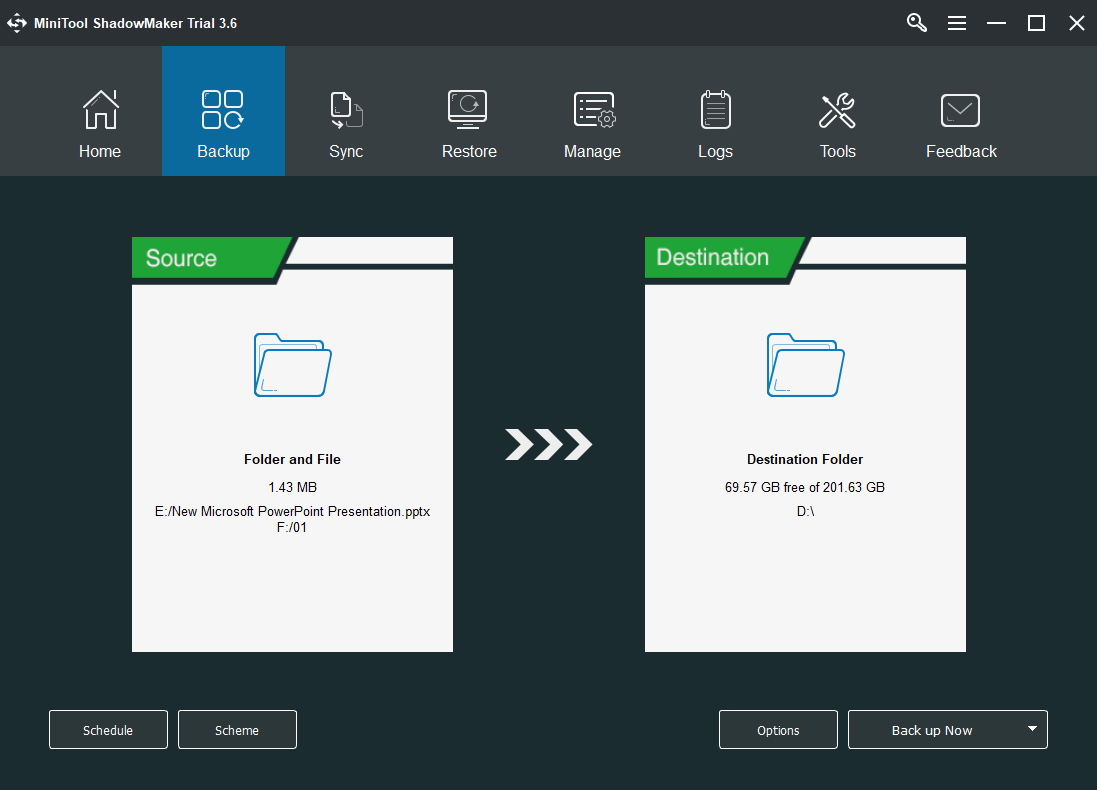
Be different from File History, you are allowed to choose the system disk as your backup destination. However, you are not recommended to do so. Instead, an external storage location, shared network, or NAS is preferred.
Step 5. Still, on the Backup screen, you can access a variety of Windows 10/11 backup options.
1. Windows Backup Options Schedule
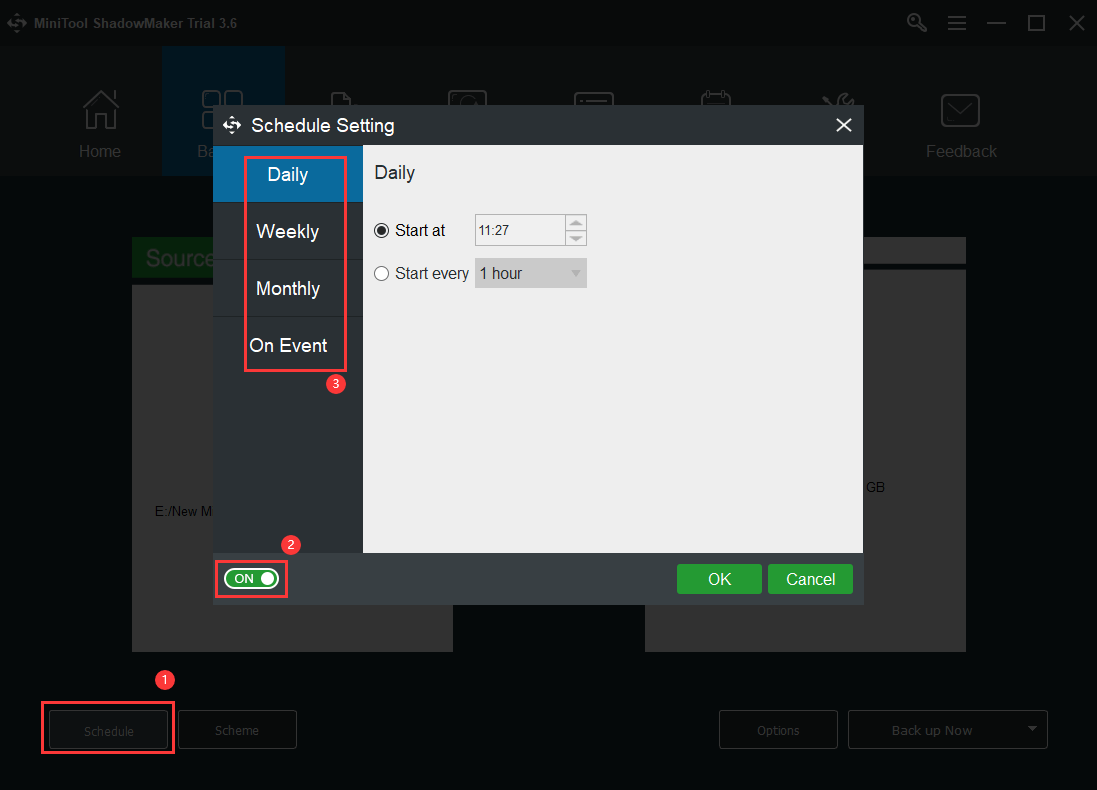
In the bottom left corner, click on the Schedule button and a small window will pop up. Firstly, switch on the schedule settings in the down left. Then, choose a backup schedule and make detailed settings for the selected schedule.
- Daily backup: When to start within a day or the time interval between two backup processes (1 hour, 2 hours, 3 hours, 4 hours, 6 hours, or 8 hours).
- Weekly backup: When to start within a day and which days within a week to carry out the backup task.
- Monthly backup: When to start within a day and which days within a month do backup.
- On event backup: Trigger backup operation on system/computer log on or log off.
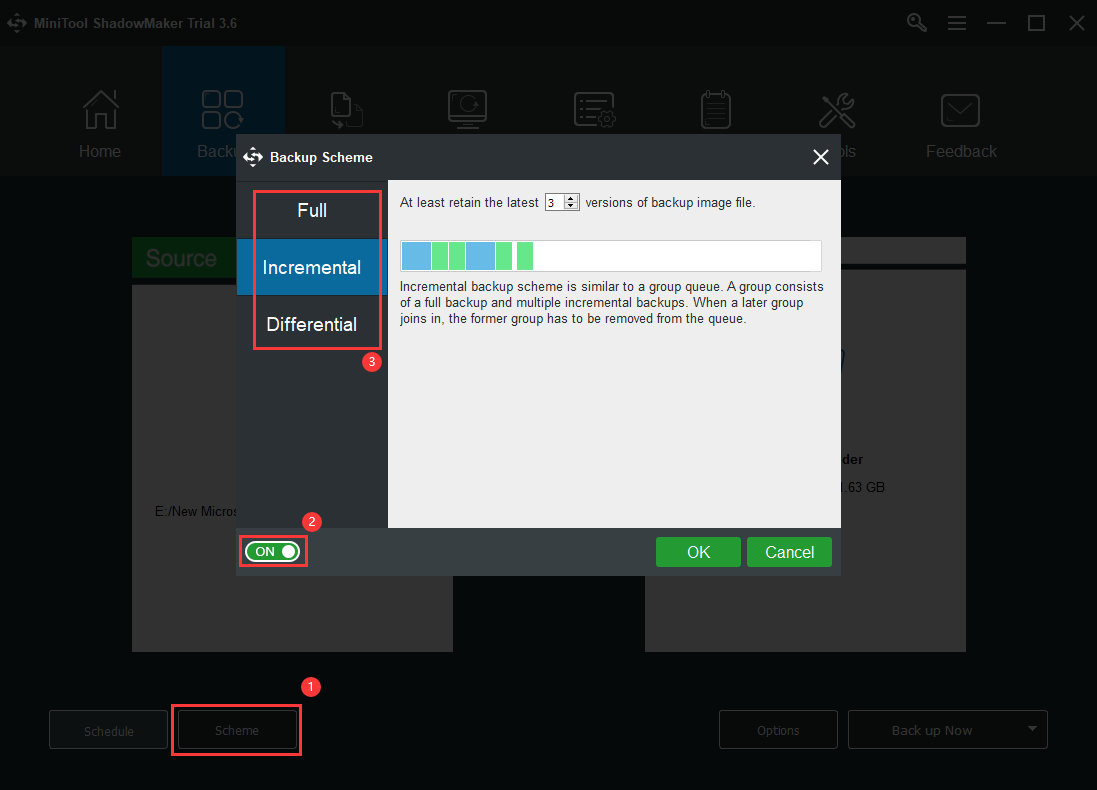
2. Windows 10/11 File Backup Options Scheme
Click on the Scheme button in the lower-left on the Backup screen. When you see the Backup Scheme window, choose a backup type, full backup, incremental backup, or differential backup.
#1 Full Backup
Back up all the source files each time. Full backup requires the most time and storage space among the 3 types of backups. When it comes to restoration, any backup version can be used to recover all the source files.
You can specify how many backup images you’d like to retain. A full backup will retain the number of backup versions you specified. When it reaches the specified numbers, it will automatically delete old backups.
#2 Incremental Backup
Only back up the changed or newly added files compared with the very LAST BACKUP. The incremental backup needs the least backup time and destination space. As for restoring all the source files, you must have the last full backup and all the incremental backups following the last full backup.
You can also decide how many backup versions to keep. The incremental backup scheme is similar to a group queue. A group consists of a full backup and several incremental backups. When a later group joins in, the former will be removed from the queue.
#3 Differential Backup
Only back up the changed or newly added files based on the LAST FULL BACKUP. Differential backup requires medium time and space for completing the backup process and storing backup image files respectively. If you want to restore all source files of a differential backup, you should provide the very last full backup and the very last differential backup.
Still, you are enabled to manage your differential backup image numbers. A differential backup scheme is similar to a circular queue. When the queue is full and if a new member joins in, one of the members has to exit from the queue.
3. Windows 10/11 Backup Options in MiniTool ShadowMaker
Next, let see how many advanced backup options MiniTool ShadowMaker can provide that File History doesn’t have. Just click on the Options button on the lower-right side to access the options.
#1 Image Creation Mode
This option offers you two backup ways to carry out the file backup task.
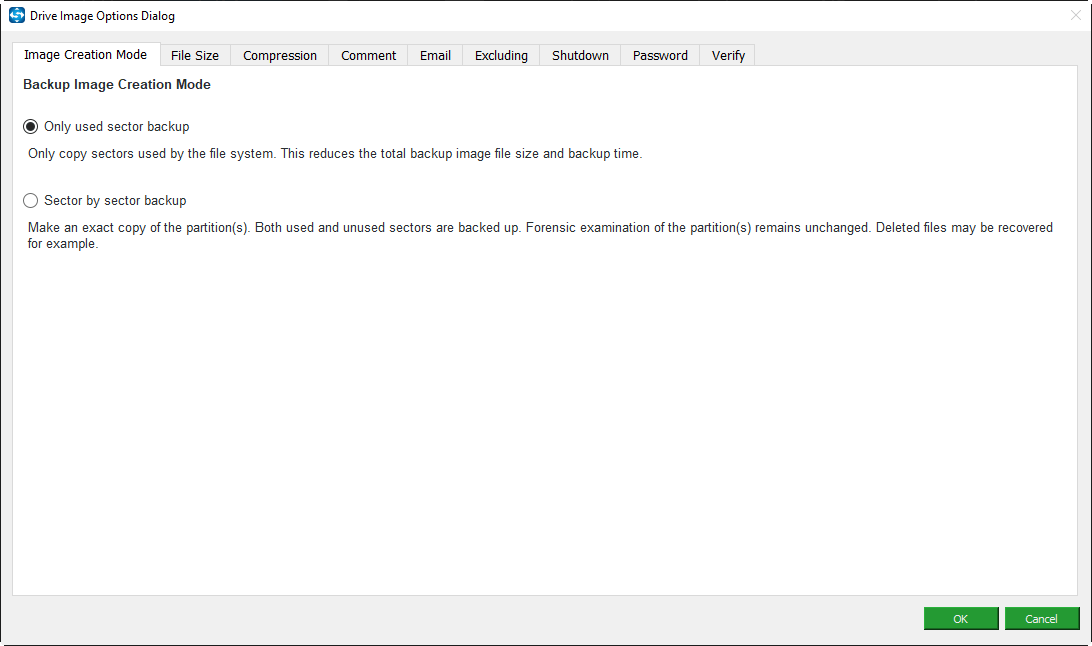
- Only used sector backup: Only copy sectors used by the file system. Thus, it reduces the total backup time and backup image size.
- Sector by sector backup: Make an exact copy of the source. Both used and unused sectors will be backed up. Forensic examination of the partitions remains unchanged. For example, deleted files may be recovered.
#2 Maximum Backup Image Size
This feature set a limit to the backup image file size. If an image reaches the maximum size limit, it will be split into multiple smaller images. There are 3 options for the set image file size.
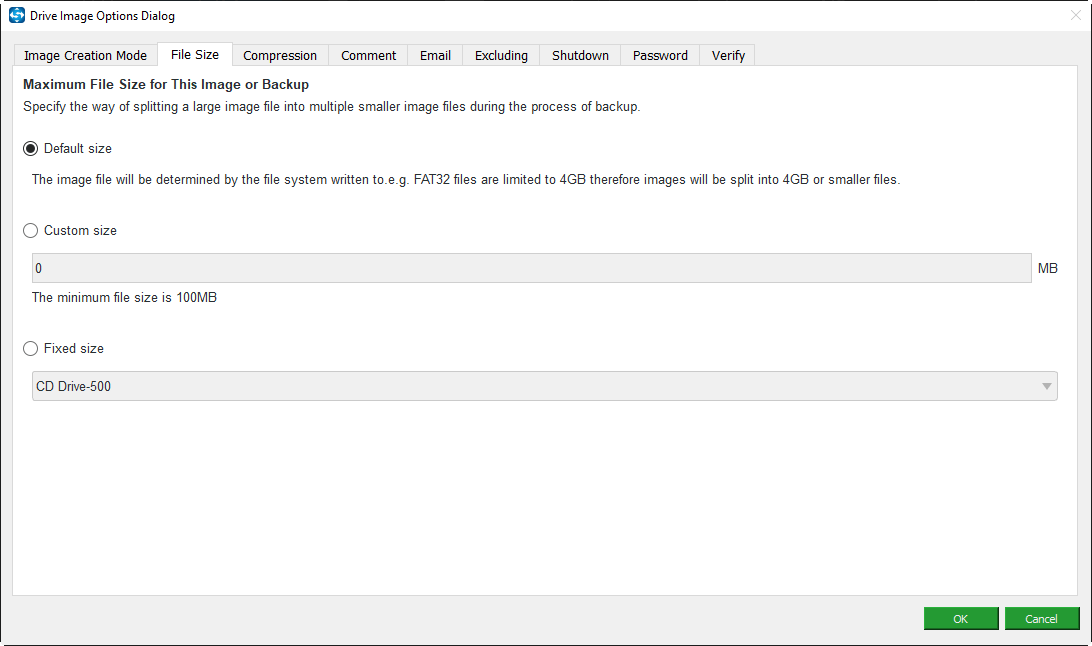
- Default size: The image file will be controlled by the file system written to it. For instance, the FAT32 file system supports up to 4 GB file size. If the image file is saved in a FAT32 partition, then the maximum size of the image should be no larger than 4 GB.
- Custom size: It enables you to set a maximum file size limit to your backup image. Yet, the minimum size you can set is 100MB. That is to say, the maximum file size you set to the image should be no small than 100MB. Of course, the maximum file size you can choose is the file size limit determined by the file system.
- Fixed size: CD Drive-500 or DVD Drive-6500.
#3 Image File Compression
Also, you are able to compress your backup images to shrink their size to reduce the necessary storage space. Yet, it may increase the backup time.
- None compression level
- Medium compression level (recommended)
- High compression level
#4 Backup Comment
Add comments to the backup. It may help you identify the specific backup image in the future, especially when receiving data by using bootable media.
#5 Email Notification
You can also enable the email notification function. Once the backup succeeds or fails, you will be informed with an email.
#6 Exclude Files from Backup
This utility helps you to avoid backing up unnecessary Windows Page File and Hibernation Files.
#7 Shut down Computer When Backup Finishes
If you have a large size of files to back up, it will take a long time to complete. To save your time, you can turn on this option and go to your other businesses. When the backup is done, MiniTool ShadowMaker will power off your PC automatically.
#8 Backup Image Encryption
You can protect your image files with passwords and the program offers 3 data encryption methods:
- None
- Normal
- AES 128
#9 Verify Backup Image
MiniTool ShadowMaker can also check the integrity of the backup images right after the backup process is done. This will add the time needed to complete the backup task completely.
Once all the above settings are done, you can continue to the next step.
Step 6. Click Back up Now to carry out the specified backup immediately. Or, you can choose to Back up Later.
If you create a backup without detailed settings but you want to specify it now, you can achieve that in the backup management tab.
Switch to the Manage tab in the top menu, find the target image, click on the down arrow next to the Back up Now button, and choose the backup type.
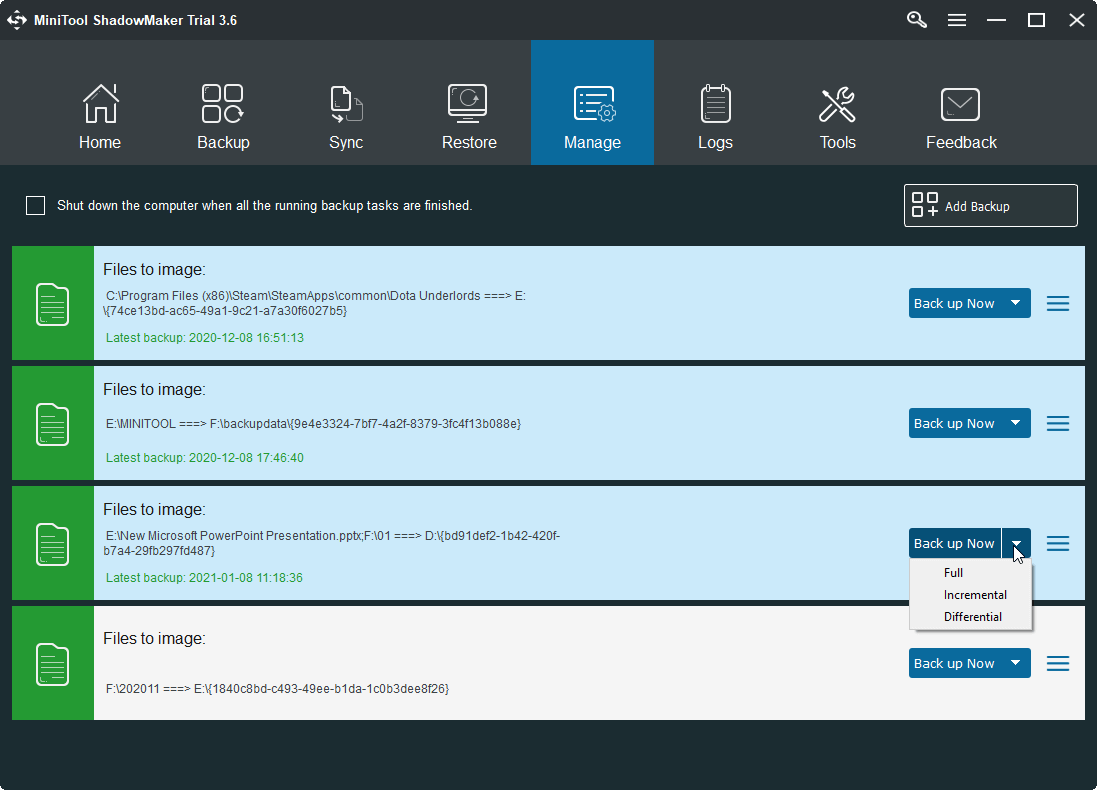
Or, click on the three slashes behind the Back up Now button and select the options you’d like to change.
- Browse image
- Restore image
- Mount image
- Edit scheme
- Verify image
- Delete image
- Edit schedule
- Locate image
Or, just simply carry out the same backup task again by clicking the Back up Now button. If you run a backup task from the Manage screen, you can check Shut down the computer when all the running backup tasks are finished in the upper left.
In the Manage tab, you can also add other image files created by MiniTool ShadowMaker but not shown currently to the Manage screen by the Add Backup button in the upper right.
Comparison and Conclusion
Now, you have learned all the details about Windows 10/11 backup options of File History (in both Windows Setting and Control Panel) and MiniTool ShadowMaker. Both programs are powerful and reliable. Yet, MiniTool ShadowMaker provides more advanced and useful backup options for your file/folder backup.
Moreover, MiniTool ShadowMaker can also back up your systems, partitions/volumes, and even the whole hard disk drive while File History can only copy your files in folders.
MiniTool ShadowMaker TrialClick to Download100%Clean & Safe
Finally, no matter which tool you choose, hope you have a good experience of making a backup of your computer!
About The Author

Position: Columnist
Helen Graduated from university in 2014 and started working as a tech editor in the same year. Her articles focus on video creation, editing, and conversion. She also has a good knowledge of disk management and data backup & recovery. Through an in-depth exploration of computer technology, Helen has successfully helped thousands of users solve their annoying problems.