Microsoft is eager to release new versions of Windows to repair bugs and put forward new features. Windows 10 is widely used around the world. Windows performance has unavoidably declined as you use it. This post is aimed to help you improve Windows 10 performance by yourself. The following content will show you detailed steps on how to make a system performance improvement.
Improve Windows 10 Performance with MiniTool Software
There are three most common problems with Windows 10: Windows 10 slow performance, Windows 10 low disk space, and Windows 10 data loss. Fortunately, all of them have corresponding solutions. Besides, you can also choose MiniTool software to resolve these problems in an easier way.
Windows 10 Running Slow
If Windows 10 runs slow, you will have a bad experience either working or gaming with this computer. Thus, you can try the following methods to speed up the Windows 10 system.
>>Way 1: Upgrade the Computer with SSD
Fast speed is one of the most attractive aspects of SSDs. Changing the disks to SSDs is an effective way to speed up Windows 10 boot and running. It is also one of the best Windows 10 performance tweaks for gaming.
Compared with installing the Windows system again, you can try MiniTool Partition Wizard to migrate the OS to SSD directly. MiniTool Partition Wizard is a comprehensive partition management tool that you can use to wipe disks, convert partitions, format partitions, and more.
Follow the steps below to convert your computer disk to SSD format.
Step 1: Prepare an SSD and connect it to your computer.
Step 2: Download and install MiniTool Partition Wizard.
MiniTool Partition Wizard FreeClick to Download100%Clean & Safe
Step 3: Launch the software, then choose Migrate OS to SSD/HD Wizard on the left pane.
Step 4: Choose one way to migrate your OS: replace the system disk with another hard disk or move the operating system to another hard disk. Then, click Next.
Step 5: In the following window, you need to choose a Copy Option based on your needs and click on Next.
Step 6: Read the note shown in the popup window, then click Finish.
Step 7: Click on Apply to complete the suspending changes. Then, choose Yes to confirm changes.
If you need more specific information about how to use MiniTool Partition Wizard to migrate OS, please read this post.
>>Way 2: Align Partitions
You’ll need to align all partitions on your disk (especially the one with a system installed on) after you have done the following things:
- Copied an advanced format HD or SSD to another advanced format HD/SSD.
- Changed the size of multiple partitions or moved the location of them many times.
Just select the target disk > expand Check Disk from the left panel > click Align All Partition > wait for the alignment > click on OK > click Apply to execute pending changes.
>>Way 3: Extend C Drive
If the C drive is going to be full, the computer performance speed will be affected. Instead of clearing files in the C drive, you are suggested to extend the size of it. The next section will explain how to extend the C drive, please keep reading.
Running out of Disk Space
Keeping enough free space on disk is another important method to optimize Windows 10 performance. If you find the disk space is running out, you can extend the disk space by replacing it with a new one. Are there any other methods to enlarge disk space? Absolutely yes. Here are three ways for you to free up your system drive space.
>>Way 1: Extend Partition with MiniTool Partition Wizard
It’s easy to find your system drive running out of space due to installed apps, system and reserved files, and some temporary files. MiniTool Partition Wizard can help you enlarge the disk space.
Step 1: Download and install MiniTool Partition Wizard.
MiniTool Partition Wizard FreeClick to Download100%Clean & Safe
Step 2: Right-click on the C drive on the right pane and choose Extend from the context menu.
Step 3: You can decide how much free space you need from other drives based on your situation.
Step 4: Click OK to confirm.
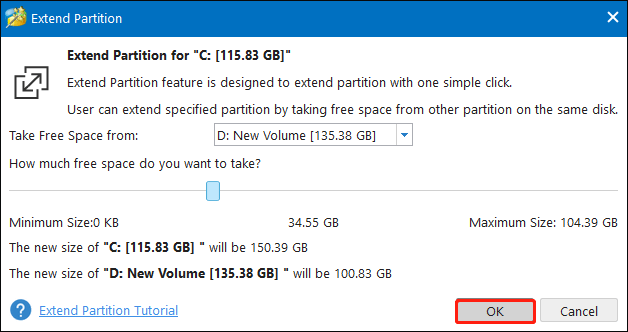
Step 5: Click Apply at the left corner to fully apply the change and click Yes to confirm.
>>Way 2: Free Up Disk Space with Disk Cleanup
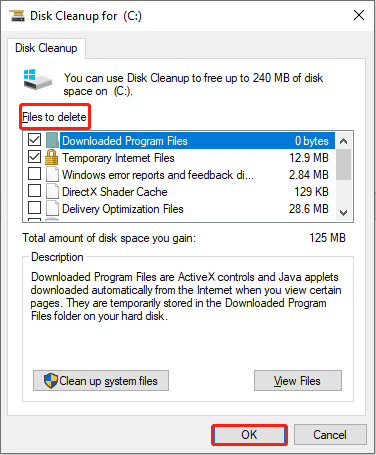
You can also use Windows built-in tools to clear unnecessary files, such as Disk Cleanup. This utility can delete temporary files, internet cache, and unnecessary program files.
Step 1: Press Win + S and type Disk Cleanup into the search bar.
Step 2: Press Enter to open it.
Step 3: Select C drive from the list.
Step 4: Select the files you want to delete from the Files to delete section and click OK to confirm your selections.
>>Way 3: Free Up Disk Space with Storage Sense
Storage Sense is another Windows snap-in utility that can clean up your disk space periodically according to your settings.
Step 1: Press Win + I to open Windows Settings.
Step 2: Select System > Storage.
Step 3: You can find Storage Sense on the right pane, then toggle the switch to On to enable this tool.
Step 4: Click on Configure Storage Sense or run it now.
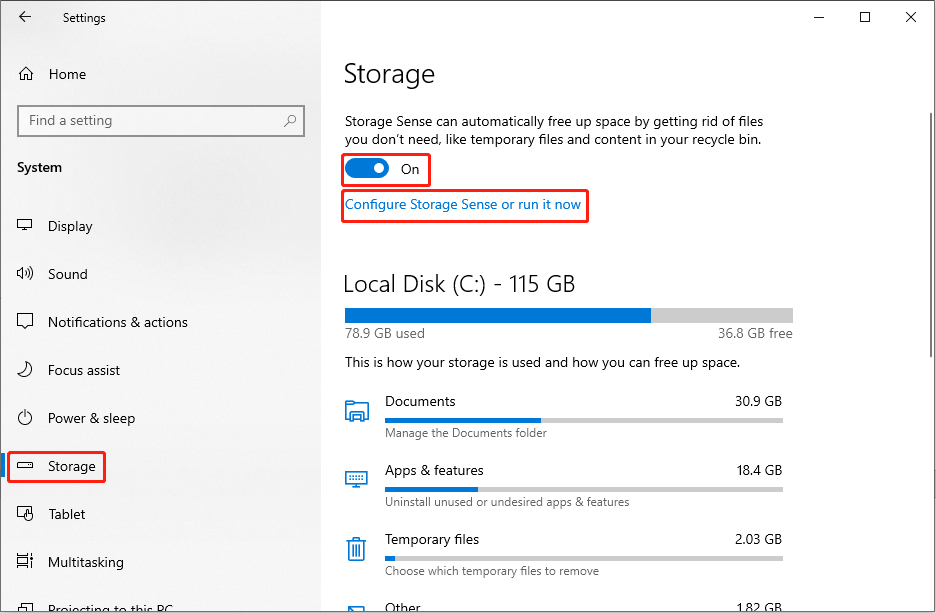
Step 5: In the following window, you can modify the settings of Storage Sense, then it will clean files according to the configuration. Or you can click on the Clean now button under the Free up space now section to clean files immediately.
Windows 10 Data Recovery
Protecting and recovering data is always a hot topic among digital device users. How to safeguard your data stored on the computer? How to get your files back if, unfortunately, they are missing? Actually, permanently deleted and missing files can’t be recovered from the Recycle Bin. In this case, professional data recovery software is required.
MiniTool Power Data Recovery is a reliable data restore tool. This software is developed to recover files, photos, videos, and audio files from various data storage devices, such as SD cards, memory cards, external hard drives, etc.
Besides, it is designed with clean interfaces and clear instructions; thus, even if you are new to data recovery, you can master this tool quickly. You can download and install the MiniTool Power Data Recovery free to experience more functional features.
MiniTool Power Data Recovery FreeClick to Download100%Clean & Safe
Step 1: Suppose you have installed this software correctly, launch this tool to enter the main interface.
Step 2: You can find all the partitions on your computer listed in the Logical Drivers section. Choose one partition where your lost files were stored. On the other hand, you can turn to the Devices tab to scan the whole disk.
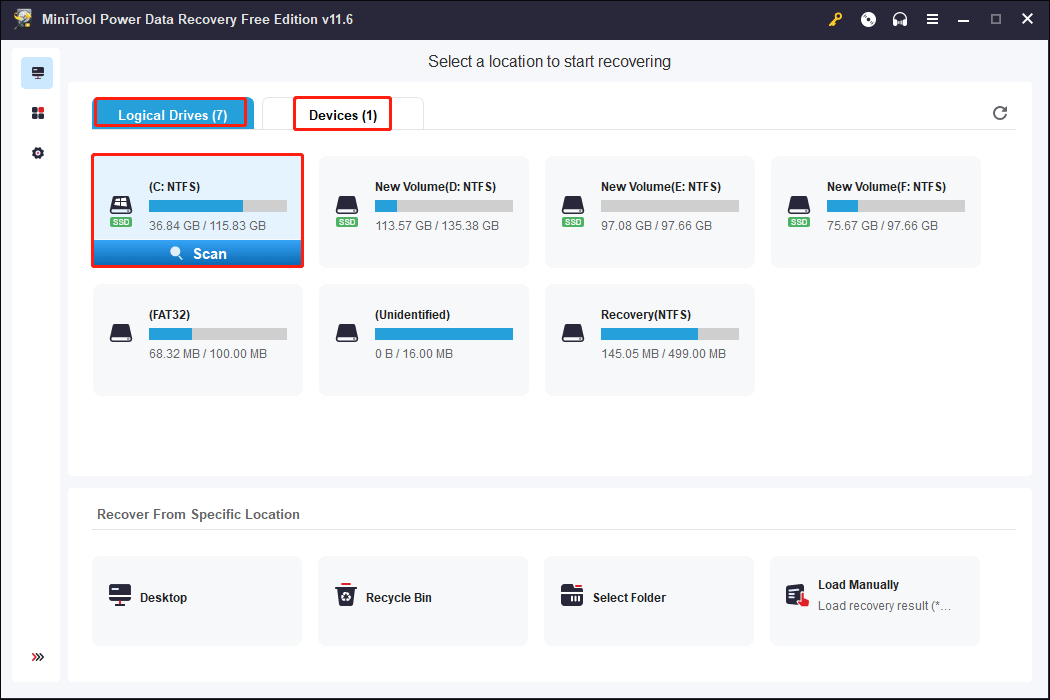
Step 3: Wait for the scan process to complete. In order to detect all files, you are advised to let the software perform a full scan. After this, browse the file list to find wanted files.
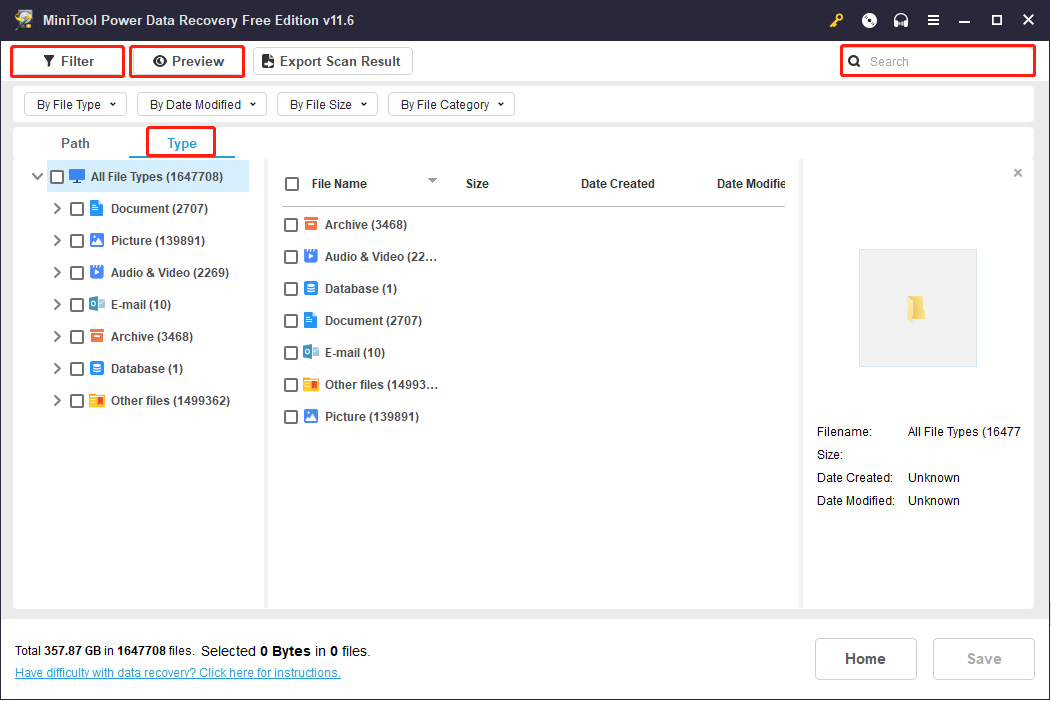
If you turn to the Type category list, you can check files according to their types, such as photos, documents, videos, audio, etc. This function works well if you want to restore certain types of files.
Additionally, to narrow down the file list, you can click on the Filter button to configure more settings, including file type, file category, file size, and file modified date. The Search function can help you find specific files more quickly as long as you remember their name (both full and partial names are acceptable).
To find the accurate files among numerous files, you can also use the Preview function. This function allows you to check documents, photos, videos, and audio before saving them.
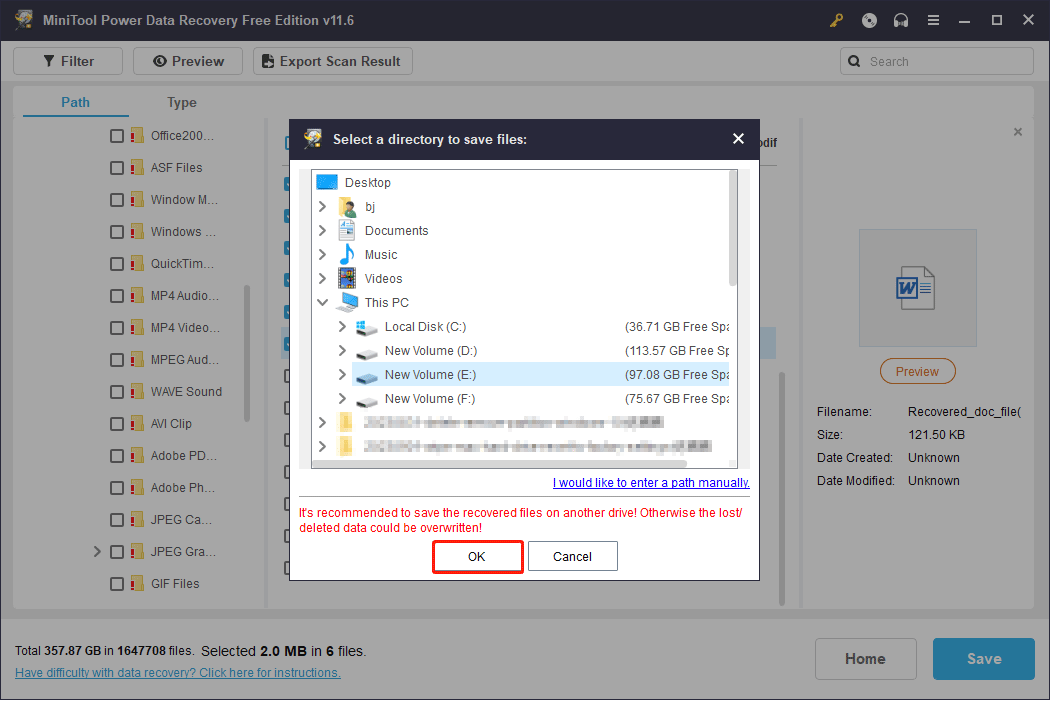
Step 4: Select all the files you need and click on the Save button. In the following window, you should choose an appropriate path to save your files and click on OK.
If your computer fails to boot up, you can also use MiniTool Power Data Recovery to rescue files from the computer. MiniTool Power Data Recovery contains a snap-in WinPE Bootable Builder. You can create a bootable media with this utility, then use this created bootable media to boot the problematic computer and rescue data from it.
MiniTool Power Data Recovery FreeClick to Download100%Clean & Safe
MiniTool ShadowMaker TrialClick to Download100%Clean & Safe
Other Adjustments for Best Performance Windows 10
There are many other effective methods for system optimization. The following content lists the most commonly used techniques to improve the performance of Windows 10.
#1. Improve RAM Performance
RAM stands for Random Access Memory. It is a form of computer memory that can be read and changed in any order for the sake of storing working data and machine code. If the RAM is insufficient on your computer, the computer will run slower.
To clean RAM on your computer, you can refer to this post and try the methods mentioned in it: How to Clean RAM? Here Are Several Efficient Methods for You.
#2. Improve CPU Performance
CPU stands for Central Processing Unit. It is the most important component of computer processing. It decides how fast your programs on the computer can run. If the CPU usage is closer to 100%, your computer will become slower.
Therefore, you can fix the high CPU usage to improve the performance of your computer. This post can help you:
#3. Defrag Hard Drive
Your Windows 10 performance will be affected a lot if there are too many fragments on the PC. To get your computer back to its normal status, you can defrag your Windows hard drive under the guidance of this post: 3 Steps to Defrag Windows 10 Computer Hard Disk Drive.
Conclusion
It is common to find the computer’s speed and performance declined. But you still have several methods to improve Windows 10 performance. Try the above methods to improve your user experience. Feel free to let us know your puzzles about MiniTool software via [email protected].

![15 Tips – Windows 10 Performance Tweaks [Updated]](https://images.minitool.com/minitool.com/images/uploads/2020/06/windows-10-performace-tweaks-thumbnail.png)