Is Word not showing recent documents in Win 10 taskbar? Now in this article from MiniTool, we will walk you through this issue. Besides, we will introduce the best free data recovery software – MiniTool Power Data Recovery to help you recover lost Word recent documents.
In general, when you right-click the Office programs icon in the Windows taskbar, you will see the last few documents you opened in that program. For example, when you right-click the Word icon in the taskbar, the most recently opened Word documents are displayed so you can quickly access them.
However, some users reported that Word not showing recent documents. Why does this issue occur?
Why Word Recent Documents Not Showing in Taskbar
Many reasons can cause the problem of “Word recent documents not showing in the taskbar”. Listed below are the most common causes.
- When you log out from your Microsoft account, all actions and changes you make to your MS account may not be recorded, resulting in Word not showing recent documents.
- The Recent Documents feature is disabled or set to show 0 files.
- You removed the recent files from the recent file list by accident.
How to Fix Word Not Showing Recent Documents in Win 10 Taskbar
Solution 1. Re-Login Your MS account
As said before, when you sign in to Word with the same Microsoft account, your operations to Word documents can be recorded and synced to the server. So, when Word recent documents not showing, you are supposed to re-sign into your account.
Step 1. Open a blank Word document, and then click File > Account.
Step 2. Under the Sign in to Office section, click Sign In.
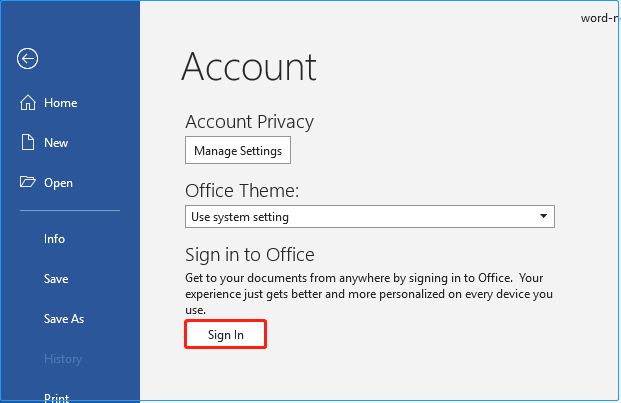
Or you can directly click the Sign in button in the upper right corner of a Word document.
Step 3. Input your Microsoft email and password to log into your account.
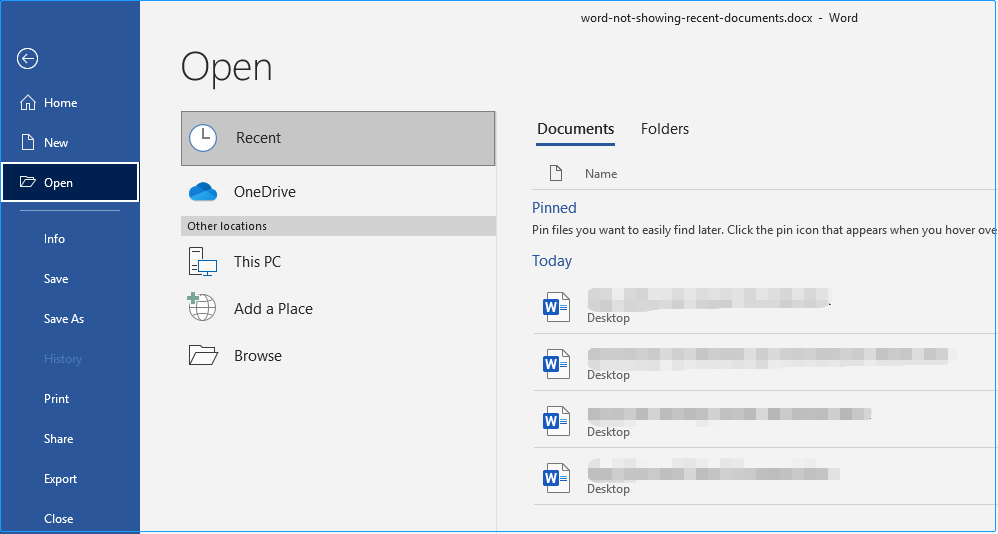
Now you can click File > Open > Recent to view recently opened documents or see them by right-clicking the Word icon in the taskbar.
Solution 2. Re-Enable the Recent Documents Feature
Generally, the Recent Documents feature is enabled by default in Word. However, sometimes it is turned off by mistake or misconfigured. If logging in to your Microsoft account did not fix the “Word not showing recent documents” issue, you can re-enable and reset the Recent Documents feature.
Tip: If the Recent Documents feature is turned off and you then turn it back on, only the files you opened and saved after turning this feature on will be listed in the taskbar.
Follow the steps below to complete the necessary actions.
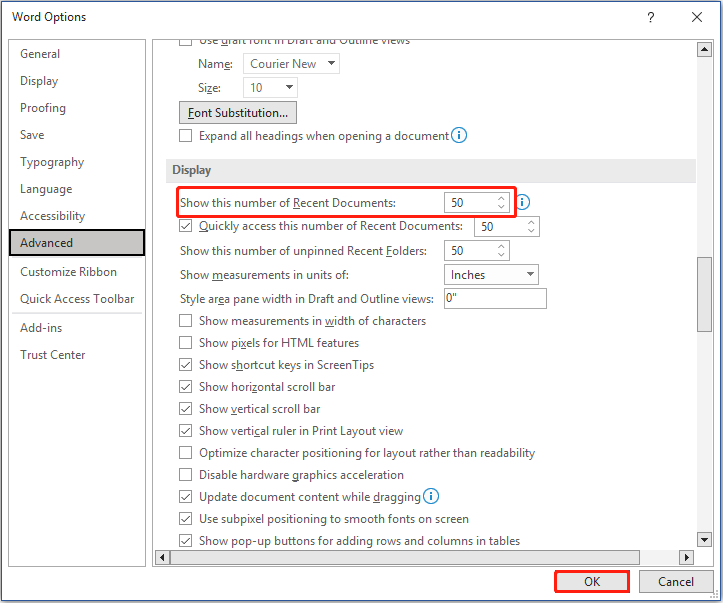
Step 1. In a Word document, click File > Options > Advanced.
Step 2. In the Word Options window, scroll down to find the Display section. In the “Show this number of Recent Documents” list, select the number of recent files to display. Then click OK.
After performing these actions, you should be allowed to see Word recent files. If this solution fails to work, your Word recent documents could be deleted.
You can search for the required files on your computer or check the Recycle Bin to find recent documents in Word.
If you cannot find or recover them because the Recycle Bin is grayed out or for other reasons, just keep reading to get the best data recovery solution.
How to Recover Lost Word Recent Documents
When it comes to Word document recovery, MiniTool Power Data Recovery, the best data recovery software, is strongly recommended to you.
MiniTool Power Data Recovery is not only suitable for Word document recovery, but also supports recovery of other Office documents, pictures, videos, emails, audio, and other types of files. It supports multiple data loss situations, such as virus infection, mistaken deletion, OS crash, hard drive failure, etc.
More importantly, it works great on computer hard drive data recovery, SSD data recovery, SD card data restoration, USB drive file recovery, external hard drive data recovery, and so on.
Besides, it offers you clear and concise interfaces so that you can carry out Word document recovery easily and quickly in Windows 11/10/8/7.
Click the following button to get MiniTool Power Data Recovery installed and give it a try.
MiniTool Power Data Recovery FreeClick to Download100%Clean & Safe
Major steps to recover lost Word recent documents on Windows.
Step 1. Select the target drive or location to scan.
Launch MiniTool Power Data Recovery to enter its home page. In the main interface of this professional file restoration tool, select the drive that contains your lost Word documents to scan.
If the deleted or lost documents were located on the desktop, you can select to scan the desktop individually, doing this can save you much time.
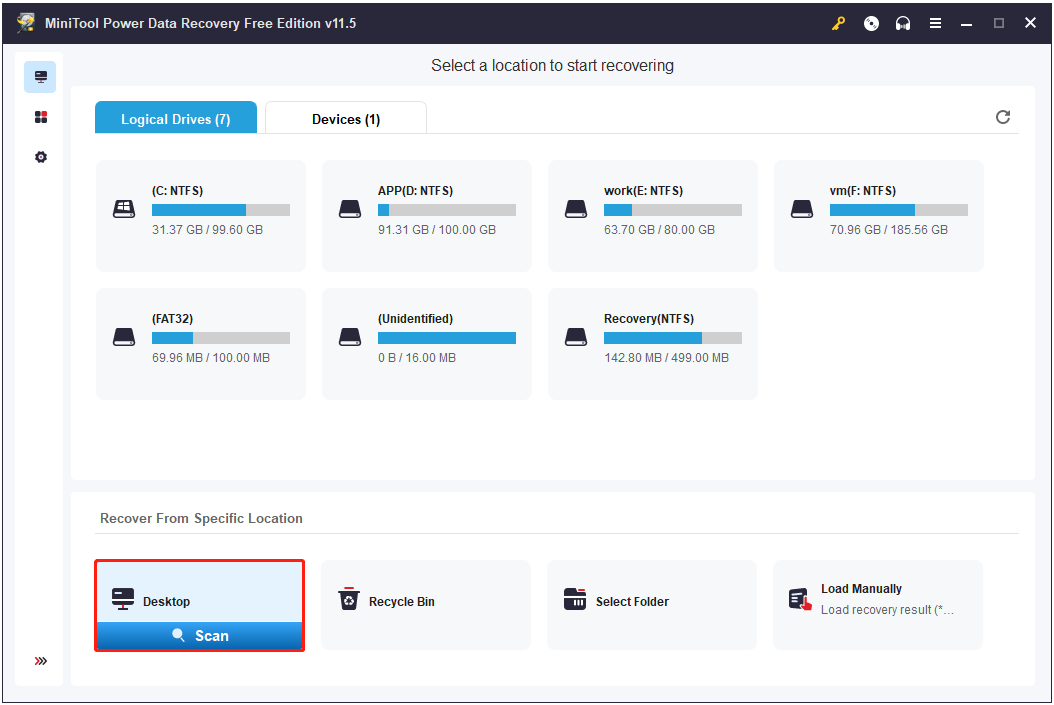
After clicking the Scan button, MiniTool Power Data Recovery will scan the desktop immediately.
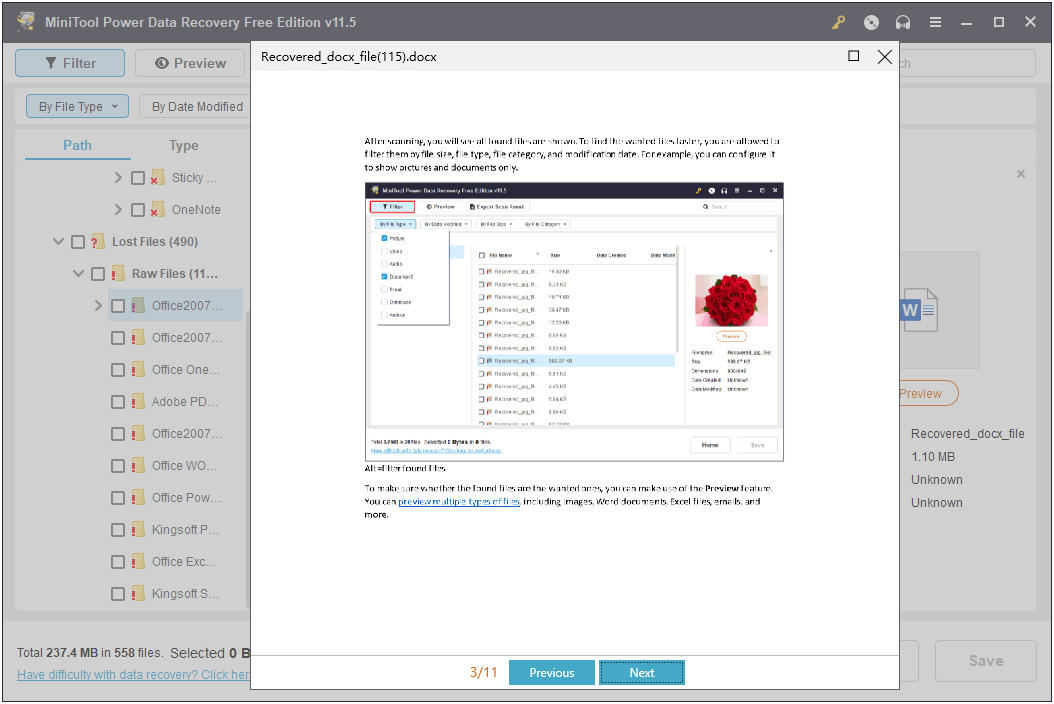
Step 2. Find and preview needed files.
After scanning, all files found on your desktop will be displayed in the scan result window. Since there are lots of data with multiple file types, you can make use of the Filter feature to specify needed file types.
To recover Word recent documents, you can check the Documents option only. Also, you can set up the file modification date and file size.
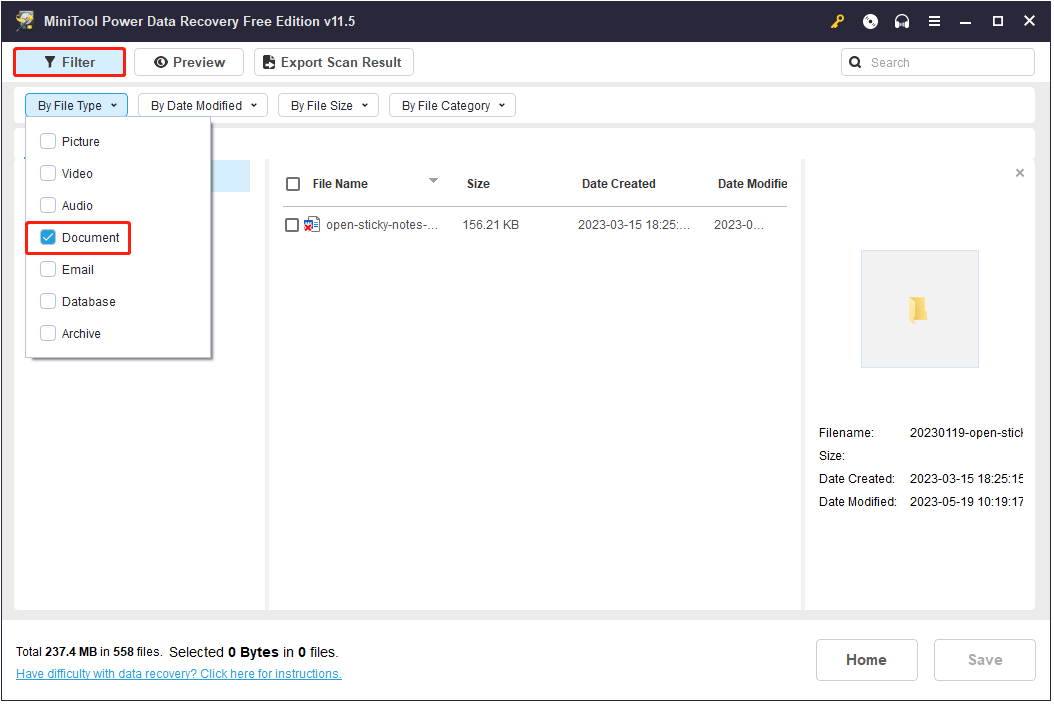
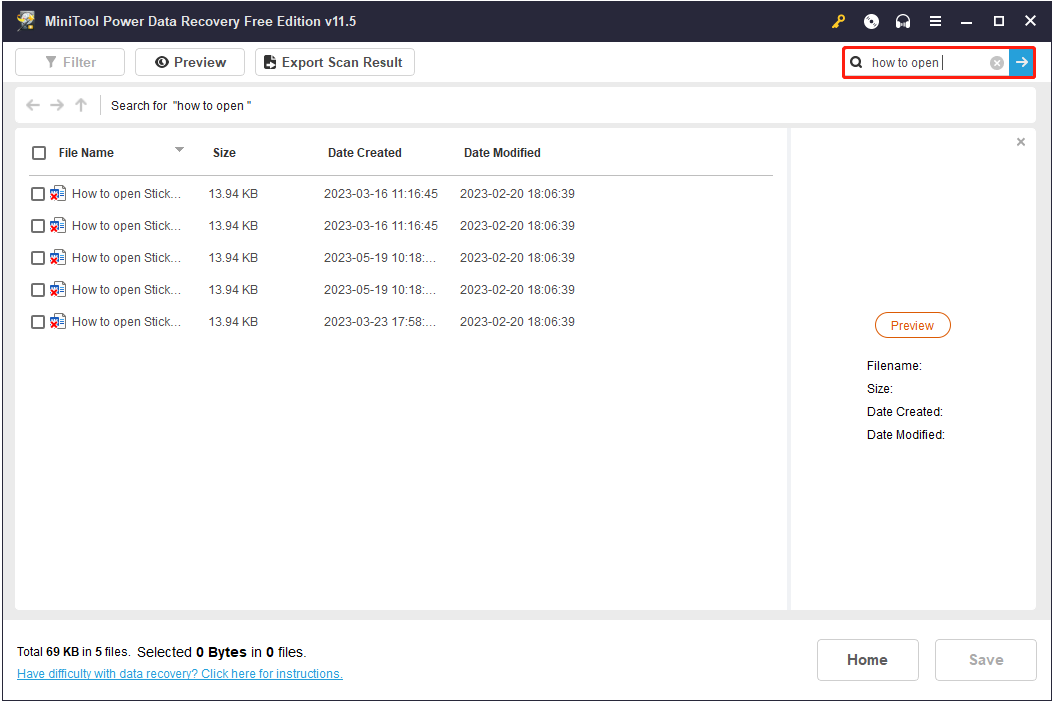
In addition, you can search for a specific Word document by its file name using the search box.
To make sure the found files are the desired ones, you can preview them. Multiple file types are supported to preview, such as DOC, DOCX, XLS, XLSX, PDF, PPT, JPEG, JPG, etc.
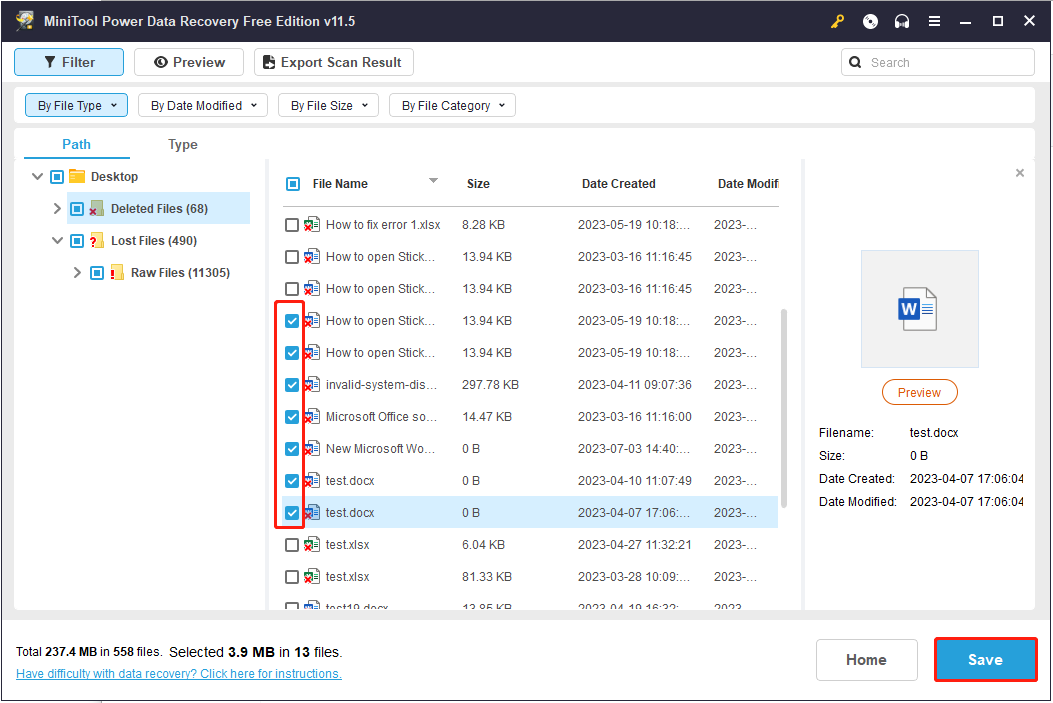
Step 3. Check all required files and save them.
Once you locate the wanted Word documents, you need to check them and then click the Save button to store them. It is strongly suggested that you do not store found files where they get lost in case of data overwriting.
Tip: MiniTool Power Data Recovery Free supports 1 GB of free file recovery. To break this data restoration limitation, you need to choose an advanced edition. For details on the different versions, see MiniTool Power Data Recovery License Comparison.
Wrapping Things Up
Is Word not showing recent documents? Try the methods listed above to make them display or use MiniTool Power Data Recovery to get lost Word documents back.
MiniTool Power Data Recovery FreeClick to Download100%Clean & Safe
If you have come across any other good solutions to the Word recent documents not showing in the taskbar issue, or have any questions about MiniTool Power Data Recovery, please feel free to leave your comments below or send an email to [email protected].
About The Author

Position: Columnist
Shirley graduated from English major and is currently an editor of MiniTool Team. She likes browsing and writing IT-related articles, and is committed to becoming a professional IT problem solver. The topic of her articles are generally about data recovery, data backup, and computer disk management, as well as other IT issues. In spare time, she likes watching movies, hiking and fishing.