A great many people want to use DVR hard drives as storage of digital video recorders. To use the hard drive on PC, you need to format it. How to format DVR hard drive for PC use? If you are also searching for a guide, this post of MiniTool is what you need.
About DVR Hard Drive
DVR hard drives are mainly used to record and store videos that are captured from a surveillance camera or a digital video recorder. At present, Seagate and WD DVR hard drives are the most popular ones. These DVR storage devices can be connected to a PC and let you watch the recorded videos easily.
–image from newtechindustries.com
To use the hard drive on a PC, you need to unlock it and then format to a compatible file system in advance. How to unlock DVR hard drive to the computer? What format does DVR hard drive use? Let’s keep reading.
![How to Import Foreign Disk Without Losing Data [Latest Update]](https://images.minitool.com/minitool.com/images/uploads/2021/06/foreign-dynamic-disk-thumbnail.jpg)
What Format Does DVR Hard Drive Use
The format depends on your computer’s operating system. On a Windows PC, the FAT32 is the most used file system format since its universal compatibility. But the biggest drawback is that you cannot store a single file larger than 4GB in FAT32. So, you can format the DVR hard drive to NTFS if you want to store extra-large files.
If you want to use the DVR hard drive on a Linux computer, then you need to format it to Ext4/3/2. On a macOS PC, you can format the DVR storage device to Refs. In addition, you need to choose the right DVR system that all security requirements can be fulfilled. This is because some DVR hard drives support Windows, while some others support Linux.
How to Connect/Unlock DVR Hard Drive to Computer
Another important thing is to unlock hard drive for DVR. To do so, you need to prepare a Philips screwdriver beforehand. Then carefully follow the steps below to remove and connect the DVR hard drive to your PC.
Step 1. Turn off your computer completely, and then unplug any peripherals and power cables.
Step 2. Remove all the screws at the side panel of your computer using a screwdriver.
Step 3. Inside the computer case, remove the screws at the edge of an empty drive bay. Then remove the screws from the sides of the drive bay and pull them out of the drive.
Step 4. Slide the DVR hard drive into an empty slot in the drive tray and make sure the connector side of the disk should be in the outward direction. Once done, reattach the screws.
Step 5. Pull out the power plug and data cable from the drive bay. Then connect the power plug to the power socket at the back of the DVR hard drive, and connect the data cable into the data socket.
Step 6. Once you have connected the DVR disk to the computer, you can slide the drive tray back into the bay and reattach the screws.
Step 7. Put back the side panel and close the computer case.
Now, you can turn on your computer and check if the DVR hard disk can be recognized by the system. If it is, you start formatting the disk by using the following ways.

How to Format DVR Hard Drive for PC Use
In this part, we will introduce 4 ways for the DVR hard drive formatting on a Windows PC. You can choose one based on your demands.
Way 1. Use Disk Management
Disk Management is a Windows built-in partition manager that allows you to format a partition to FAT32 within 32GB. Here is a tutorial for you.
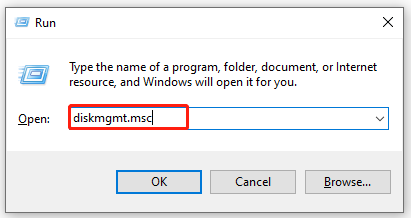
Step 1. Press Win +R keys to open the Run dialog box, and then input diskmgmt.msc in the text box and hit Enter to access Disk Management.
Step 2. In the pop-up window, right-click the partition on the DVR hard drive and select the Format option from the submenu.
Step 3. Select FAT32 from the File System drop-down menu. Also, you can set the Volume label and Allocation unit size for the hard drive. After that, click on the OK button to save the change.
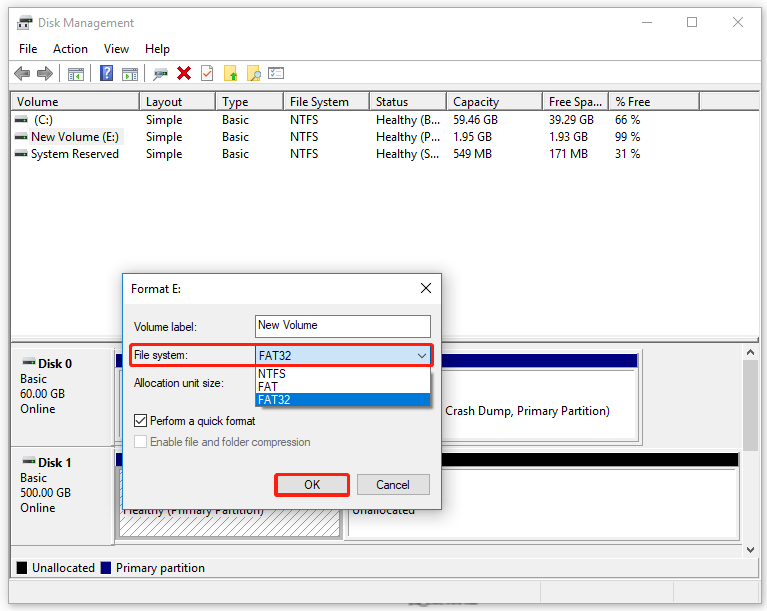
Step 4. Click on OK to confirm this operation.
If there are more than one partitions on the hard drive, you need to repeat the above steps until all partitions are formatted to FAT32.
Way 2. Use File Explorer
The File Explorer is another commonly used tool to format hard drive. To do so, you can follow the given steps below:
Step 1. Press Win + E keys to open the File Explorer and navigate to This PC from the left sidebar.
Step 2. Right-click the partition on the DVR hard drive and select Format from the pop-up menu.
Step 3. Select FAT32 from the File system drop-down menu, and then tick the checkbox of Quick Format and click on Start.
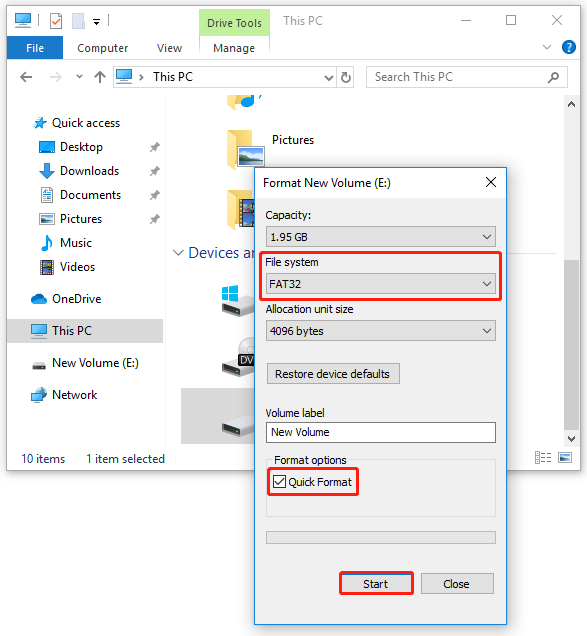
Step 4. Click on OK to confirm and finish the formatting. If there are several partitions on the hard drive, you should repeat these steps.
Way 3. Use Diskpart
Diskpart is a Windows command-line disk partitioning utility included in Windows 2000 and the later versions. It can be used to format a partition to FAT32/NTFS. Let’s see how to format DVR hard drive using this tool.
Step 1. Open the Run dialog box by pressing Win + R keys, and then input diskpart and hit Enter.
Step 2. In the command prompt, input the following commands one by one and hit Enter after each one.
- list disk
- select disk * (replace * with the number of your DVR disk)
- list partition
- select partition * (replace * with the drive letter of the partition on the DVR disk)
- format fs=fat32 quick
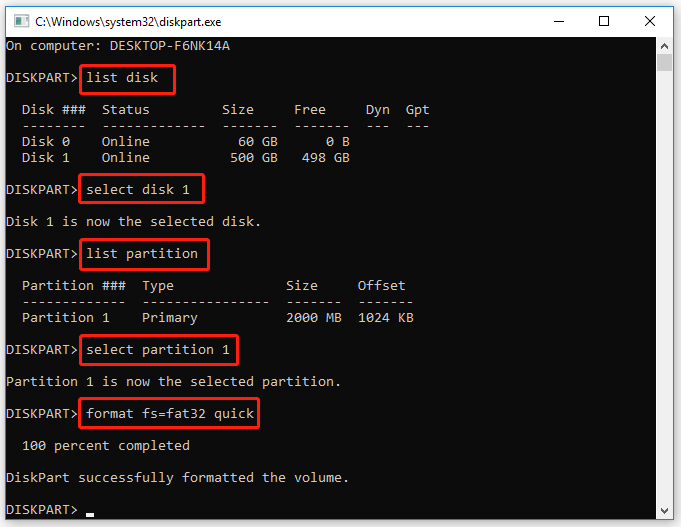
Step 3. Input Exit to close the command prompt.
The 3 Windows utilities are restricted in formatting a partition with a large capacity. In addition, you may encounter various issues when using these tools such as formatting takes forever, FAT32 partition size limit, etc. How to format a hard drive more quickly and easily? Let’s try the following method.
Way 4. Use MiniTool Partition Wizard
Here we highly recommend you use MiniTool Partition Wizard. It is a trusted multifunctional partition manager that can format a hard drive to FAT32/NTFS/exFAT, Ext2/3/4, and Linux Swap. Besides, it can help you convert NTFS to FAT without data loss, convert MBR to GPT, perform disk benchmark, check file system, and so on.
Here’s how to format DVR disk to FAT32 using MiniTool Partition Wizard:
MiniTool Partition Wizard FreeClick to Download100%Clean & Safe
Step 1. Select the partition on the DVR hard disk and click on Format Partition from the left pane. Also, you can right-click the partition and select Format from the pop-up menu.
Step 2. In the Format Partition window, select FAT32 from the File System drop-down menu and click on OK. To specify the partition, you can set the Partition label and Cluster size from here.
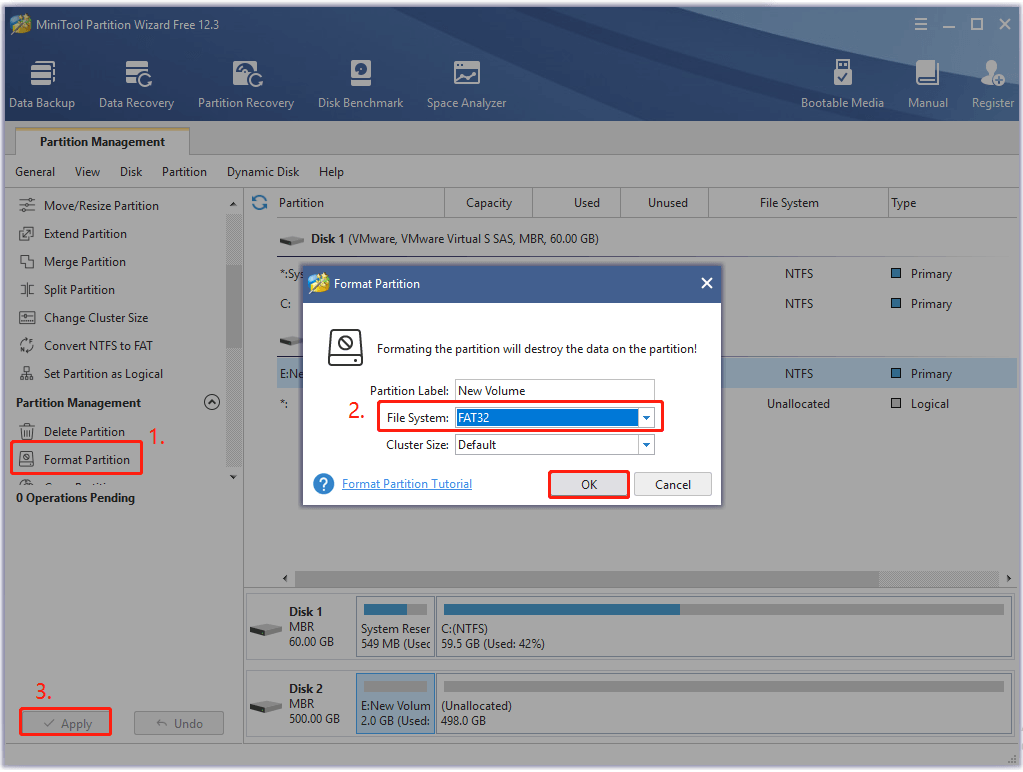
Step 3. Click on Apply to execute the formatting operation.
Now, the DVR hard drive formatting process should complete.
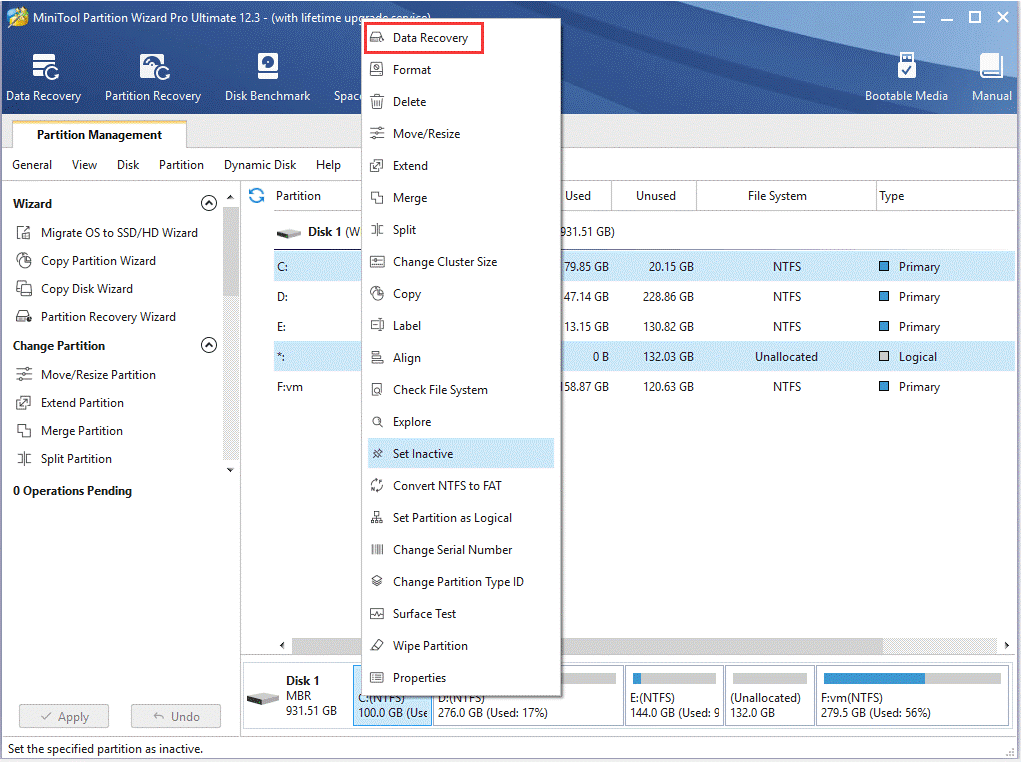
Bonus: How to Recover Lost Data from DVR Hard Drive
Sometimes, the DVR videos or images may get lost due to technical faults, human errors, and even natural calamities if you don’t have a backup. However, many users don’t know how to recover lost videos. If you are also trying to find the lost videos or images on the DVR drive, you can use MiniTool Partition Wizard.
Here are detailed steps to recover lost videos using MiniTool Partition Wizard.
MiniTool Partition Wizard DemoClick to Download100%Clean & Safe
Step 1. Open the main interface of this program, and then right-click the connected DVR drive and select Data Recovery.
Step 2. Then you need to wait for the program to scan the DVR drive. Once the lost videos are scanned, you can tick the checkboxes next to the needed files and click on the Save button.
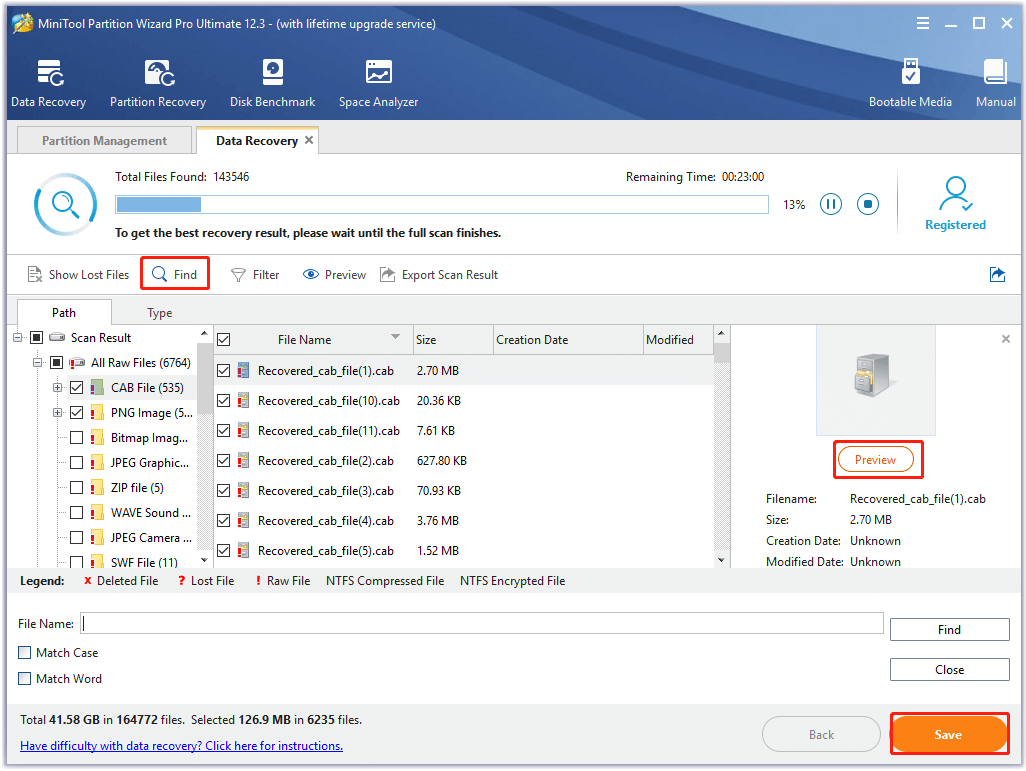
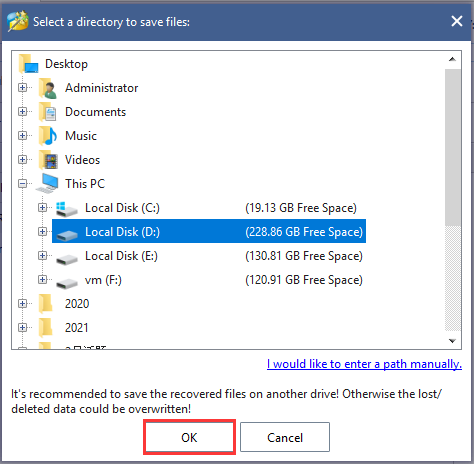
Step 3. Select a directory to save the recovered files and click on OK to confirm. Here we recommend you save them to another drive. Otherwise, the recovered data could be overwritten.
Bottom Line
This post mainly focuses on how to format DVR hard drive on a Windows PC. If you can’t format a large hard drive using the Windows built-in tools, MiniTool Partition Wizard is a good choice. Besides, you can use this tool to recover lost videos or images.
If you have any questions about the MiniTool software, you can send us an email to [email protected] and we will reply as soon as possible. We are glad to see your ideas or opinions for this subject in the commend area.
DVR Hard Drive FAQ
When purchasing a hard drive for DVR, storage size, compatibility, and power consumption are the main considerations. Here we summarize 3 best-buy DVR hard disks for you:
- WD Purple Surveillance Hard Drive
- Seagate Skyhawk Surveillance Internal Hard Drive
- MaxDigitalMedia Internal Surveillance DVR Hard Drive
- Press the DVR button on your recorder and press the Red color or Options
- Select Manage Recording and use the arrow keys to select the recording that you want to back up.
- Select the external hard drive and select Transfer.
- Once the transfer progress complete, click on OK.
The most common way is to add an external hard drive that is compatible with your DVR system. Here’s how to use it:
- Use an eSATA cable to connect the external hard drive.
- Navigate to the SATA port at the back of the DVR and the back of the external hard drive.
- Plug the eSATA cable into the SATA port of the DVR and the other end into the SATA port of the external hard drive.
- Plug the DVR into a power outlet and turn on it. Once reboots, it will automatically detect the external hard drive.
About The Author

Position: Columnist
Ariel has been working as a highly professional computer-relevant technology editor at MiniTool for many years. She has a strong passion for researching all knowledge related to the computer's disk, partition, and Windows OS. Up till now, she has finished thousands of articles covering a broad range of topics and helped lots of users fix various problems. She focuses on the fields of disk management, OS backup, and PDF editing and provides her readers with insightful and informative content.