Diskpart Clean Not Working
DiskPart is an inbuilt command-line hard drive partitioning program in Windows. It allows you to partition internal or external hard drives and format removable storage devices like USB drives. The Clean command is one of its commands that can remove any and all partitions or volume formats from the drive.
Sometimes, some of you may encounter DiskPart Clean not working when trying to use this command to erase your external drive. In this condition, you are likely to receive the following error messages:
- DiskPart Clean access is denied.
- DiskPart Clean device is not ready.
- DiskPart has encountered an I/O device error.
- DiskPart has encountered an error: the media is write-protected.
- DiskPart has encountered an error: Data error <cyclic redundancy check>.
As per the different types of error messages that you may meet, we will show you the corresponding fixes respectively for you.
How To Fix DiskPart Clean Not Working on Windows 10/11?
Fix 1: Reconnect Your Target Drive to Your PC
When the external hard drive, USB drive, or SD card is not connected properly to your computer, it will lead to Diskpart not working with the Device not ready error on Windows 11/10/8. As a result, you can consider reconnecting your external hard drive, USB drive, or SD card.
Step 1. Unplug the USB drive or SD card from your PC. As for a hard drive, reinstall it via a power cable and a SATA cable.
Step 2. Reconnect the device to your computer.
Step 3. Log in to your computer as an administrator.
If you still cannot load the Clean command in DiskPart, please move to the next solution.
Fix 2: Unlock the Drive & Remove Write Protection
Make sure that your disk is not write-protected or occupied by other programs, or else it will also trigger Diskpart Clean not working on your Windows PC. To do so, you can follow the guidelines below:
Preparation: Check If the Drive is Locked or Occupied
Step 1. Connect the target device to your computer.
Step 2. Press Win + E altogether to launch File Explorer.
Step 3. Go to This PC and turn on your device under Devices and drives to check whether the data on it is accessible or not.

You may receive two error messages: the media is write-protected or Data error <cyclic redundancy check>. The former means that the device is write-protected and the latter indicates that it is being occupied by a running program or file without your knowledge.
If you do receive either of the messages above, you can try to unlock the drive or remove the write protection. Therefore, you need to unlock, decrypt, and remove the write protection to make Diskpart Clean work properly. There are two options for you: remove write protection by editing the registry key or remove the read-only state from the target device.
# Way 1: Remove Write Protection by Editing the Registry Key
When you confirm that the target device is write-protected, you can edit the relevant registry key to remove the write protection.
Step 1. Connect the target device to your computer.
Step 2. Press Win + R to open the Run dialog > type regedit > hit Enter to open Registry Editor.
Step 3. Navigate to the following path: HKEY_LOCAL_MACHINE\SYSTEM\CurrentControlSet\Control\StorageDevicePolicies.
Step 4. In the right pane, find the write Protection key and double-click it to change its value to 0.
Tip: If you cannot find StorageDevicePolicies, you can create it manually: right-click on Control > select New > hit Key > rename the new key to StorageDevicePolicies > right-click it to choose New > hit Dword > specify the name as WriteProtect > double-click WriteProtect to set the value to 0.
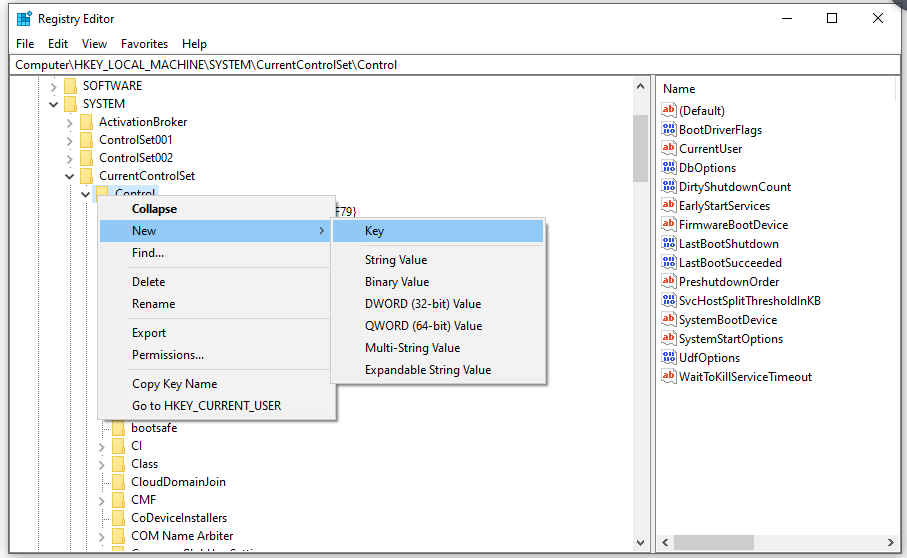
Step 5. Hit OK to save the changes. Finally, close Registry Editor and reboot your computer.
# Way 2: Remove Read-Only State from Device
There is a chance that your external hard drive, USB drive, or SD card shows as Read-only in Disk Management. If so, take the steps below to clear this state:
Step 1. Connect this device to your computer.
Step 2. Type cmd in the search bar to locate Command Prompt and hit it.
Step 3. In the command window, type diskpart and hit Enter.
Step 4. type list disk and hit Enter to show all the disks on your computer.
Step 5. Type select disk # and hit Enter. (# should be the actual disk number of your read-only device.) Here, we take removing read-only for volumes on disk 1 as an example, so we type select disk 1 and hit Enter.
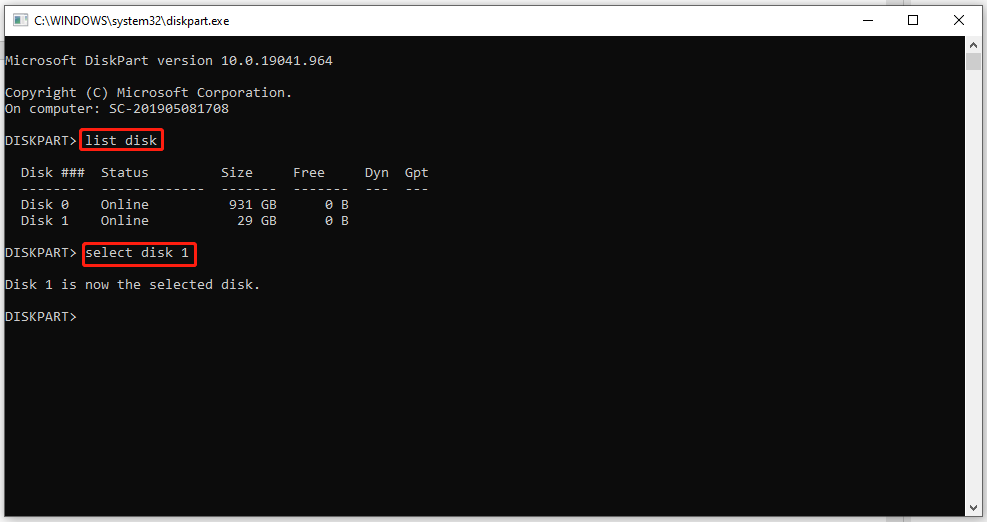
Step 6. Type attributes disk clear readonly and hit Enter.
Fix 3: Run CHKDSK in Command Prompt
When DiskPart Clean stops working, you may receive a message telling you that DiskPart has encountered an error: The request could not be performed because of an I/O device error. This I/O (short for Input/Output) device error indicates that there are logically bad sectors, corrupted partition tables or physical sectors.
Although most disk I/O errors are caused by physical damage of the disk, running CHKDSK is also worth a try. Here’s how to do it:
Tip: In addition to running CHKDSK, you can also try reinstalling or updating Disk driver.
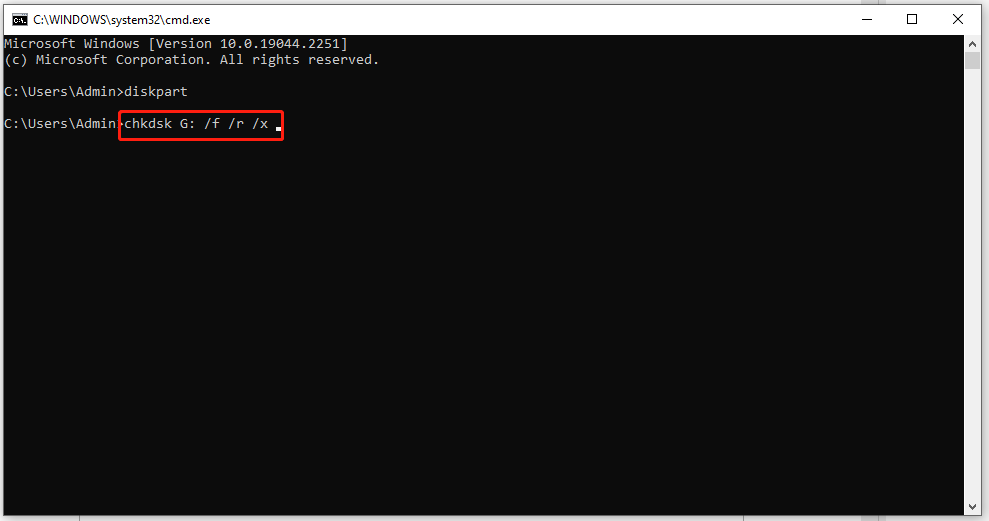
Step 1. Run Command Prompt as an administrator.
Step 2. Copy & paste chkdsk G: /f /r /x into the command window and hit Enter. G refers to the drive letter of the partition you want to repair, you should replace it with yours.
Tip: Do you know what the differences among SFC, DISM, CHKDSK, and ScanDisk are? See this guide to get the answer: CHKDSK vs ScanDisk vs SFC vs DISM Windows 10 [Differences].
Fix 4: Wipe the Drive Using Diskpart Clean Command
If you receive the Access is denied error, chances are that the wiped disk contains system files hence Diskpart Clean not working occurs. Therefore, it is a good option to boot your computer from a bootable drive and erase the target device in the Windows PE.
Step 1. Prepare a Windows installation disk, insert it into your computer and boot from it.
Step 2. Press Repair your computer > Troubleshoot > Advanced Options > Command Prompt.

Step 3. Run the following commands one by one to clear the disk. Don’t forget to hit Enter after each command.
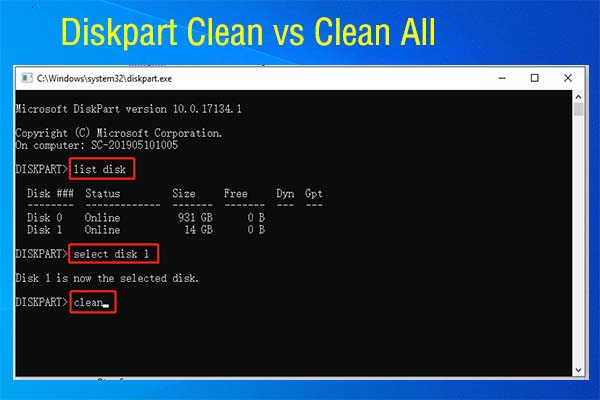
diskpart
list disk
select disk #
clean all
Tip: Also, replace # with the actual disk number of your target device.
Fix 5: Wipe the Drive Using Diskpart Clean Alternative – MiniTool PartitionWizard
If you are not familiar with Command Prompt, the first method to use the Clean All command might not be the best choice for you to erase a disk because it is easy to make mistakes. Therefore, it is advisable to use a more user-friendly disk-wiping solution – MiniTool PartitionWizard.
MiniTool Partition Wizard FreeClick to Download100%Clean & Safe
This free partition manager provides you with simple ways to organize disk partitions which is fully compatible with Windows 11/10/8.1/8/7. Even if you are a computer beginner, you can erase your disk easily with just a few clicks. Here’s how to do that:
Step 1. Launch the program and select the disk that you need to wipe from the right pane.
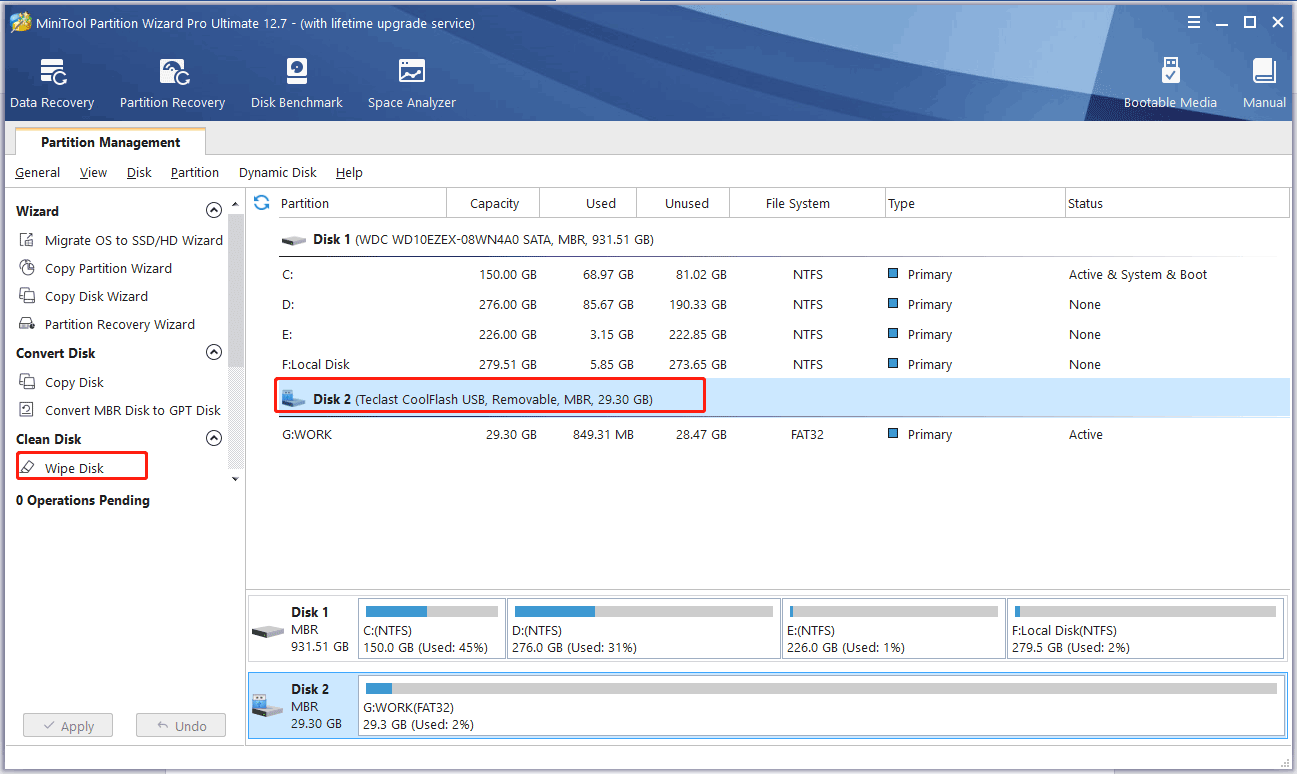
Step 2. Click on Wipe Disk from the left action panel and then you will be prompted by a warning message informing you to select one of the five wiping methods. Just choose one and hit OK.
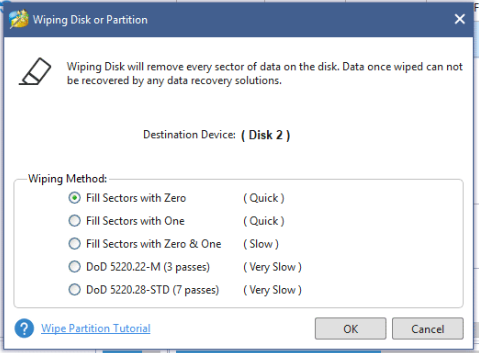
Tip:
- Generally speaking, the latter two methods are more time-consuming but safer.
- If you choose either of them, it will be pretty hard to recover the wiped data.
Step 3. Now, you will see a preview page in which the selected disk becomes unallocated. Finally, hit Apply to perform the changes.

Suggestion: Back up Your Files Before Wiping Disk
After using the solutions below, the DiskPart Clean command on your PC may work properly now. However, you cannot be too cautious when using this command because there is no confirmation message before running it. What’s more, although you can undo the DiskPart Clean command, the process is pretty troublesome if you select the wrong object.
At the same time, wiping the disk will erase all the data on your computer. If you use MiniTool PartitionWizard or continue to use the DiskPart Clean command to wipe your disk, it is necessary to back up your precious personal files to another external drive to before proceeding.
Here, we recommend creating a backup of your files with a piece of reliable and professional backup software – MiniTool ShadowMaker. This free tool is dedicated to helping you to back up your files, folders, systems, partitions, and disks with easy steps. Now, create a file backup with us:
Step 1. Download, install and launch this program. Click the following button to get a 30-day free trial.
MiniTool ShadowMaker TrialClick to Download100%Clean & Safe
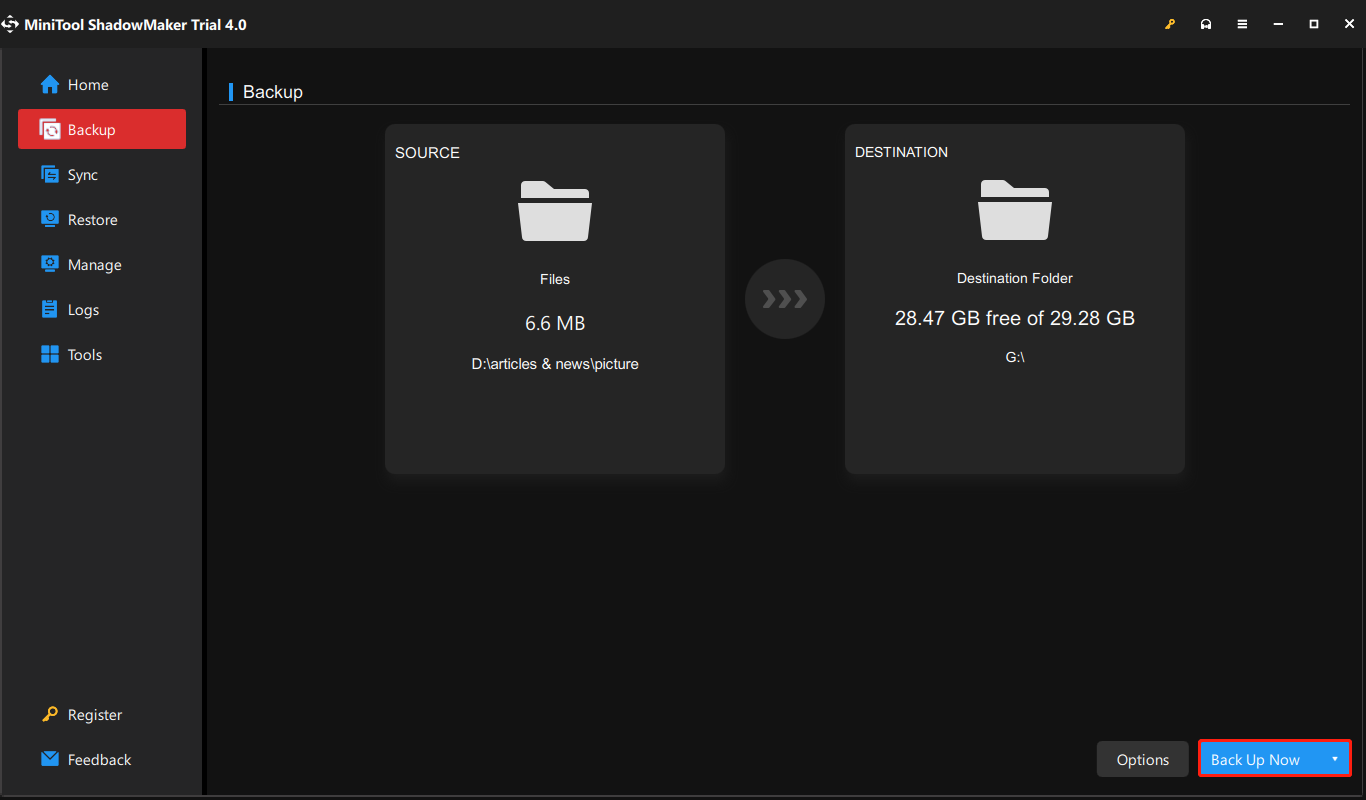
Step 2. Click on Keep Trial and then go to the Backup page.
Step 3. Go to SOURCE > Folders and Files to select a backup source. After making your decision, hit OK to return to the Backup page. In DESTINATION, choose a storage path for your backup.
Step 4. Hit Back Up Now to start the backup task right away.
We Need Your Voice
In this guide, we show you 5 viable solutions to fix DiskPart Clean not working as per different conditions. The last solution is preferred by most people. Besides, we also sincerely advise you to back up your important files before wiping the target disk. Do you have other ideas about this issue or our service? Leave your comment below or contact us via [email protected].
Diskpart Clean Not Working FAQ
The DiskPart Clean command not working can be caused by the reasons below:
- The target hard drive, USB drive or SD card is not correctly connected to your PC.
- The disk is locked or write-protected.
- There are logically bad sectors, corrupted partition tables or physical sectors.
- The wiped disk contains system files.
Press Win + R to open the Run box > type diskpart > hit Enter, then type the following commands one by one and hit Enter after each of them:
- list disk
- select disk X (X stands for the number of the disk to wipe)
- clean
The DiskPart Clean command can help you to erase a disk and it will delete any and all partitions or volume formats from the disk.
Launch Command Prompt as an administrator and then run the following command one by one:
- diskpart
- list disk
- select disk x
- list partition X
- delete partition override
Remember to replace x with your target disk number and X for the selected partition number.
About The Author

Position: Columnist
Aurelie is a passionate soul who always enjoys researching & writing articles and solutions to help others. Her posts mainly cover topics related to games, data backup & recovery, file sync and so on. Apart from writing, her primary interests include reading novels and poems, travelling and listening to country music.