What Is Drive Letter
A drive letter is a single alphabetic character ranging from A to Z that is used to designate a storage device in DOS (Disk Operating System) and Windows systems. In general, every drive in your system will be assigned a unique drive letter, making it easier to identify and locate.
About Windows Not Assigning Drive Letter Automatically
When you are attempting to connect a USB flash drive or other external storage device to the computer, your Windows will always automatically assign a drive letter to its partition. However, this process will not always succeed and sometimes you may notice Windows cannot assign drive letter to partition on the connected disk.
The “Windows 10/Windows 11 not assigning drive letter” issue can happen due to various reasons, such as the incompatible file system, outdated Windows, virus infection, and so on. To solve this issue, some effective methods are listed in this post. Simply follow them to sort out your problem if you face the same issue.
Note: Before troubleshooting the issue with advanced solutions, you’d better make sure that you have a proper Windows version supporting automatically assigning drive letters and that the file system of the connected drive is compatible with your computer. Besides, you can run a specified scan to check if there is a virus preventing Windows from assigning drive letters.
Method 1: Start the Virtual Disk Service
The Virtual Disk service plays an important role in the disk management of your computer. If it is disabled, certain disk problems may come out, including the “Windows not assigning drive letter” issue. Therefore, once you run into this issue, you’d better check if the Virtual Disk service is enabled. If not, follow the guide below to start it.
Tip: If the service has been started, you can try right-clicking it and select Restart to re-enable it. This may sometimes help solve problems.
Step 1: Press Windows + R to open the Run dialog.
Step 2: Type services.msc in the text box and then click OK to enter the Services window.
Step 3: Scroll down to find Virtual Disk in the right panel. Then right-click this service and select Properties.
Step 4: In the next window, set Startup type as Automatic. Then click the Start button to run this service.
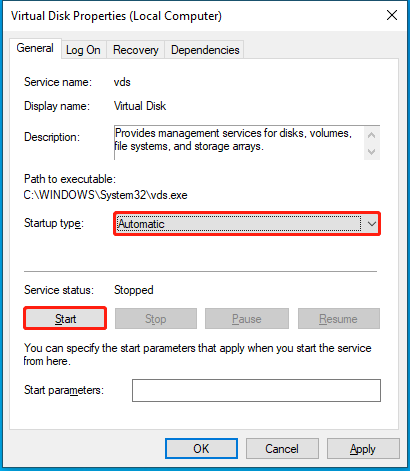
Step 5: At last, click Apply and OK to save the changes. You can now safely eject the external hard drive from your PC and then reconnect it to see if the “Windows 10 not assigning drive letter” issue persists.
Further reading:
If you are unable to start the Virtual Disk service in the Services app, then you can try the following instructions.
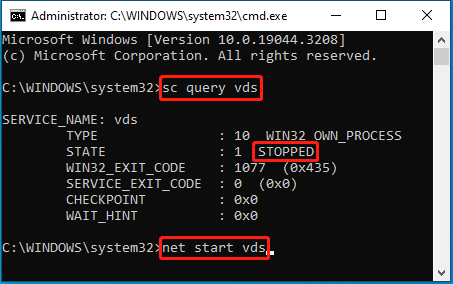
- Type cmd in the Run dialog box.
- Press Ctrl + Shift + Enter to open Command Prompt with administrative privileges.
- Type sc query vds and then press Enter to obtain and display detailed information about the Virtual Disk
- If the state is STOPPED, type net start vds and press Enter to enable this service.
- After that, reconnect the device to see if it has a drive letter.
Method 2: Enable Automatic Mounting of New Volumes
When you connect an external hard drive to your computer, the system will automatically mount the added drive and assign a drive letter to it by default with the Automatic mounting of new volumes (automount) feature. If you disable this feature accidentally, you are likely to find Windows 10 or Windows 11 not assigning drive letter when you connect a new drive to the PC.
Tip: If you want to learn more about disabling or enabling automount, you can pay attention to this post: How to Disable or Enable Auto-Mounting of New Disks and Drives.
In this case, you can try to get rid of the “Windows not assigning drive letter” issue by enabling automount. Here’s a full guide on how to do this.
Step 1: Run Command Prompt as an administrator.
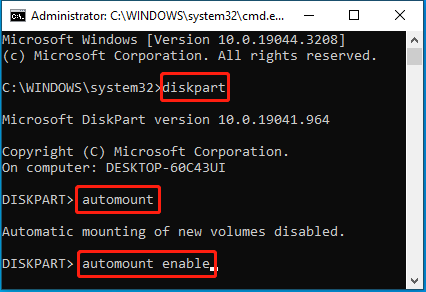
Step 2: Type diskpart and press Enter to open the Diskpart utility.
Step 3: After that, type automount and press Enter to check the status of the automount feature.
Step 4: If a message saying “Automatic mounting of new volumes disabled” shows up on the screen, you should then type automount enable and press Enter to execute this command.
Step 5: Exit Command Prompt and connect the external drive back to your PC to check if your Windows will automatically assign a drive letter.
Method 3: Disable Hidden and No Default Drive Letter
If the Hidden and No Default Drive Letter attributes are enabled, you may experience the “Windows 11 or Windows 10 not assigning drive letter” issue as well. On this occasion, you can attempt to repair this issue by disabling the specific attributes. To do this, follow the steps below.
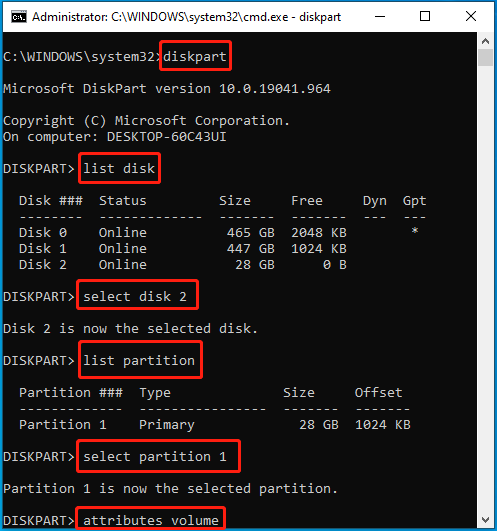
Step 1: Make sure the problematic storage device is connected to your computer. Then run Command Prompt as an administrator.
Step 2: In the elevated Command Prompt window, type diskpart and press Enter.
Step 3: After that, type the following commands one by one and press Enter after each to check the related attributes of the target drive.
- list disk
- select disk N (N represents the disk number of the connected storage device)
- list partition
- select partition X (Replace X with the number of the partition on the storage device)
- attributes volume
Step 4: If the Hidden and No Default Drive Letter attributes show Yes, you should execute the following commands to disable them.
- attributes volume clear Hidden
- attributes volume clear NoDefaultDriveLetter
Step 5: Once done, close Command Prompt and restart your PC to check if the “Windows not assigning drive letter” issue disappears.
Method 4: Assign the Drive Letter Manually
If Windows cannot assign drive letter to partition automatically yet after you apply the above methods, you can try assigning a drive letter manually. In this part, this post summarizes several ways that can help you complete the drive letter assignment. Just pick one according to your preference.
Way 1: Via Disk Management
Disk Management is a Windows built-in utility that helps you do basic management of your partitions and disks including adding or changing a drive letter. To assign a drive letter manually with Disk Management, you can follow the given steps.
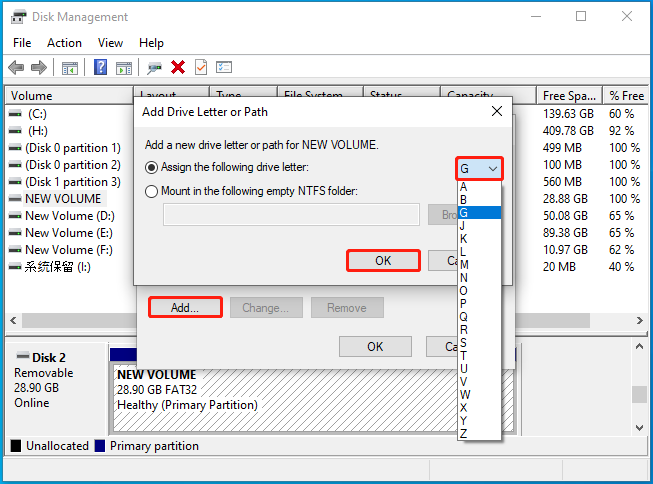
Step 1: Right-click the Start icon and select Disk Management.
Step 2: Right-click the partition on the connected disk. Then select Change Drive Letter and Paths.
Step 3: In the pop-up window, click the Add button to continue.
Step 4: Select Assign the following drive letter and then choose a suitable drive letter from the drop-down menu.
Step 5: After that, click OK to save the change.
Way 2: Via Diskpart
Diskpart is also a useful tool that can help you assign a drive letter to your partition. The following are details about this operation.
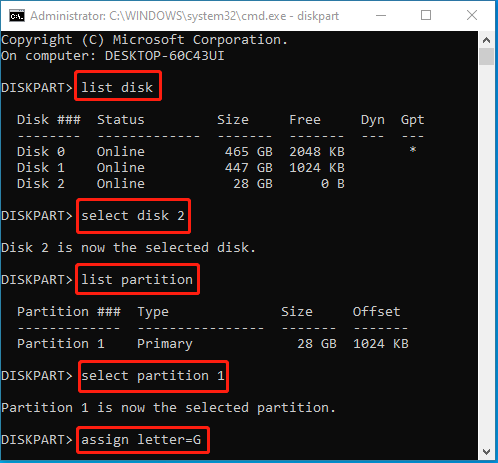
Step 1: Open the Run dialog. Then type diskpart in the text box and press Enter to run Diskpart.
Step 2: To assign a drive letter, you should run the following commands one by one.
- list disk
- select disk N (N refers to the disk number of the connected disk)
- list partition
- select partition X (X is the number of the partition on the target disk)
- assign letter=G (You can replace G with the drive letter you prefer)
Tip: In addition to the above commands, you can try assigning the drive with these commands as well:
- list volume
- select volume * (* represents the number of the target partition)
- assign letter=G
Diskpart Unassign Drive Letter in Windows 11/10 [Full Guide]
Way 3: Via MiniTool Partition Wizard
Although both Disk Management and Diskpart are helpful utilities allowing you to assign a drive letter effectively, they may randomly trouble you with unexpected issues, such as Change Drive Letter and Paths greyed out, Diskpart has encountered an error, and so on. In such cases, it’s recommended that you take advantage of third-party disk partition software.
As for this, MiniTool Partition Wizard is a great choice. It’s a professional partition manager that provides a wide range of features related to partitions and disks. For instance, it enables you to create/format/resize partitions, change the drive letter, recover data/partitions, migrate OS to SSD/HDD, etc.
Here, MiniTool Partition Wizard introduces how to assign a drive letter step by step. You can have a try.
Step 1: Download and install this program on your PC. Then launch it to get into the main interface.
MiniTool Partition Wizard FreeClick to Download100%Clean & Safe
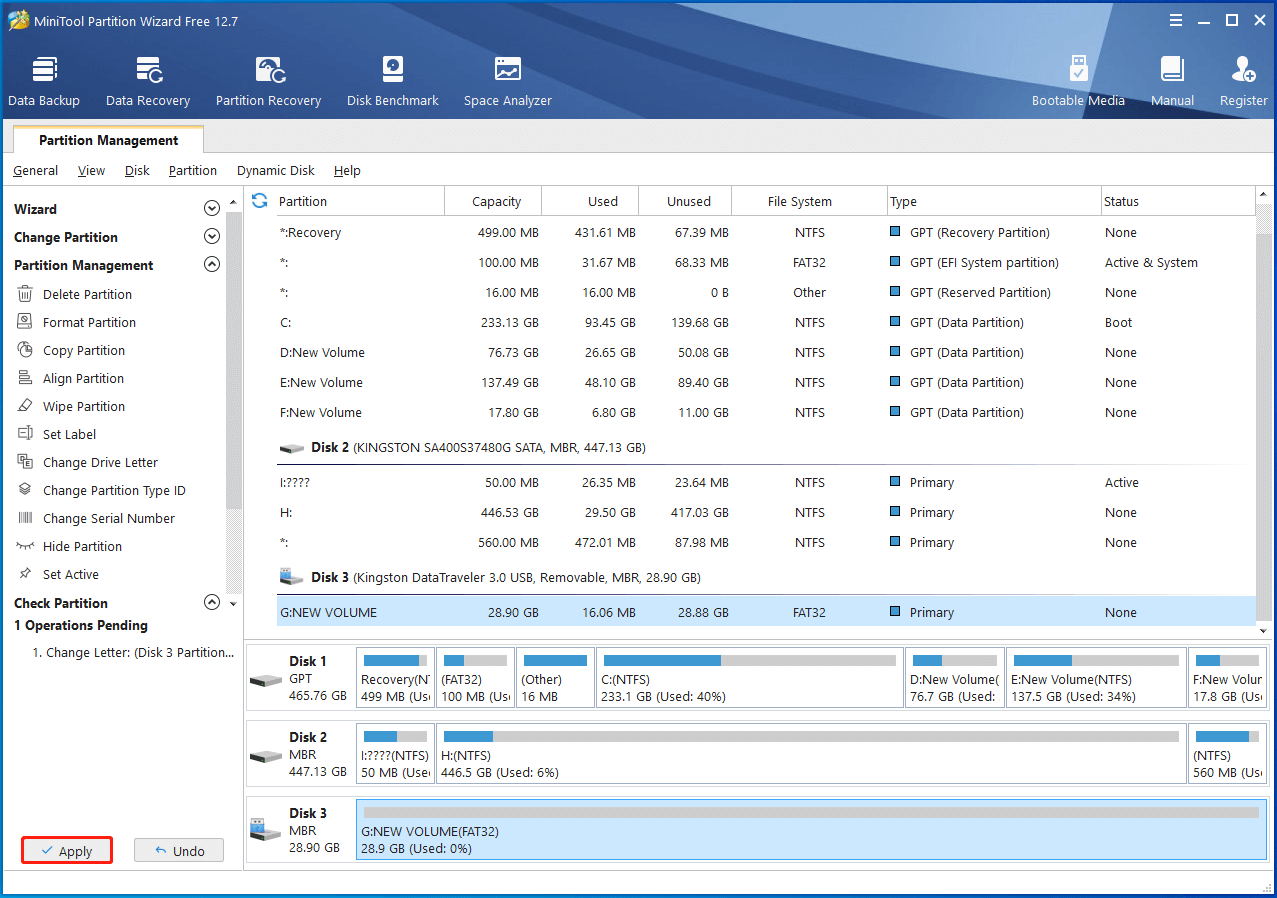
Step 2: Right-click the partition on the target disk and then select Change Letter. Alternatively, you can highlight the target partition and select Change Drive Letter from the left action panel.
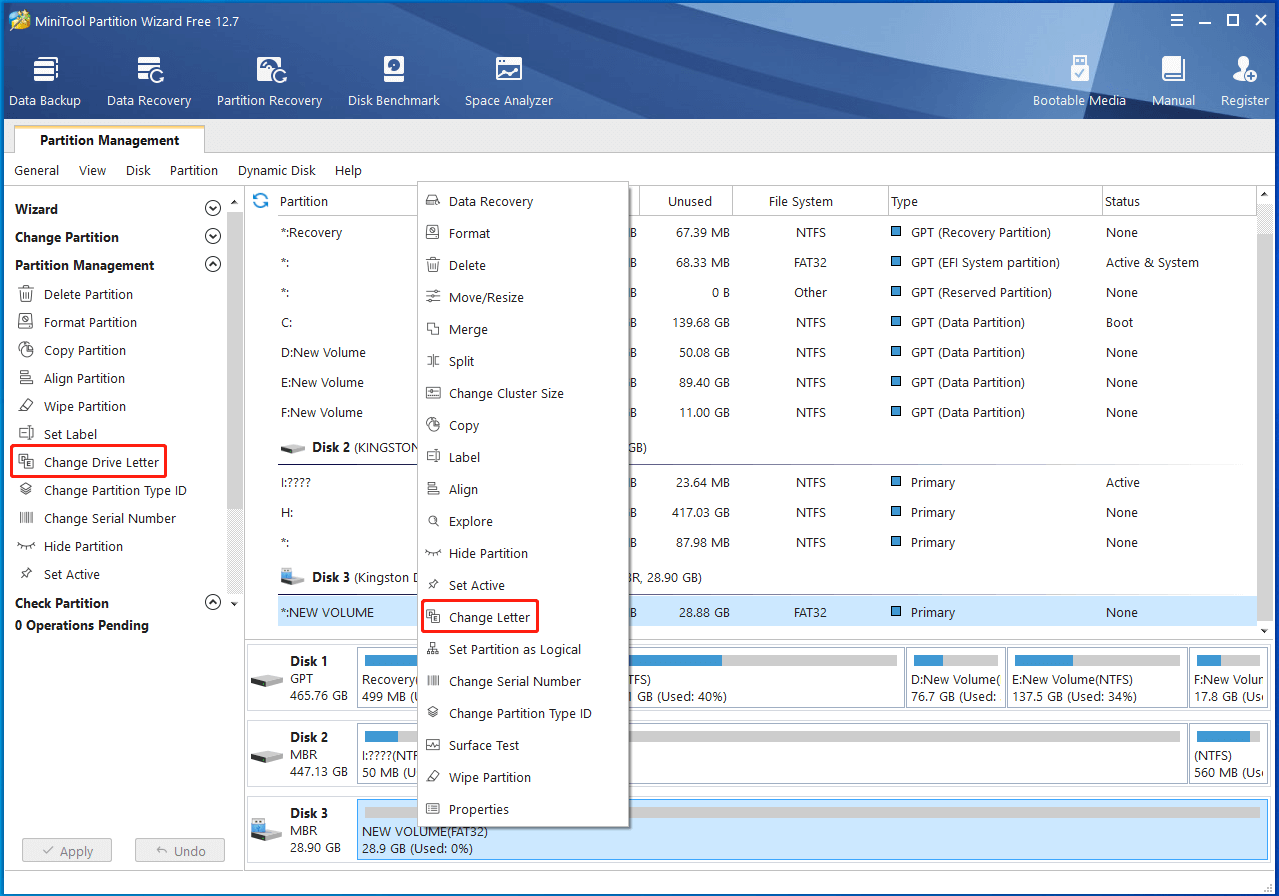
Step 3: Select a preferred drive letter and then click OK.

Step 4: Finally, click Apply to execute this operation.
Bottom Line
All the methods mentioned above are available. When you run into the “Windows not assigning drive letter” issue, you can try to fix it with the above methods. If you have any problems with this issue, you can leave a message in the comment area.
If you encounter any problems while using MiniTool Partition Wizard, you can contact us via [email protected]. We’ll reply to you as soon as possible.
About The Author

Position: Columnist
Yamila is a fan of computer science. She can solve many common issues for computer users by writing articles with simple and clear words. The very aspect that she is good at is partition management including create partition, format partition, copy disk and so on. When she is free, she enjoys reading, doing some excerpts, listening to music and playing games.