Do you know how to stop uploading updates to other devices on Windows 11/10? You can turn off Delivery Optimization to close this update upload path. MiniTool Software will show you how to stop uploading updates to other devices on Windows 11/10 in different situations.
Delivery Optimization: Allows You to Get Windows 11/10 Updates Faster
Microsoft releases Windows 11/10 updates via Windows Update. In most cases, your system can automatically detect the updates, then download and install them on your device. However, if your system doesn’t get the updates initiatively, you can go to Start > Settings > Windows Update to check for updates.
What Does Delivery Optimization Do on Your Windows 11/10 Computer?
When referring to the Windows 11/10 update, we need to talk about Delivery Optimization. It is a feature that allows your device to quickly download some Windows updates and Microsoft Store apps’ updates from multiple download points. The available points include the Microsoft servers and computers in the local network and the internet. Of course, your device also uploads updates for other computers in the local network when needed.
As a receiver, your computer can quickly download Windows 11/10 updates and app updates using less bandwidth and prevent saturation of connections to the Microsoft servers. As a supplier, your computer will need to use more system resources and bandwidth to upload the updates.
If your device is in a capped internet connection, you may be concerned about your privacy or you don’t like the update upload to use your internet connection. If so, what can you do? You can limit the bandwidth while uploading updates and limit the monthly upload capacity. You can also directly turn off the Delivery Optimization feature to stop your device from uploading updates to other devices on Windows 11/10.
In this article, we will show you how to stop uploading updates to other devices on Windows 11 and Windows 10. You can also find ways to limit the bandwidth while uploading updates and limit monthly uploads as per your requirements.
How to Turn off Delivery Optimization on Windows 11/10 to Disable Update Uploads and Downloads?
To disable update downloads and uploads, you can directly turn off the Delivery Optimization feature on your Windows 11/10 computer.
How to Turn off Delivery Optimization on Windows 11?
To prevent Microsoft from using your computer to upload system and app updates to other devices, you can turn off Delivery Optimization on your Windows 11 PC. Here is how to stop uploading updates to other devices on Windows 11 using this method:
Step 1: Press Windows + I to open the Settings app.
Step 2: Click Windows Update from the left menu, then click Advanced options.
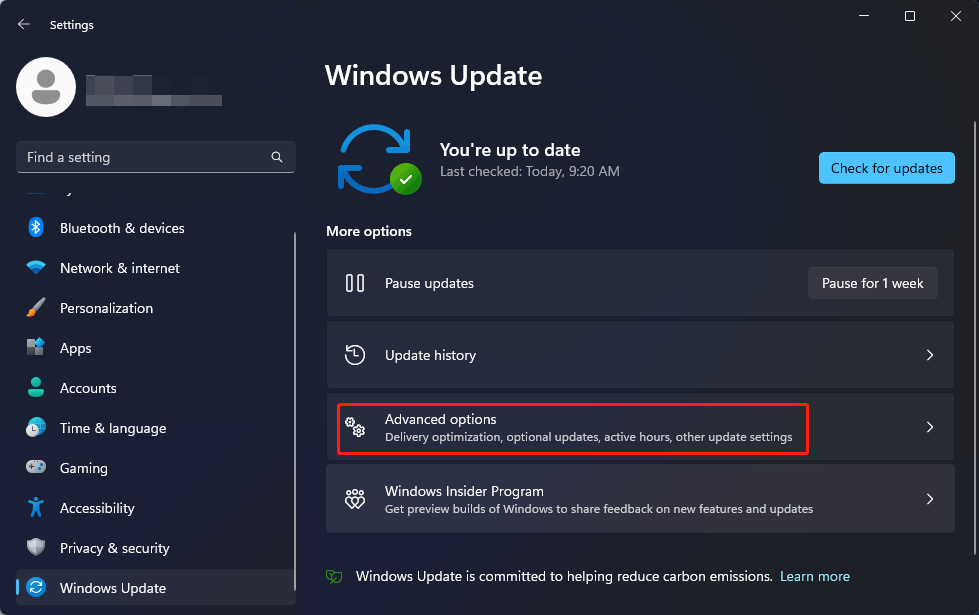
Step 3: On the next page, click Delivery Optimization to continue.
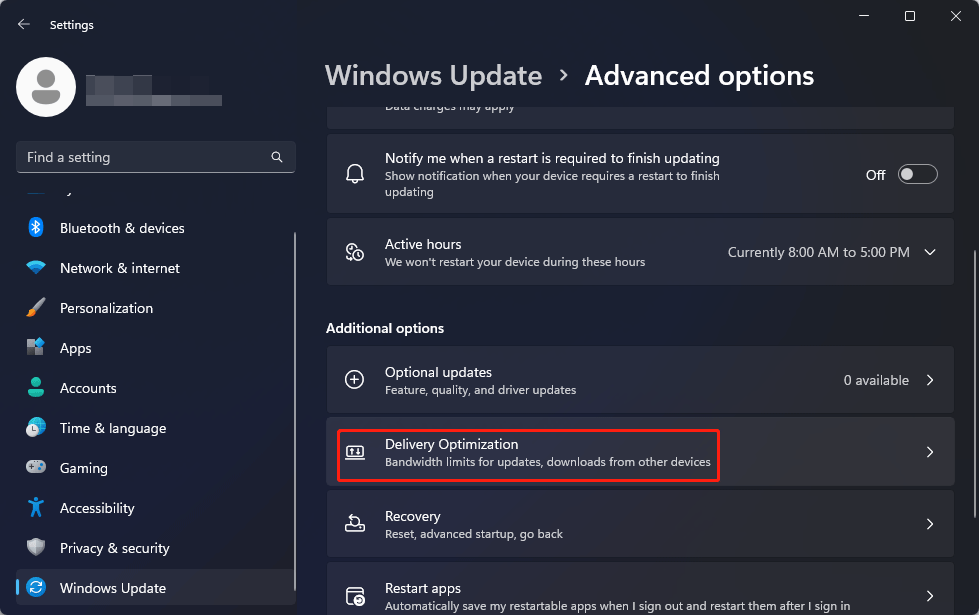
Step 4: Turn off the button next to Allow downloads from other PCs. This change will be automatically saved.
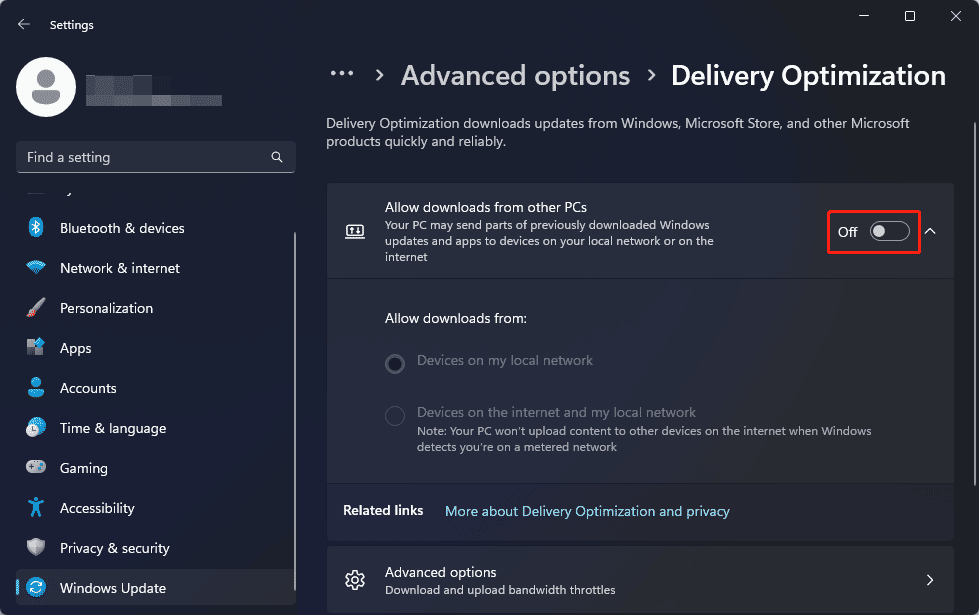
After these steps, the Delivery Optimization feature is disabled. Your computer will not upload and download updates from other devices. Don’t worry. This doesn’t mean that your computer will not receive Windows 11 updates anymore. You can still download and install updates from the Microsoft update services.
How to Turn off Delivery Optimization on Windows 10?
Here is how to stop uploading updates to other devices on Windows 10 by turning off Delivery Optimization on your Windows 10 PC:
Step 1: Press Windows + I to open the Settings app.
Step 2: Go to Update & Security, then click Delivery Optimization from the left menu.
Step 3: Turn off the button for Allow downloads from other PCs on the right panel.
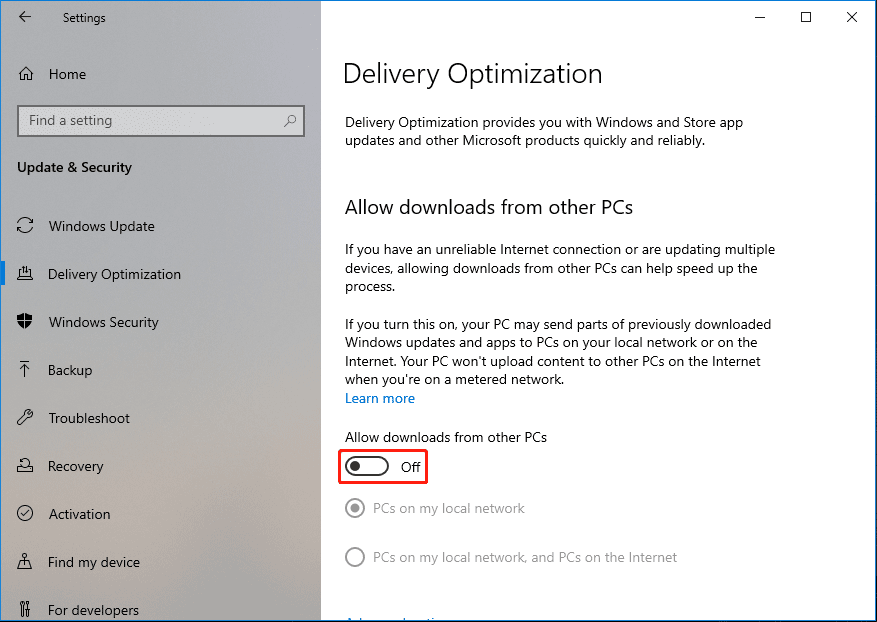
Now, your Windows 10 computer will not upload updates to other devices and download updates from other devices. But it will continue receiving updates from the Microsoft update services.
How to Turn off Update Uploads on Metered Connections on Windows 11/10?
You can also limit data usage while using a metered connection.
How to Disable Update Uploads on a Metered Connection on Windows 11?
If you want to disable update uploads through a metered connection on Windows 11, you can follow this guide:
Step 1: Press Windows + I to open the Settings app.
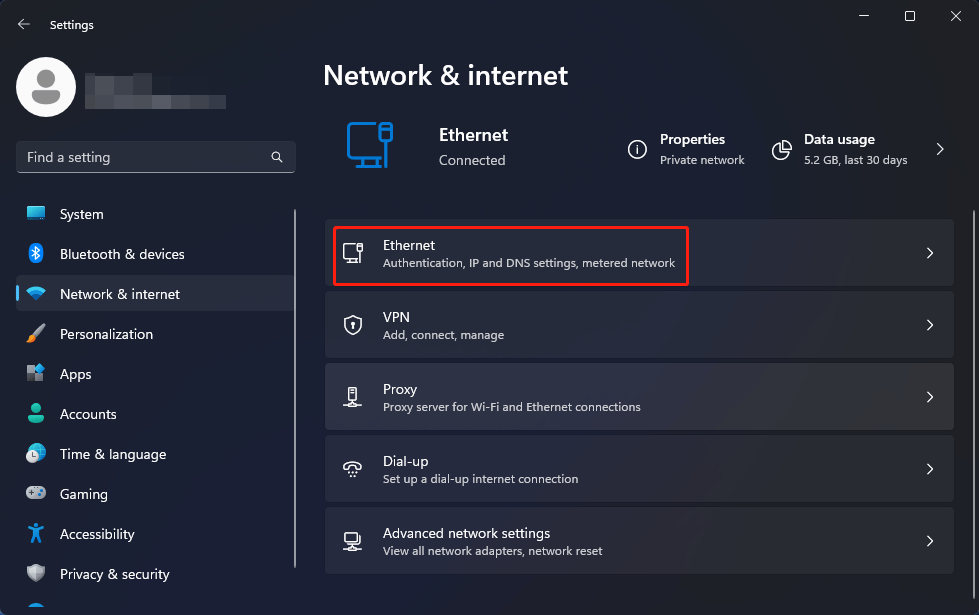
Step 2: Click Network & internet from the left menu.
Step 3: Click Ethernet from the right panel if you are using a cable network connection. If you are using a Wi-Fi connection, you need to select the active Wi-Fi connection to continue.
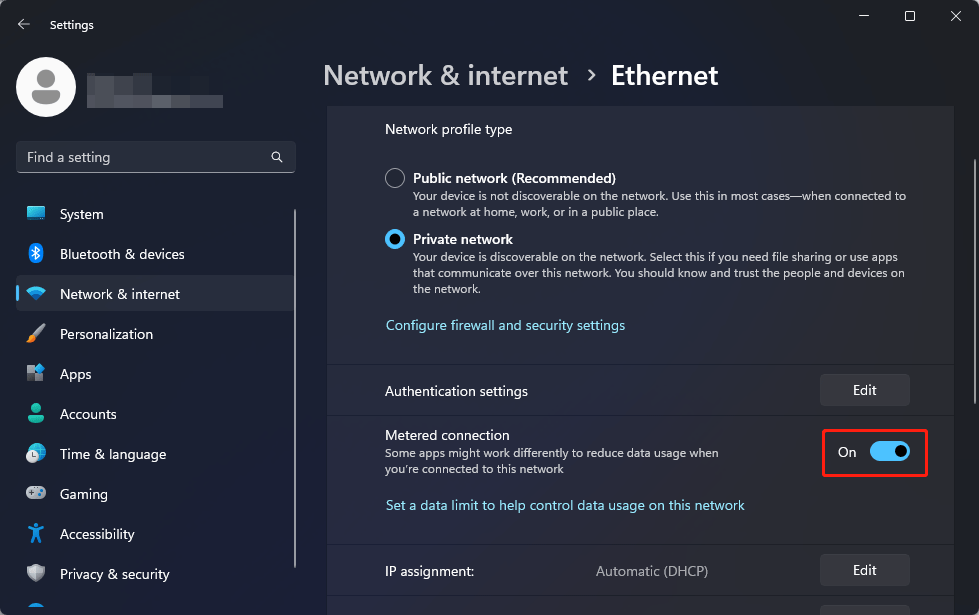
Step 4: On the next page, scroll down to find Metered connection, then turn on the button next to it.
How to Disable Update Uploads on a Metered Connection on Windows 10?
Step 1: Press Windows + I to open the Settings app.
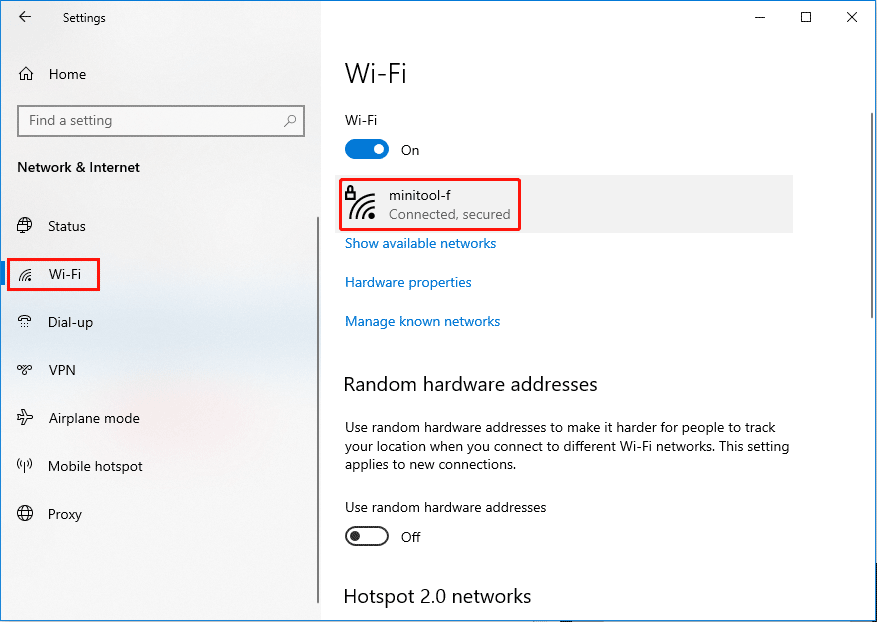
Step 2: Go to Network & Internet.
Step 3: On the next page, click Ethernet or Wi-Fi depending on the type of network connection you are using to continue.
Step 4: Click the active Ethernet connection or Wi-Fi connection on the right panel to continue.
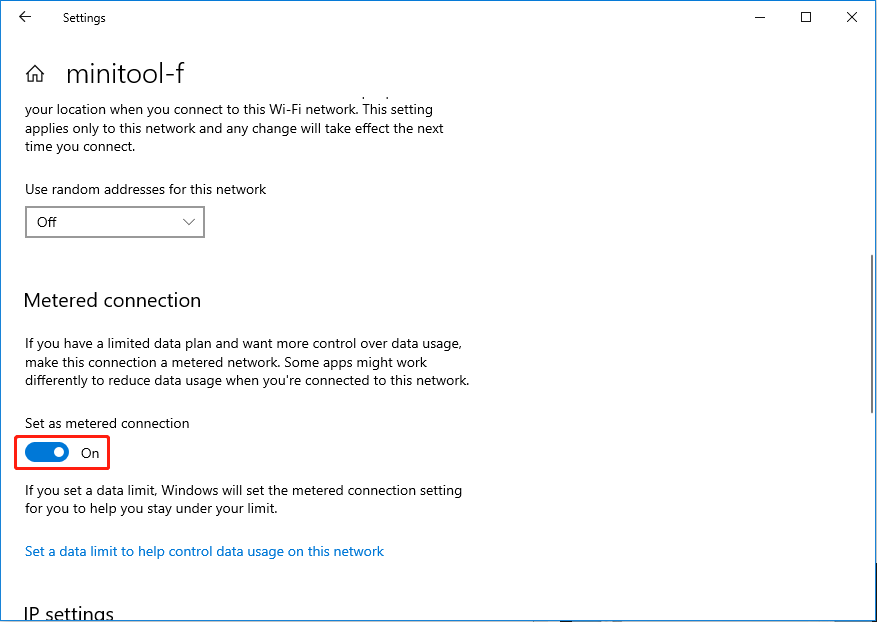
Step 5: On the next page, scroll down to the Metered connection section and turn on the button under Set as metered connection.
After your turn on a metered connection on your Windows 11/10 computer, you can get more control over data usage. For example, your computer will stop sending updates to other PCs on the internet. But update uploads will be allowed if you are using any other network connection that isn’t configured as metered.
If you want to prevent your computer from sending updates to other devices all the time, you can turn off Delivery Optimization and turn on the metered connection at the same time on your device.
How to Limit the Update Uploads Speed on Windows 11/10?
If you don’t want to completely stop uploading updates to other devices, you can set your computer to slow down the update upload speed.
How to Limit the Upload Speed of Updates on Windows 11?
If you are running Windows 11, you can follow these steps to limit the update upload speed:
Step 1: Press Windows + I to open the Settings app.
Step 2: Go to Windows Update > Advanced options.
Step 3: On the next page, click Delivery Optimization to continue.
Step 4: Turn on the button next to Allow downloads from other PCs.
Step 5: Select Devices on the internet and my local network under Allow downloads from.
Step 6: Click Advanced options on the next section to continue.
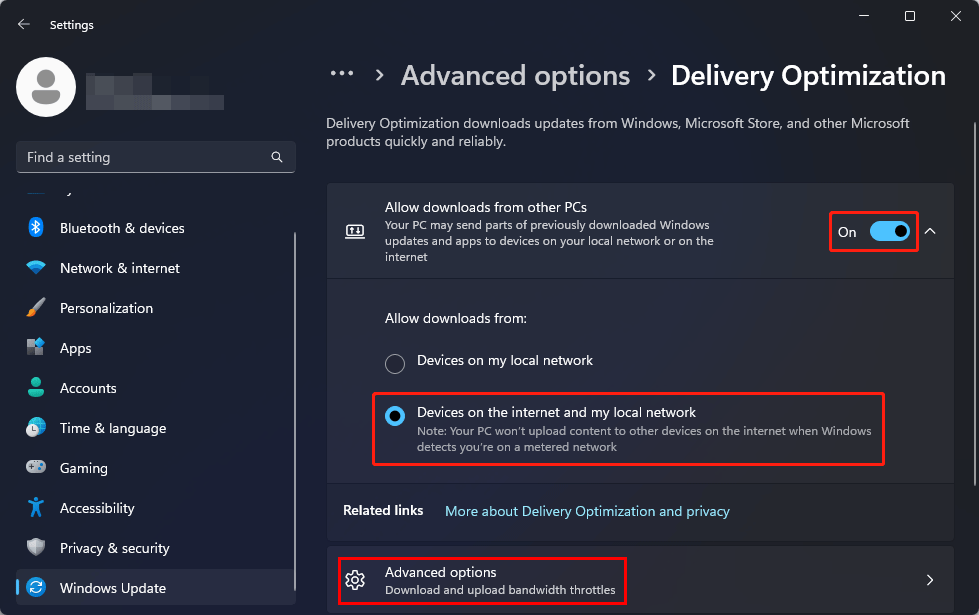
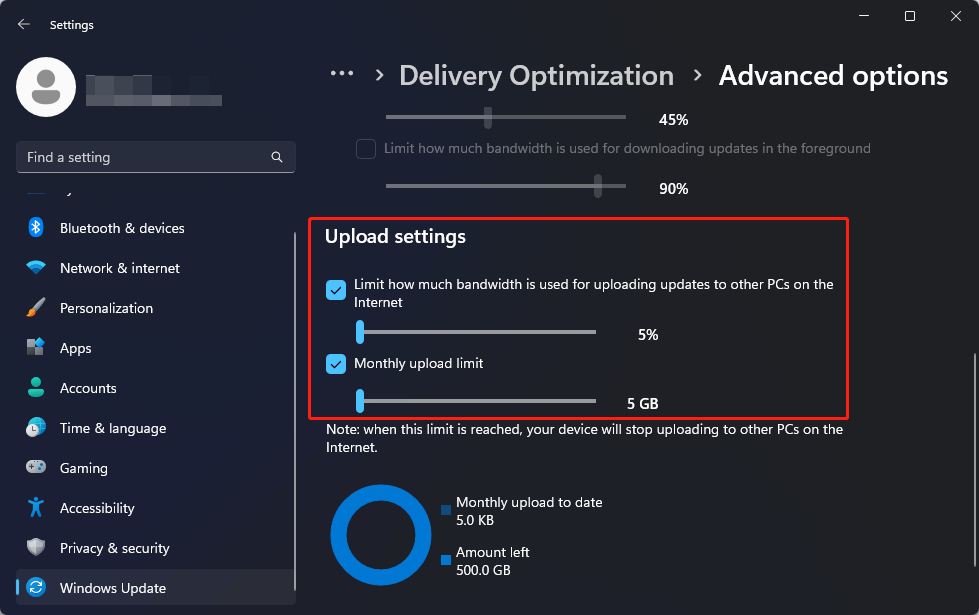
Step 7: Scroll down to the Upload settings section and select the two options under it. Then, you can drag the slider left and right to decide how much bandwidth is used for uploading updates to other PCs on the Internet and the monthly upload limit if necessary.
How to Limit the Upload Speed of Updates on Windows 10?
If you are running Windows 10, you can follow this guide to limit the upload speed of updates:
Step 1: Press Windows + I to open the Settings app.
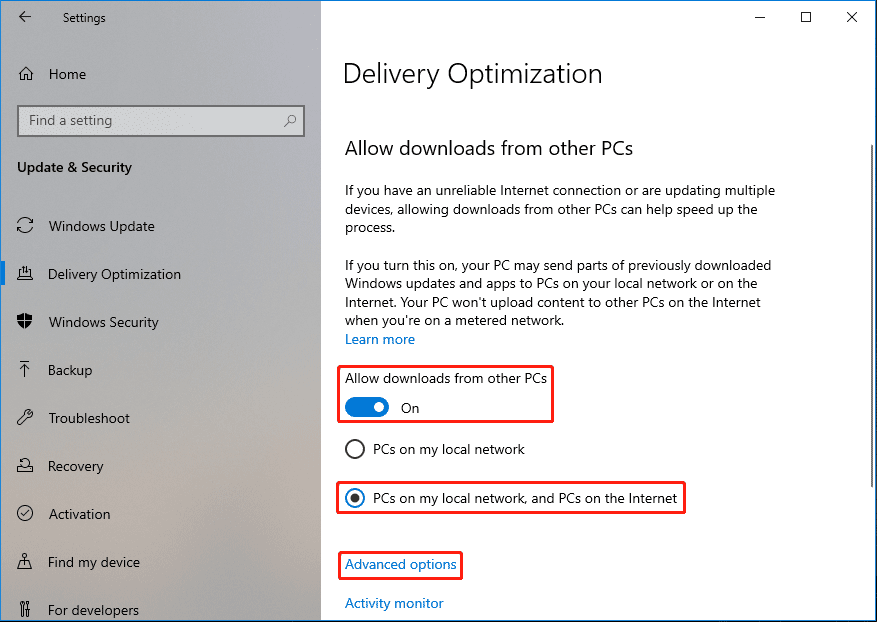
Step 2: Go to Update & Security > Delivery Optimization.
Step 3: Turn on the button for Allow downloads from other PCs on the right panel.
Step 4: Select PCs on my local network, and PCs on the Internet.
Step 5: Click Advanced options to continue.
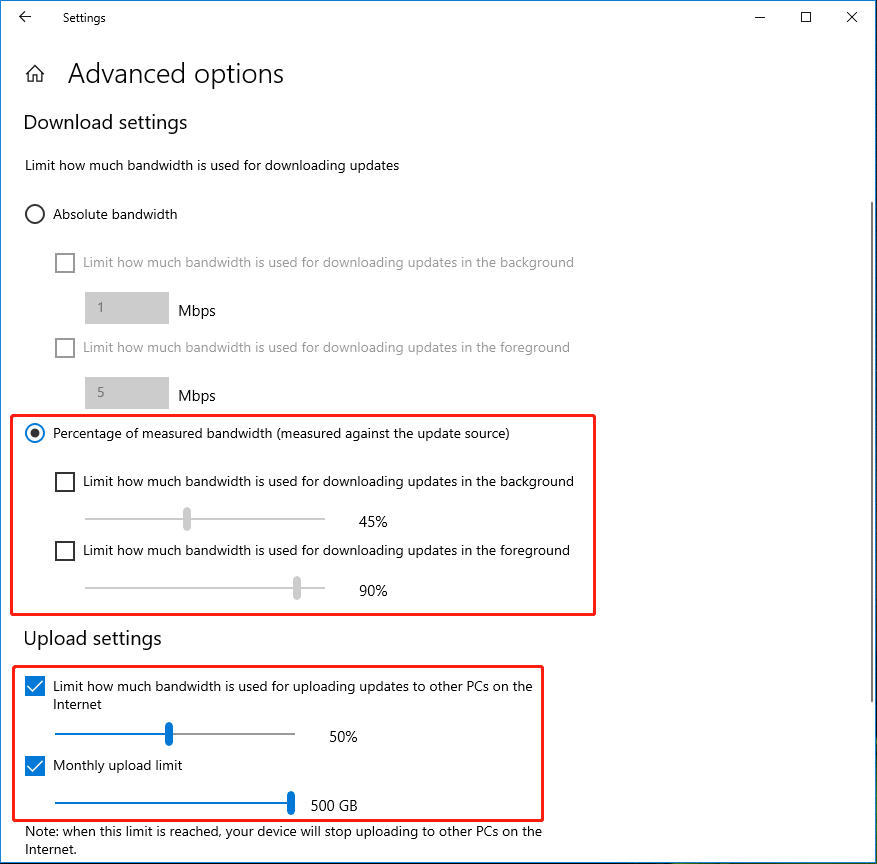
Step 6: Under Download settings, select Percentage of measured bandwidth (measured against the update source).
Step 7: Under Upload settings, select the two options under it. Then, you can drag the slider left and right to decide how much bandwidth is used for uploading updates to other PCs on the Internet and the monthly upload limit if necessary.
After these steps, your system will continue to send updates to other devices on the internet, but the upload bandwidth will be limited according to your configurations.
What to Do Before You Perform a Windows 11/10 Update?
In theory, a Windows 11/10 update will not delete files on your device. But to safeguard your system and files, we recommend backing up your computer to an external hard drive. You can try MiniTool ShadowMaker to do this job.
MiniTool ShadowMaker is a special data backup software for Windows. You can use it to back up files, folders, partitions, disks, and systems. This software has a trial edition, which allows you free use it within 30 days.
MiniTool ShadowMaker TrialClick to Download100%Clean & Safe
Of course, you need to prepare an external hard drive that has enough space to save the backup of your computer. Then, you can connect the drive to your computer, open the software, select both the source drive and destination drive, and follow the on-screen instructions to make a backup of your computer. Additionally, you can also use this software as a daily/weekly/monthly backup tool.
If your system crashes due to a Windows 11/10 update or some of your files get lost, you can restore the backup using this MiniTool backup tool.
What if Your Files Are Missing after a Windows 11/10 Update?
If unfortunately, some of your files are missing after a Windows 11/10 update but there is no available backup, what can you do to get your data back?
You can use professional data recovery software like MiniTool Power Data Recovery to perform data recovery on your Windows 11/10 computer.
This MiniTool data recovery software recover data from computer internal hard drives, external hard drives, SD cards, memory cards, pen drives, USB flash drives, and other types of data storage devices. This tool can run on all versions of Windows.
You can first try the free edition of this software and see if it can find the files you want to recover. With the free edition, you can recover up to 1 GB of files.
MiniTool Power Data Recovery FreeClick to Download100%Clean & Safe
After downloading and installing this software on your Windows 11/10 computer, you can follow this guide to scan for drives and recover data:
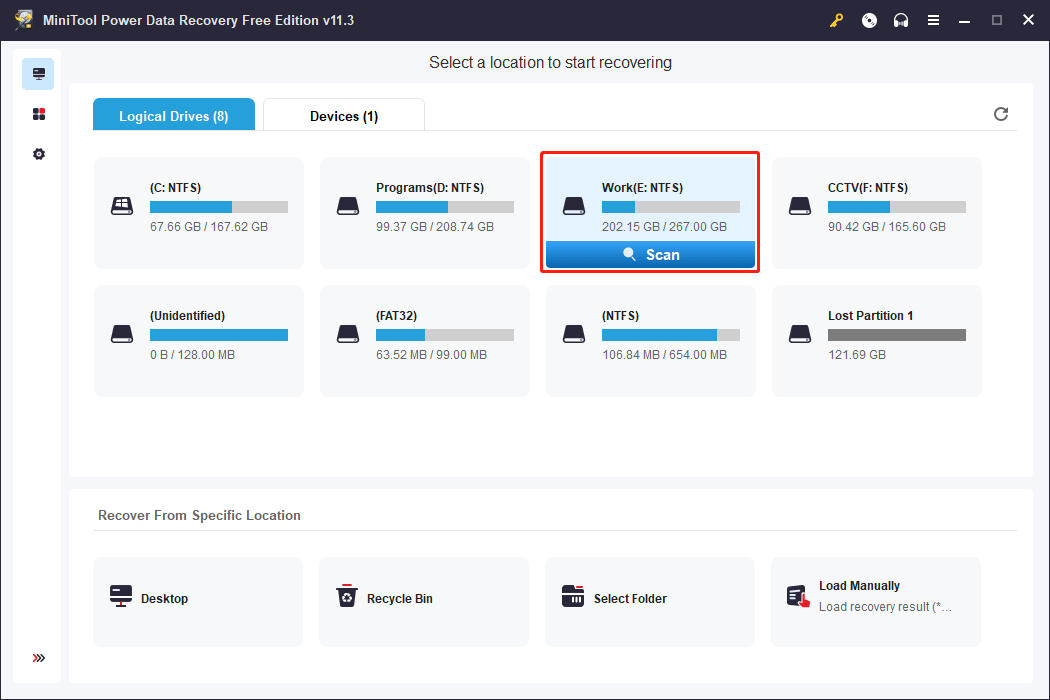
Step 1: Open this free file recovery tool.
Step 2: Hover over the drive you want to recover data from, then click the Scan button to start scanning that drive. If you have forgotten which drive the lost files were previously saved, you can switch to the Devices section and select the whole disk to scan.
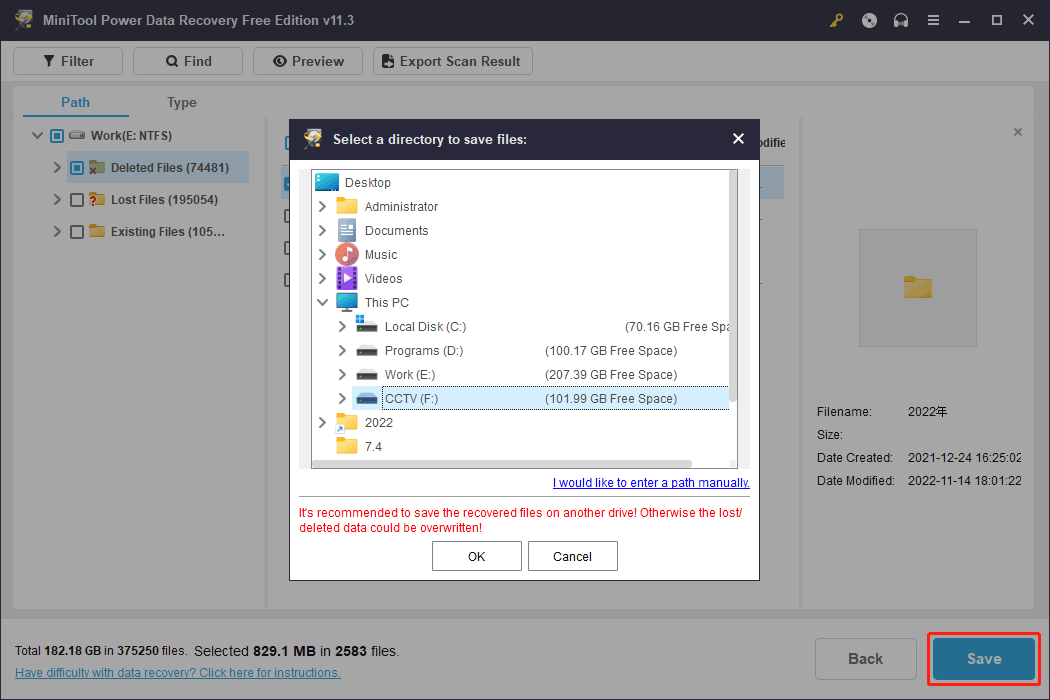
Step 3: When the scanning process ends, you will see the scan results that are categorized by path. You can also switch to Type to find files by type. If you still remember the name of the file, you can use the Find feature to directly locate that file by name.
Step 4: Select the files you want to recover, then click the Save button and select a suitable location to save files.
You can directly use the recovered files.
If you want to use this data recovery program to recover more files, you need to upgrade this software to a full edition.
Bottom Line
How to stop uploading updates to other devices on Windows 11 or Windows 10? You can disable the Delivery Optimization feature on your device to completely prevent your device from uploading/downloading some Windows updates or app updates to/from other devices. You can also use the methods mentioned in this article to limit the upload and download speed of updates on your computer.
Should you have other related issues, you can let us know in the comments. You can also contact us via [email protected].
About The Author

Position: Columnist
Stella has been working in MiniTool Software as an English Editor for more than 7 years. Her articles mainly cover the fields of data recovery including storage media data recovery and phone data recovery, YouTube videos download, partition management, and video conversions.