If a program can’t be uninstalled from computer, you may want to start Windows 10 in Safe Mode to try to uninstall it. To uninstall a program in Safe Mode, the Windows Installer Service much be running. Learn how to enable Windows Installer in Safe Mode in this tutorial. MiniTool software also provides you free data recovery software, hard drive partition manager, system backup and restore software, and some other useful tools.
Why can’t uninstall programs in Safe Mode in Windows 10? How to enable Windows Installer in Safe Mode to remove applications?
Sometimes you may be unable to uninstall a program in Windows 10 in Windows normal mode and want to start Windows 10 in Safe Mode to remove the program. However, you cannot uninstall software in Safe Mode unless the Windows Installer is running.
By default, Windows Installer isn’t running in Windows Safe Mode. If you try to uninstall a program in Safe Mode, you will get this error message: The Windows Installer Service could not be accessed. This can occur if the Windows Installer is not correctly installed. Contact your support personnel for assistance.
To fix this issue and enable Windows Installer in Safe Mode, you can follow the 2 ways below.
How to Enable Windows Installer in Safe Mode Windows 10 via Registry Editor
- Press Windows + R, type regedit, and press Enter to open Registry Editor.
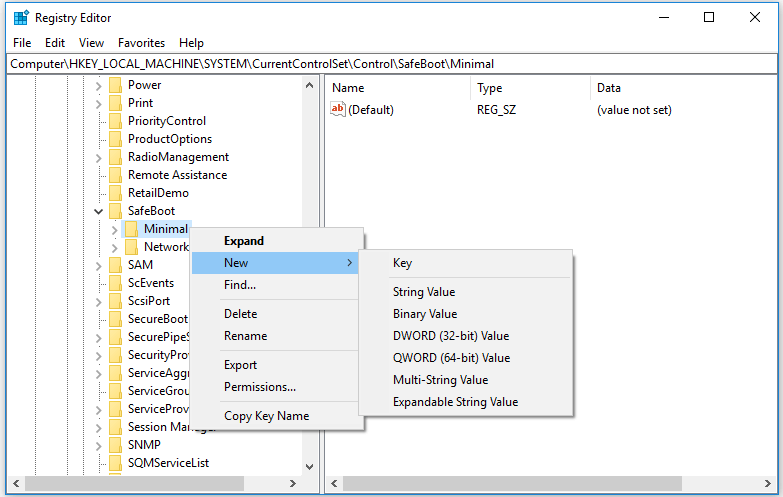
- Navigate the following key from the left panel: HKEY_LOCAL_MACHINE\SYSTEM\CurrentControlSet\Control\SafeBoot\Minimal.
- Right-click Minimal the click New -> Key to create a new subkey named MSIServer.
- Click MSIServer key. In the right window, double-click the Default key and set its Value data as Service. This can enable Windows Installer in Safe Mode without network support.
- Alternatively, if you want to start Windows Installer in Safe Mode with network, you can navigate the following path in the left panel in Registry Editor window: HKEY_LOCAL_MACHINE\SYSTEM\CurrentControlSet\Control\SafeBoot\Network. And follow the same way above to create an MSIServer key under Network, and set its value as Service.
- Then you can press Windows + R, type cmd, and press Ctrl + Shift + Enter to run CMD as administrator.
- Type the command net start msiserver in Command Prompt window, and press Enter to enable Windows Installer in Safe Mode in Windows 10.
Related: How to Backup and Restore Registry in Windows 10.
How to Run Windows Installer in Safe Mode Windows 10 with Command Prompt
Alternatively, you can also open elevated Command Prompt, and type the following commands to activate Windows Installer in Safe Mode. Press Enter after typing each command line.
- REG ADD “HKLM\SYSTEM\CurrentControlSet\Control\SafeBoot\Minimal\MSIServer” /VE /T REG_SZ /F /D “Service”
- REG ADD “HKLM\SYSTEM\CurrentControlSet\Control\SafeBoot\Network\MSIServer” /VE /T REG_SZ /F /D “Service”
- net start msiserver
Now you should be able to uninstall programs in Safe Mode in Windows 10.
Bottom Line
This post introduces two ways to allow you to enable Windows Installer in Safe Mode so as to uninstall programs in Safe Mode in Windows 10. Hope it helps.
As a leading software provider, MiniTool software designs professional and easy-to-use free data recovery software, hard drive partition manager, system backup and restore software, movie maker, video downloader, and more for users. If you need one of these tools, you can go to MiniTool software official website to get it.