Part 1: Do You Need to Recover Photos Lost in Cut and Paste
How do you transfer your photos from one drive to another one? It is not a difficult question.
Most of you will answer like this: use the cut + paste or copy + paste commands. The cut command can remove the selected photo from the original position, while the copy command is able to create duplicates of the selected photos.
In these two cases, the selected photos are kept in a temporary storage tool which is called the clipboard. Then, these photos, which are in the clipboard, will be inserted in the position where the paste command is issued later.
Relatively speaking, copy + paste commands are safe since these commands create duplicates of the selected photos. But, you may lose your photos after using cut + paste commands. Let see a real-life example as follows:
So my girlfriend cut some photos from a flash drive to cut and paste them onto a flash drive, But the transfer didn’t work and I’m not able to paste them again. So where do cut files go? Is it possible to recover these cut photos? How?www.overclock.net
As a matter of fact, if you have a piece of professional photo recovery software, you will be able to recover the cut photos easily and effectively. In this situation, the MiniTool software can help you out.
The following content will tell you how to use MiniTool software to do cut photo recovery. Please keep on reading.

Part 2: How to Recover Cut Photos by Using MiniTool Software
No matter which method you want to use to recover cut photos, you should note that to prevent the cut photos from being overwritten, you should not install the photo recovery tool to the drive which contains the cut photos originally.
Besides, you have to stop using that drive as soon as possible for the same reason.
Method 1: Use MiniTool Photo Recovery to Recover Cut Photos
To recover cut photos from memory card, computer hard drive, USB disk, digital camera and so forth, we think you’d better choose to use a piece of professional photo recovery software. MiniTool Photo Recovery is an excellent choice.
This MiniTool software is a kind of file recovery tool which is specially designed to recover lost and deleted photos, audios and videos from different kinds of storage devices, including computer hard drive, USB flash drive, memory card, SD card and more.
Thus it can fully meet your demand to retrieve photos lost in cut and paste.
![[SOLVED] How to Recover Photos From a Formatted SD Card Free](https://images.minitool.com/minitool.com/images/uploads/2018/09/recover-photo-from-formatted-sd-free-thumbnail.jpg)
Some of you may have never used this software before and question the functionality of this software. Don’t worry. The free edition of this tool allows you to recover 200 MB files. So, you can firstly download and install this free software to your computer to have a try.
MiniTool Windows Photo RecoveryClick to Download100%Clean & Safe
Then, the following steps will guide you to recover your cut photos.
Step 1: Open the software to enter its main interface as shown below.
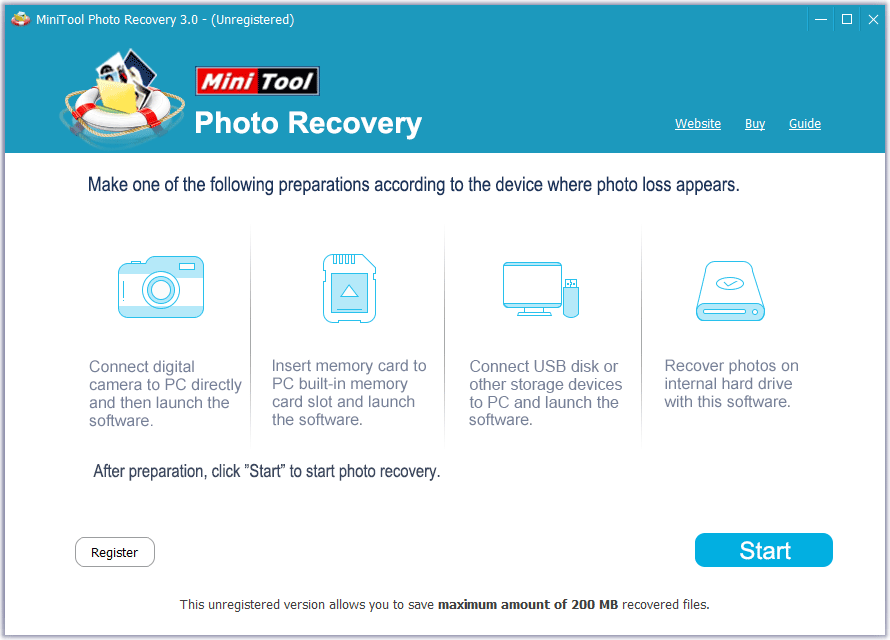
Here, you can see this software introduces you some ways to connect different kinds of storage devices to your computer. You can just choose one way according to your own situation and then click on Start button.
Here, in this post, we will take recover cut photos from computer internal hard drive as an example.
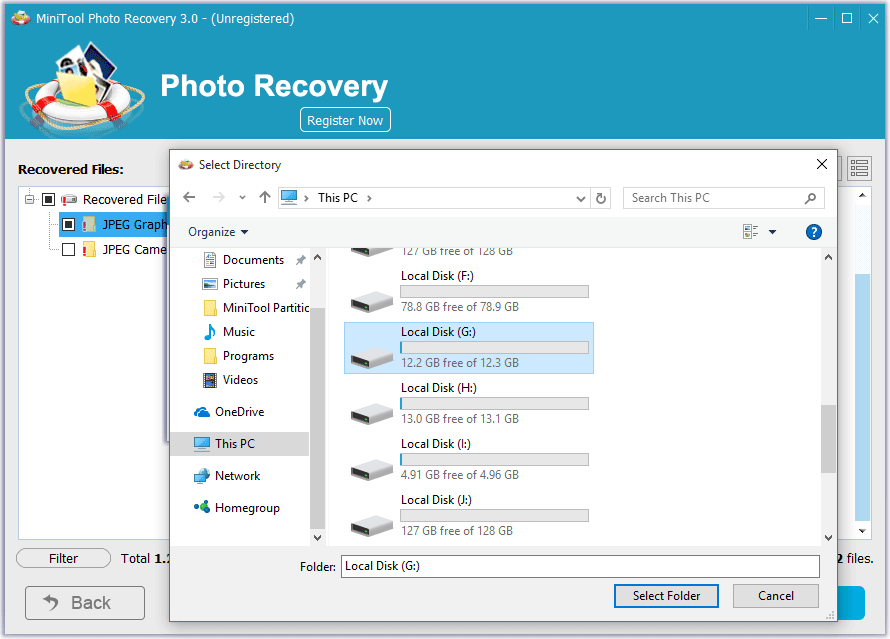
Step 2: You will see the following interface with the drives on your computer. Then, it’s time to choose the target which is used to store the photos you want to recover. You can identify them from the drive letter and capacity.
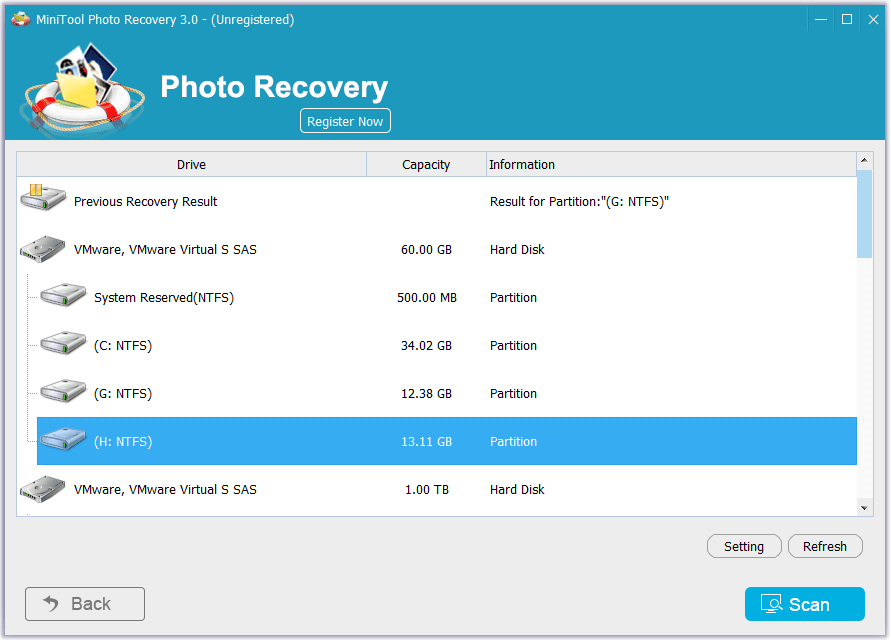
For instance, if the cut photos are saved on the drive (G:) originally, you need to choose that drive here. Then, please click on Scan button to start the scanning process.
In addition, when you enter this step, you need to pay attention to these things:
- If the target drive is not shown here, you can click on Refresh button to make this software try to detect the drive again until it is displayed in this interface.
- The Setting button is designed to choose the data types you want to recover. If you just want to recover some certain types of photos, you can click on this button and uncheck the unnecessary types in the pop-out window. Then, please click on OK button to confirm this setting.

Step 3: When the scanning process ends, you can see this scan result interface as follows.
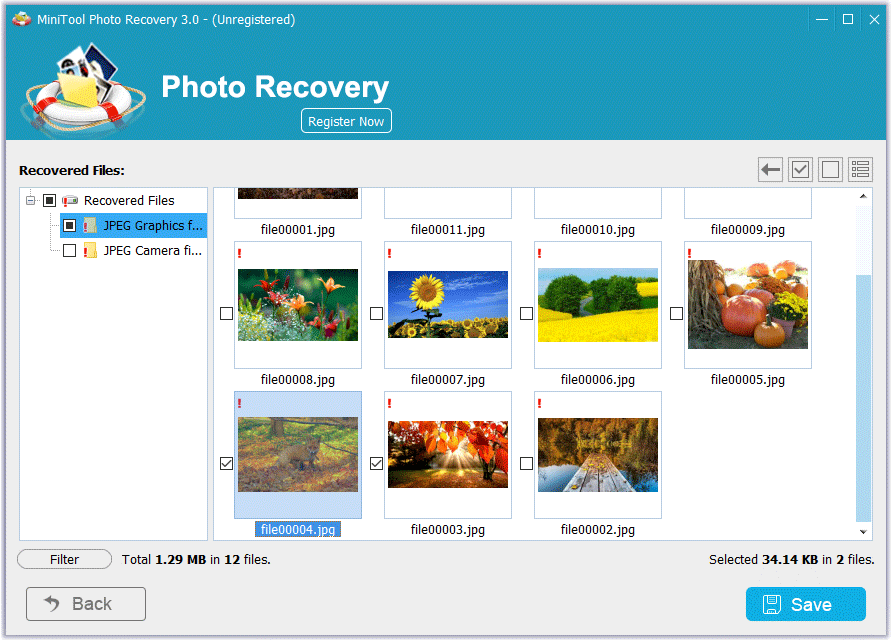
The types of recovered files are displayed in the left list. You can choose one type from the list and view its detailed items. As to photos, you can double click on the pictures to preview them one by one.
After that, you need to check the photos you want to recover and click on Save button to continue.
You may note that there is a Filter button in this scan result interface. It is used to filter the scanned items.
If you want to do this operation, just click it. Then, in the pop-out window, you will find two filter methods: By Filename/Extension and By Size. Please choose one way according to your own needs. Then, click on OK button to exit this window.

After that, this software will only show you the filtered photos.
Step 4: Then, there will be a small pop-out Save Files window as follows.
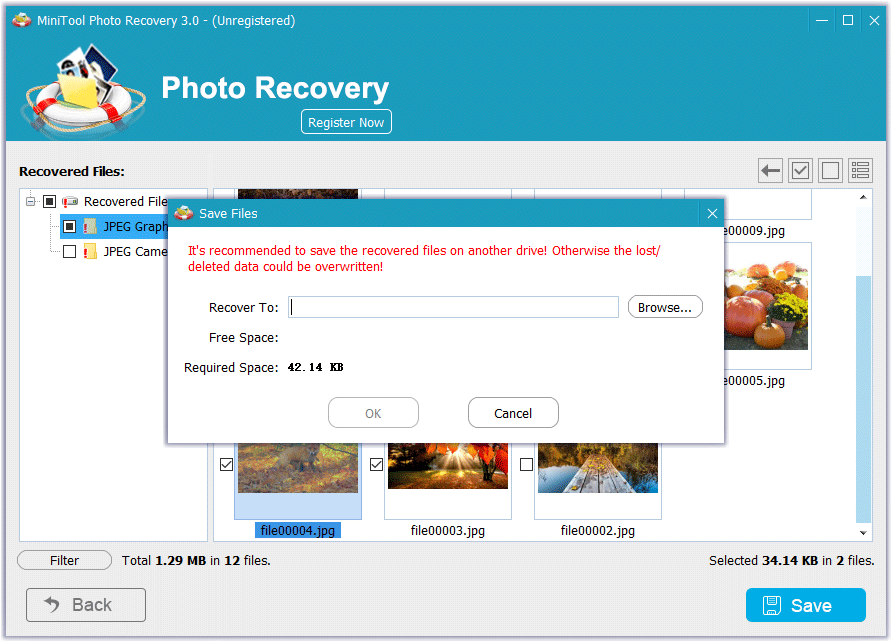
Now, it’s time for you to choose a suitable path to save these selected photos.
However, before doing this, you may note there is a red warning in this window which prompts you to save the selected photos to another drive rather than the original drive. Otherwise, the lost photos could be overwritten.
To choose the storage path, you should click on Browse button to go on.
Then, there will be another pop-out window in which you can choose the drive you use to save these selected photos. After selecting the destination drive, please click on Select Folder button to quit this window.
Then, you will be back to the Save Files window with the specified storage path shown in it. Next, click on OK button to quit this window.
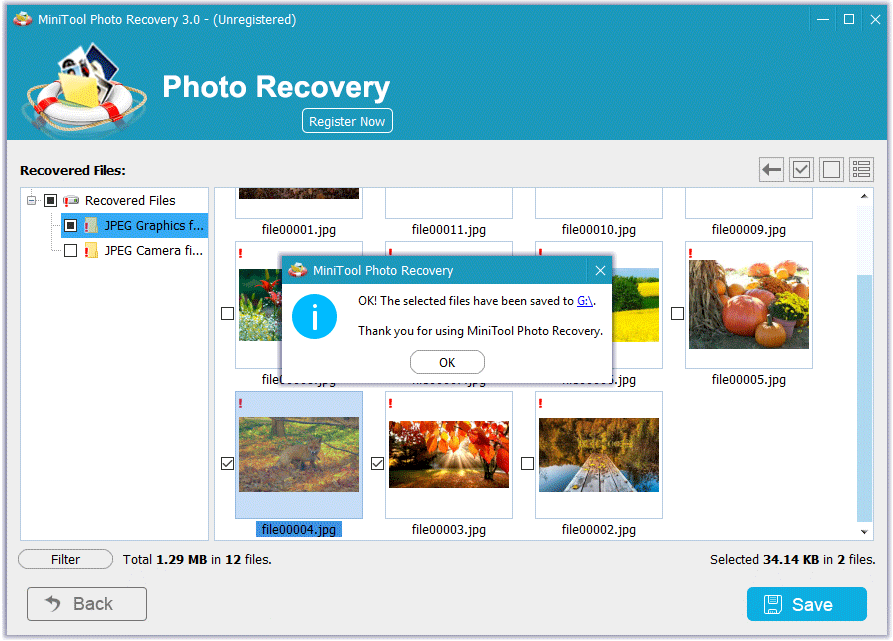
Step 5: There will be another pop-out which prompts you that the selected photos have been saved to the specified storage drive.
Here, you can click on OK button to close this small window. Or, you can just click on the blue drive letter in this window to open the specified storage path and view the recovered photos.
You can see that it is really simple to use this software to recover the cut photos.
The free edition of this software only enables you to recover 200 MB photos in total. If you want to break this limitation to recover more photos, you can choose to get its advanced edition from the MiniTool official site.
Here, we strongly recommend you not to close the scan result interface if you decide to get an advanced edition of this program.
After you receive the license key, you can click on Register Now button, copy the license to the text box in the pop-out window and then click on Register button to enter the advanced edition immediately.

After that, you can check the photos in the scan result interface directly. Thus you can avoid scanning the target drive again and save a lot of time for you.
If you are using Mac computer, you can ask MiniTool Mac Photo Recovery for help. Here is a post which tells you how to recover photos from Mac computer with this software: See! I Can Free Recover Mac Photos with Ease.
In addition to MiniTool Photo Recovery, there is another program which can be used to retrieve photos lost in cut and paste. It is MiniTool Power Data Recovery. Now, see the detailed introduction in method 2.
Method 2: Use MiniTool Power Data Recovery to Restore Lost Photos
As a free file recovery program, MiniTool Power Data Recovery is specially designed to recover different kinds of files from internal hard drives, external hard drive, USB flash drive, memory card, SD card, CD/DVD discs, and more.
This software has four recovery modules: This PC, Removable Disk Drive, Hard Disk Drive, and CD/DVD Drive.
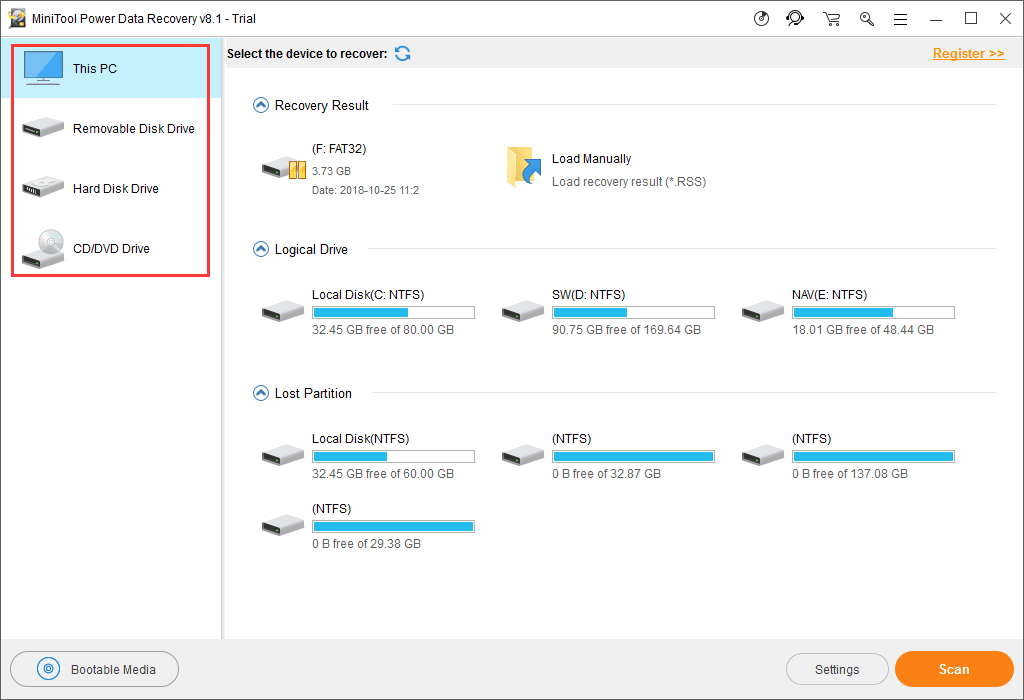
With This PC recovery module, you can recover your lost photos from logically damaged, formatted and RAW partition;
With Removable Disk Drive recovery module, you are able to recover photos from different kinds of removable disk drives, including SD card, flash drive, and more.
With Hard Disk Drive recovery module, you can recover lost photos from lost partition on the hard drive.
These three recovery modules can help you to recover cut photos, and you can choose a proper one according to your actual situation.

Now, you can firstly try the Trial Edition of this software to check whether it can find the photos you want to recover. If yes, you can then use the full edition of it to recover your needed photos.
MiniTool Power Data Recovery TrialClick to Download100%Clean & Safe
Both of these two methods are available to restore your lost photos in cut and paste. You can choose one according to your own preferences.
Part 3: How to Transfer Your Photos to Another Drive in a Safe Way
Using cut + paste command is a simple way to transfer data from one drive to another. But, you bear the risk of data loss issue. Relatively, copy + paste commands are safe for data transmission. But, if you want to transfer a lot of files, it will cost you a long time.
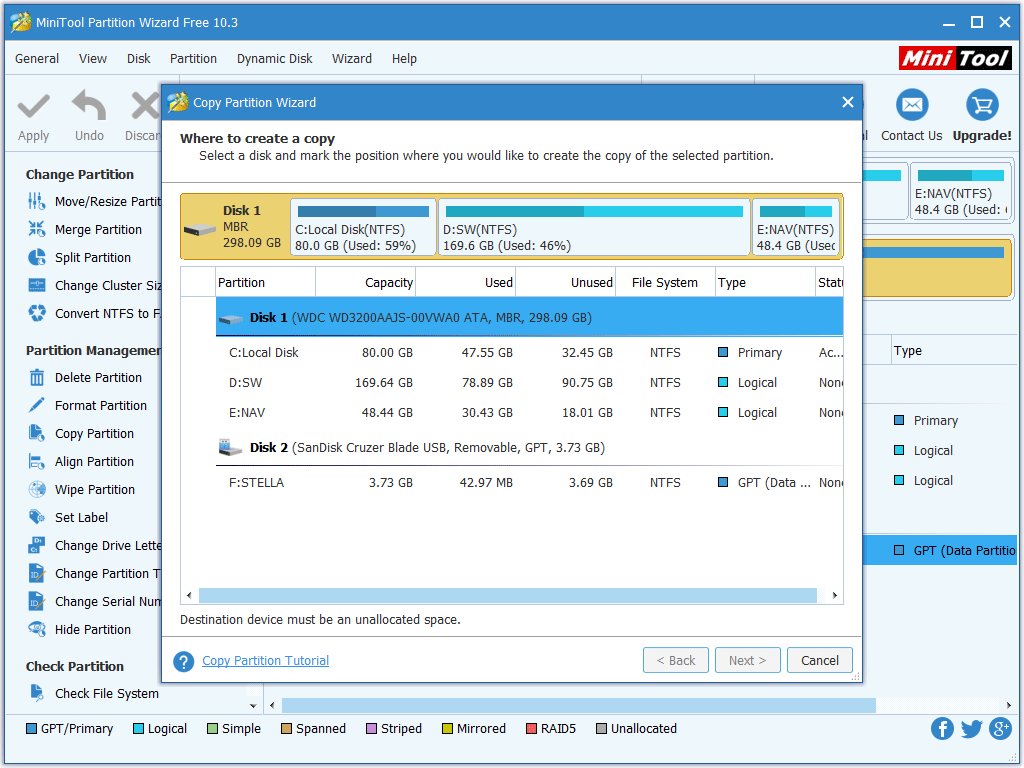
Now, we will introduce you how to copy photos in large size to another drive in a fast way: using MiniTool Partition Wizard.
This is a professional partition management program which owns many useful functions, such as Migrate OS to SSD/HD, Move/Resize Partition, Copy Disk, Copy Partition, and so on.
If your photos are saved in one partition, you can use Copy Partition function of this software to transfer these photos to the destination partition quickly. Luckily, this function is available in the free edition of this software. Please download it to enjoy this function.
Of course, you can also use this function to back up your important photos to keep them safe.
Part 4: Bottom Line
After reading this post, you must know how to recover cut photos with MiniTool software. Next time, when you are facing cut photo recovery issue, you can just try these software to help you out.
Should have any questions when you are using MiniTool software, you can just leave a message on the following comment zone, or send an email to [email protected]. Of course, your good ideas and suggestions are also appreciated here!
About The Author

Position: Columnist
Stella has been working in MiniTool Software as an English Editor for more than 7 years. Her articles mainly cover the fields of data recovery including storage media data recovery and phone data recovery, YouTube videos download, partition management, and video conversions.