SSD has become the first choice for PC/laptop users to pursue higher disk performance, so more and more people want to choose large-capacity SSD. The following is a true example from the Microsoft.com forum.
How to clone SSD C drive to larger SSD D drive, then run Windows from the bigger drive
We have a 512GB PCIe SSD as a C drive running Windows 11 and a new empty 1TB SSD as a D drive. We want to have the operating system be on the larger drive and become the system and boot drive - but we want the 1TB drive to become a C drive after cloning. Then we will erase everything on the old 512 GB drive and make it drive D.
-from Microsoft
Why Need to Clone SSD to Larger SSD
Why choose a larger SSD instead of an HDD? Many Windows computers are equipped with SSDs to install the system and save data since SSDs are more durable, faster, lighter, and quieter than HDDs. When the SSD space is insufficient, the running speed of the operating system and the computer will slow down, affecting the daily life of the user.
Why choose cloning rather than other ways? Migrating from one drive to another can be a hassle. Clean install Windows will take a long time, and you could spend time reinstalling your apps, settings, and data. However, cloning a drive is a quick and easy way to transfer your installation from a slower, smaller drive to a faster, larger drive.
Related post: New SSD, Clean Install or Clone Disk or Migrate Windows OS?
In a word, cloning SSD to a larger SSD Windows 11 can increase your PC space, optimize the working efficiency of the computer, and speed up the operating system.
Preparations You Need to Do Before Cloning
The following are some preparations you need to do before cloning your SSD to larger SSD on Windows 11.
1. Connect the New SSD to the PC/Laptop
If you want to move the data of your PC’s boot drive to a new, faster, or larger replacement drive, you need to connect both drives to your computer at the same time. If your desktop has space, you can connect the new drive to its M.2 or SATA port and install it in your case.
However, if you’re using a laptop, or if you don’t have enough space in your computer to install both drives, you need to use the hard drive enclosure to attach the new drive to the USB port.
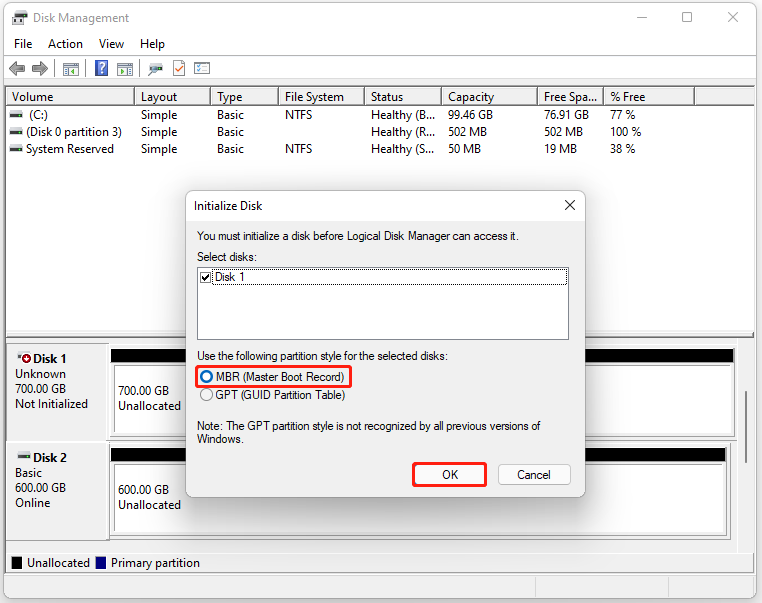
2. Initialize the Larger SSD
If the added large SSD doesn’t show up on your computer with a new drive letter, you need to use the Disk Management tool to initialize the SSD and create a new volume on it.
Step 1: Press the Windows + R keys together to open the Run dialogue box.
Step 2: Type diskmgmt.msc and press the Enter key to open Disk Management.
Step 3: Find the larger SSD and right-click to initialize it.
How to Clone SSD to Larger SSD
Now, you can start to clone SSD to larger SSD on Windows 11. There are two tools for you – MiniTool ShadowMaker and MiniTool Partition Wizard. We will introduce how to use them with detailed steps desperately.
1. MiniTool ShadowMaker
The first Intel Data Migration alternative is MiniTool ShadowMaker. It is a piece of professional backup software, which supports data migration with several SSD brands. This program provides you with the Clone Disk feature to transfer all contents from the old SSD to the new SSD in Windows 11/10/8/7 without losing data or messing up the cloning process.
Now, we will show you the full steps of cloning an SSD. Download a free MiniTool ShadowMaker Trial Edition for 30 days.
MiniTool ShadowMaker TrialClick to Download100%Clean & Safe
Step 1: Connect the SSD to your computer. Launch MiniTool ShadowMaker, and click Keep Trial to continue to use the Trial edition.
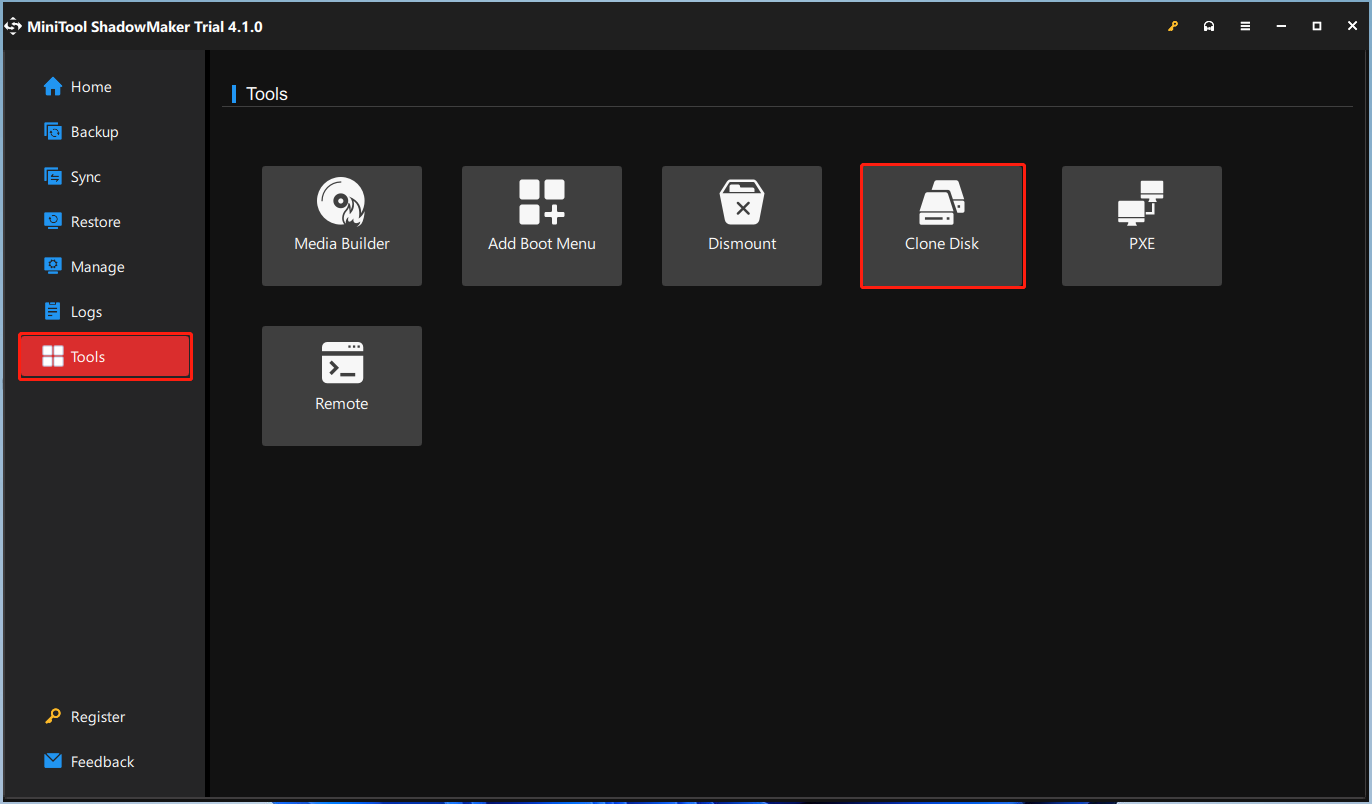
Step 2: After entering the main interface, navigate to the Tools tab. And then choose the Clone Disk feature to continue.
Tip: MiniTool ShadowMaker supports you to clone the dynamic disk, but it is just for the simple volume.
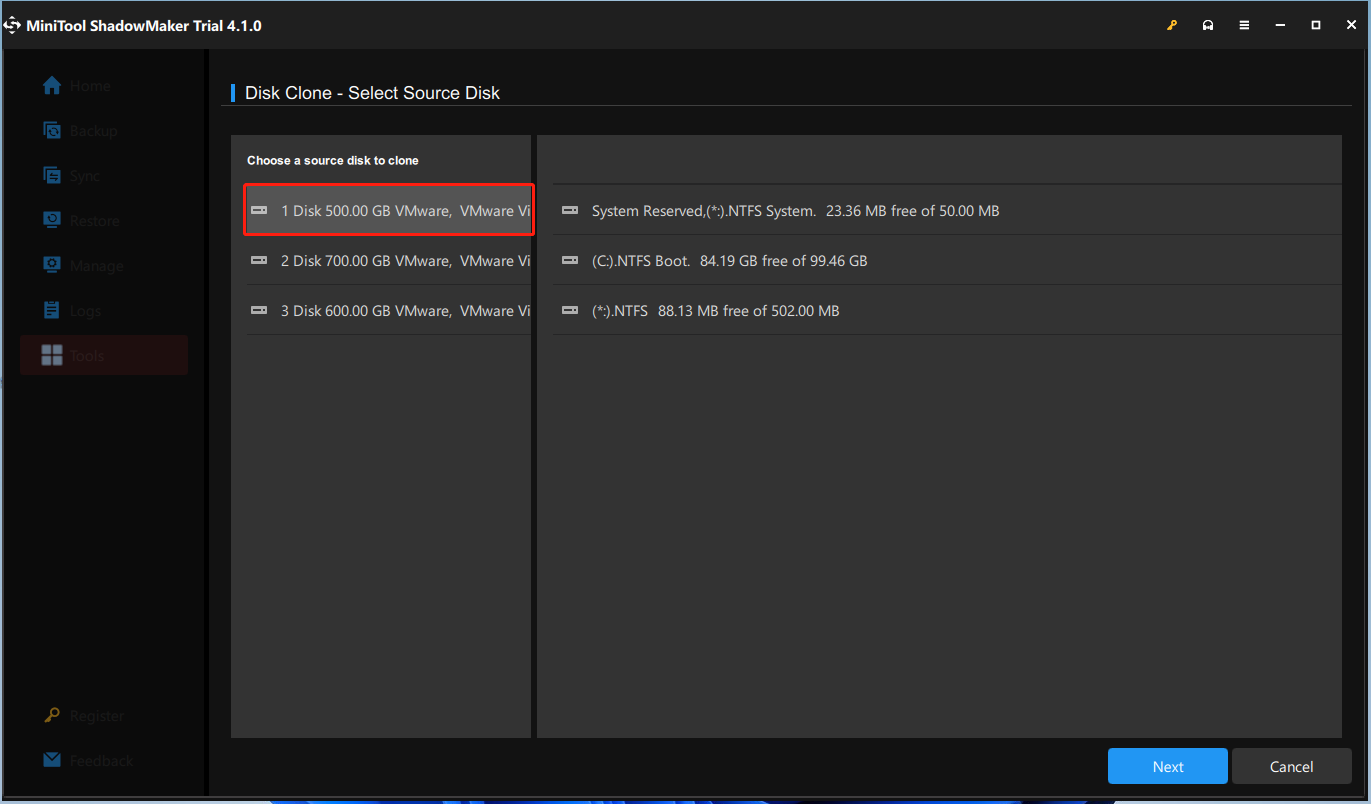
Step 3: Next, you are required to choose the source disk and the target disk for cloning. Here, you intend to clone the smaller SSD to the larger SSD, thus, please set the smaller SSD as the source disk and the larger SSD as the target disk.
Step 4: After you have successfully selected the disk clone source and destination, click Start to continue.
Step 5: Then you will receive a warning message that tells you all data on the target disk will be destroyed during the disk cloning process. Then click OK to continue.
Step 6: Then it will begin to clone HDD to SSD and you need to wait several minutes until the process is finished.
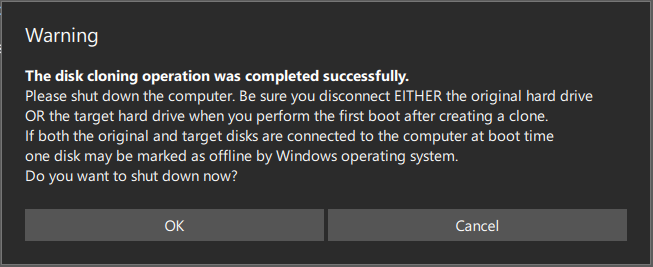
Step 7: When the disk clone process is finished, you will receive a message which tells you that the source disk and the target disk have the same signature. Thus, you need to remove the old SSD from your computer and insert the larger SSD into the PC.
2. MiniTool Partition Wizard
In addition to MiniTool ShadowMaker, MiniTool Partition Wizard is also one of the best tools to clone a hard drive. It is an all-in-one partition manager able to clone systems, hard drives, and partitions. Get a free download of MiniTool Partition Wizard and try its Migrate OS to SSD/HD feature to a clone data disk.
How to clone the HDD to SSD for hard drive replacement? Take Migrate OS to SSD/HD as an example. The details are here.
MiniTool Partition Wizard DemoClick to Download100%Clean & Safe
Step 1: Choose a Feature to Migrate HDD to SSD
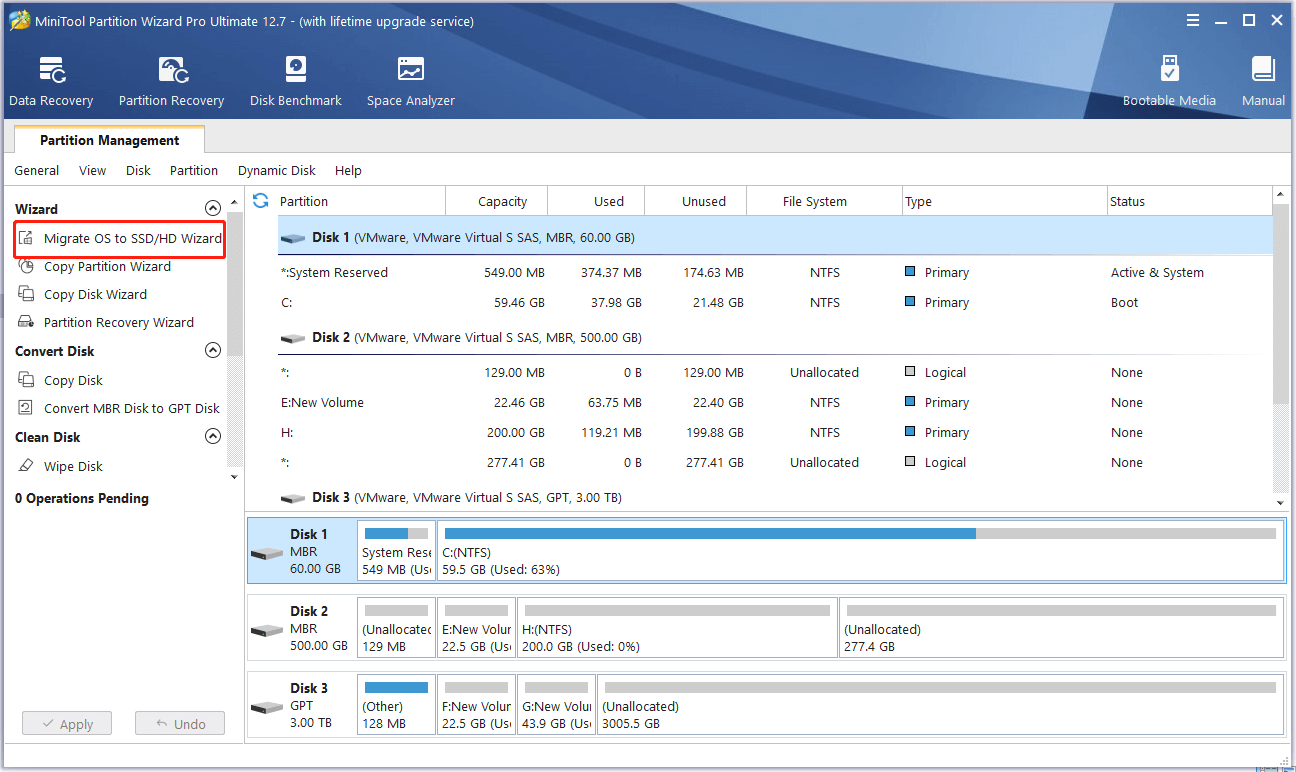
- Launch MiniTool Partition Wizard.
- Click Migrate OS to SSD/HD Wizard from the Wizard menu.
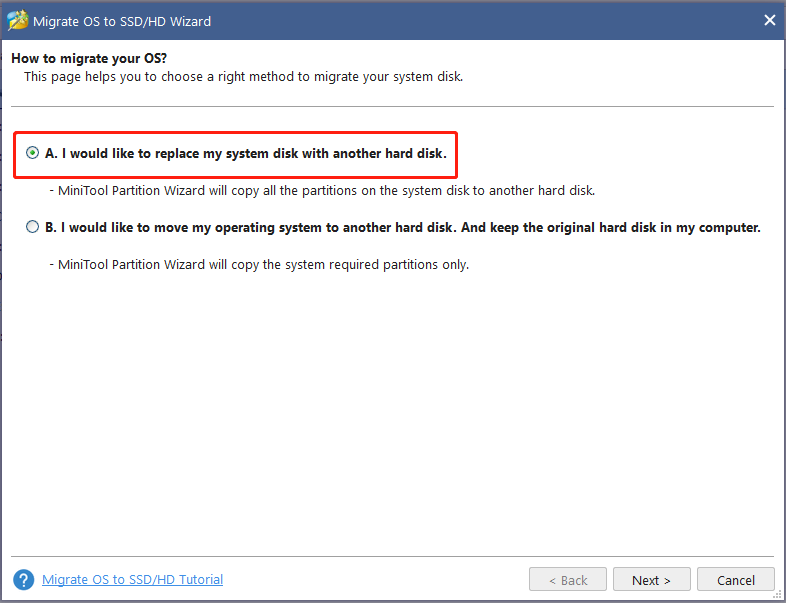
Step 2: Choose a Cloning Option
- If you want to replace your system disk with another hard disk, A is available.
- If you want to only move the operating system to another disk, B is proper.
- Here, you intend to replace the hard drive with SSD, so here A is suitable.
Step 3: Choose a Target Disk
- Decide the destination disk you want to use to replace your system disk. Here please choose the SSD you have connected to your laptop.
- During migration, the content of the destination disk will be deleted. Thus, you had better prepare an empty SSD. But, if your SSD holds many important files, ensure they are backed up before.
Step 4: Check One Copy of Option
- From the following figure, choose a copy option based on your needs.
- For an SSD or advanced format disk, please align all partitions to 1MB, which can improve the computer’s performance.
- If you want to clone the OS disk with MBR to the GPT disk, the Free Edition of MiniTool Partition Wizard is not supported. Get the Professional Edition or an advanced edition when there is a need.Step 5: Then a window pops up to tell you what you need to do to ensure your laptop can be booted from this destination disk.
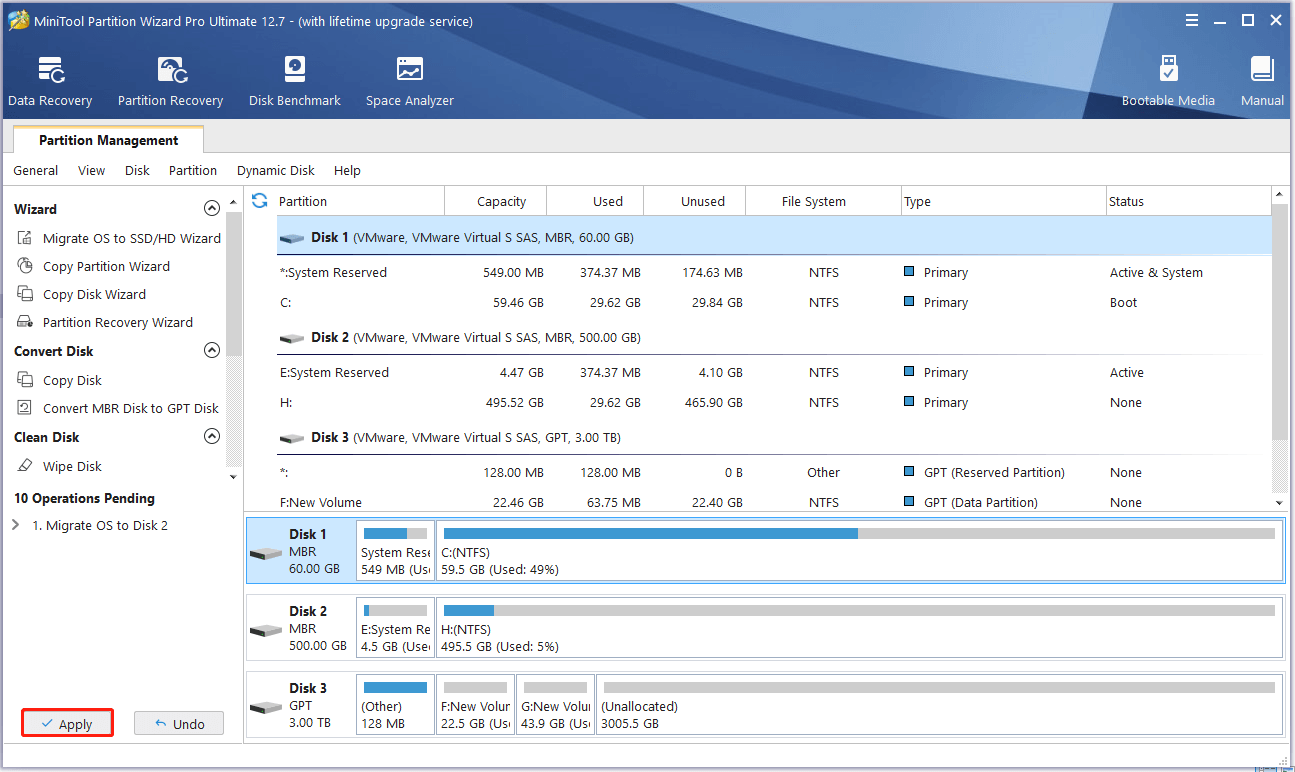
Step 6: Execute all the operations you have made by hitting the Apply button at last.
Top 5 Recommended SSD
Before choosing a new SSD, you should consider the following factors:
Choose a compatible interface: M.2 PCIe, SATA, or add-in card.
SATA is slowest: SATA is not as fast as M.2 PCIe or PCIe add-in cards, but most desktops and many laptops support 2.5″ SATA drives.
Choose a large capacity: 1TB is the practical minimum for any PC that costs over $500. 2TB is the best SSD capacity for anyone who can spend upwards of $200 on a drive.
Here, we will introduce the top 5 recommended SSDs for you.
Top 1: Samsung 870 EVO
If you want more storage with a traditional 2.5-inch SATA drive, Samsung 870 EVO is a great choice. It is highly welcomed due to its various storage volumes and fast read and write speeds. On durability, TBW is an estimate to evaluate the allowable lifespan of write activity. The Samsung 870 EVO SSD 4TB provides 2400TBW rated capacity, which meets the expectation of the capacity of SATA SSD.
Top 2: WD SN850
WD SN850 is also welcomed. WD has taken its popular Black SN850 SSD and bumped it up to 11. The Black SN850X utilizes an improved controller and updated flash memory to take full advantage of the PCIe 4.0 interface.
Performance has been boosted across the board, and the drive comes close to matching the Platinum P41 in most respects. Unlike the Platinum P41, it offers a cooler option that also comes with 1TB and 2TB of RGB. WD also backs the SSD with its nice Dashboard app and a solid warranty.
Top 3: Crucial BX500
Crucial BX500 SSD is the successor to its popular BX300 line of SSDs. Crucial BX500 SSD skips over the 400-naming scheme, like the company’s mainstream MX500 brand. Compared with the Crucial MX series, the Crucial BX series is a streamlined, no-frills SSD and has a few accessories and features.
The Crucial BX500 comes with 6 Gb/s or SATA III interface options and is available with a 2.5-inch form factor. This Crucial BX500 SSD is also available in five different capacities and reaches up to 2TB. It is designed for budget-minded buyers, with a lightweight feature set and a low price to match.
Top 4: Samsung T7
The Samsung T7 series is an upgraded version of the Samsung T5 drive. It is protected by AES 256-bit cipher encryption. It consists of ePCM technology and a dynamic thermal protector. The Touch version of the T7 also uses fingerprint recognition for added security, while the regular version of the T7 doesn’t.
Top 5: Crucial P3
There is some newer hardware in the PCIe 3.0 SSD segment, especially in capacities up to 4TB. Crucial offers a full 5-year warranty and decent software support. However, its guaranteed write endurance is very low. The P3 is based on QLC and also has no DRAM, so it could be prone to potential performance issues. It also works best at higher capacities.
Bottom Line
In this post, we have shown you information on clone SSD to larger SSD. Now, it is your turn to get our MiniTool software to give a try! If you have any questions or suggestions while using our software to clone SSD to a larger SSD, please feel free to let us know by either leaving a comment below or sending us an email via [email protected].
About The Author

Position: Columnist
Having been an editor at MiniTool since graduating college as an English major, Daisy specializes in writing about data backups, disk cloning, and file syncing as well as general computer knowledge and issues. In her free time, Daisy enjoys running and going with friends to the amusement park.