What Is WOL (Wake On Lan) and How to Enable It in Windows 10?
What is WOL and what can it be used for? It is short for Wake On Lan and can be used to wake computers up from a very low power mode remotely. And in this post from MiniTool, you can also know its principle of operation, as well as how to enable it.
What Is WOL?
WOL, which is the abbreviation of Wake On Lan, is an industry-standard protocol that supports waking computers up by a network message. The message is usually sent to the target computer through a program executed on a device (such as a smartphone) connected to the same local area network (LAN).
Related post: WAN VS LAN: What Is the Difference Between Them?
You can also initiate the message from another network by using a subnet directed broadcast or WOL gateway service. Equivalent terms contain wake on WAN, remote wake-up, power on by LAN, power up by LAN, resume by LAN, resume on LAN and wake up on LAN.
If the computer being woken up is communicating via Wi-Fi, a supplementary standard called Wake on Wireless LAN (WoWLAN) must be used. If you want to fix problems with Wi-Fi, then it is recommended to go to the MiniTool website.
Related post: Fixed: Windows 10 WiFi Doesn’t Have a Valid IP Configuration
Principle of Operation
Ethernet connections (including home and work networks, wireless data networks, and the Internet itself) are based on frames sent between computers. Wake On LAN (WOL) is implemented using specially designed frames called a magic packet, which is sent to all computers on the network, including the computer to be woken up.
The magic packet includes the MAC address of the target computer, the identification number built into each network interface card, or other Ethernet devices in the computer, so that it can be uniquely identified and addressed on the network.
Powered-off computers with WOL will include network devices that can “listen” to incoming packets in a low-power mode when the system is turned off. If you receive a magic packet that is directed to the device’s MAC address, the NIC will signal the computer’s power supply or the motherboard in the same way as pressing the power button to initiate system wake-up.
Related post: 6 Best X570 Motherboards Paired with the Ryzen 3000 CPU
The magic packet is sent on the data link layer (layer 2 in the OSI model), and is broadcast to all connected devices on the given network using the network broadcast address when sent; IP address (layer 3 in the OSI model) is unused.
Because WOL is built on broadcast technology, it can usually only be used in the current network subnet. However, there are some exceptions, as long as the configuration and hardware are appropriate (including remote wake-up via the Internet), WOL can actually run on any network.
For WOL to work, some network interfaces need to remain open. This consumes a small amount of standby power, which is much lower than the normal operating power. The link speed is usually reduced to the lowest possible speed to avoid wasting power (for example, a Gigabit Ethernet NIC only maintains a link of 10 Mbit/s).
Disabling Wake On LAN when not needed can very slightly reduce the power consumption of a computer that is turned off but still plugged into a power socket.
How to Enable WOL?
To use WOL, you need to enable it at first. Now let’s look at how to enable Wake On Lan Windows 10.
Step 1: Press the Win + X keys at the same time to open the Device Manager.
Step 2: Expand the Network adapter section and then right-click your network card to choose Properties.
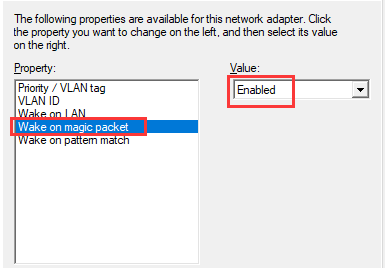
Step 3: Go to the Advanced tab, choose Wake on magic packet under the Property section and then change the Value to Enabled.

Step 4: Go to the Power Management tab, make sure that Allow this device to wake the computer, and Only allow a magic packet to wake the computer boxes are checked. Click OK to save changes.
After you have done the steps above, then you have enabled Windows 10 Wake On Lan.
Bottom Line
To sum up, this post has introduced what WOL is, and you can also know its principle of operation. If you want to enable it in Windows 10, then you can follow the steps mentioned above.
