Can Windows 11 dual boot with Linux? This question has been heatedly discussed in forums. In this post, MiniTool will explain it in detail and show you how to set up Windows 11 and Linux dual boot.
As the successor of the Windows 10 operating system, Windows 11 brings many new features and improvements. Since its release, a great many people have installed the new OS. Moreover, many of them want to set up dual boot with Windows 11 such as dual boot Windows 10 and Windows 11, dual boot Windows 11 and macOS, dual boot Windows 11 and Windows 7, and the one discussed here. This post will guide you through detailed steps to dual boot Linux and Windows 11.
Can Windows 11 Dual Boot with Linux
Can Windows 11 dual boot with Linux? To answer this question, you need to figure out the Secure Boot technology. It is a mandatory safety feature that your computer must support to install and run Windows 11. However, a difficulty is that many versions of Linux distros are not compatible with Secure Boot.
According to the Windows 11 requirements and specifications, the Secure Boot technology comes along with the TPM 2.0. To dual boot Windows 11 and Linux smoothly, you have 2 choices. You can either disable the Secure Boot in Windows 11 BIOS or use a compatible Linux distribution. Obviously, the latter is a better choice because your computer might be attacked without Secure Boot.
Here comes a new question, which Linux distribution is compatible with Windows 11. We find the answer from the user reports. Only Fedora and Ubuntu can work with Windows 11. That is:

What You Need to Prepare for the Windows 11 and Linux Dual Boot
Before you start operating the dual-boot Windows 11 and Linux, there are some important things you need to prepare. Here we summarize them as follows:
Hardware requirements:
- A Windows 10 or Windows 11 PC
- A USB flash drive with at least 8 GB
- An external hard drive to back up your system in case anything goes wrong
Software requirements:
- A right Linux distribution like Ubuntu
- Rufus to create a Linux bootable USB drive
Since the process of building dual-boot Windows 11 and Linux is relatively long and complex, we highly recommend you back up all important data to an external hard drive in case anything goes wrong. How to back up the Windows system without reinstalling OS? MiniTool Partition Wizard can help you migrate OS and even copy the whole hard disk easily. Let’s use this professional disk backup tool now.
MiniTool Partition Wizard DemoClick to Download100%Clean & Safe
How to Set up Windows 11 and Linux Dual Boot
There are 4 main parts on how to dual boot Windows 11 and Linux. Note this operation mainly show you how to install Linux from Windows 11. If you are still using Windows 10, you need to upgrade it to Windows 11 first and then apply the steps below.
Part 1. Create a Partition for Linux
The first thing you need to do is to create a second partition on your hard drive for Linux. Here make sure that your hard drive has enough free space. Since different Linux distributions have different requirements, you need about 50GB to 100GB of free disk space depending on your demands.
To create a new partition for Linux, you need to shrink the primary partition that has extra space or create a new primary partition if possible. Here’s how:
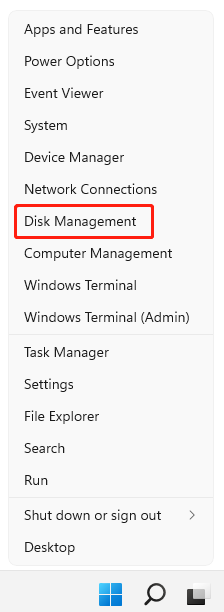
Way 1. Use Windows 11 Disk Management
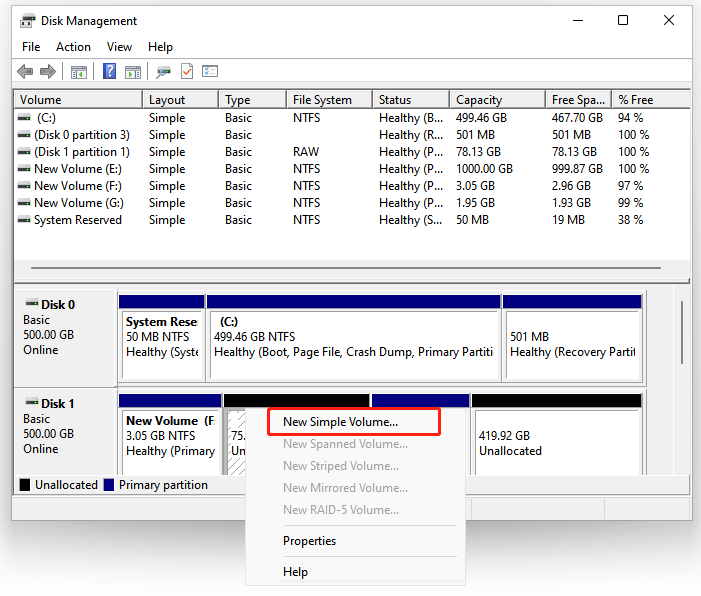
Step 1. Right-click the Start menu at the bottom and select Disk Management from the context menu.
Step 2. In the Disk Management window, right-click the primary partition that has enough free space and select Shrink Volume.
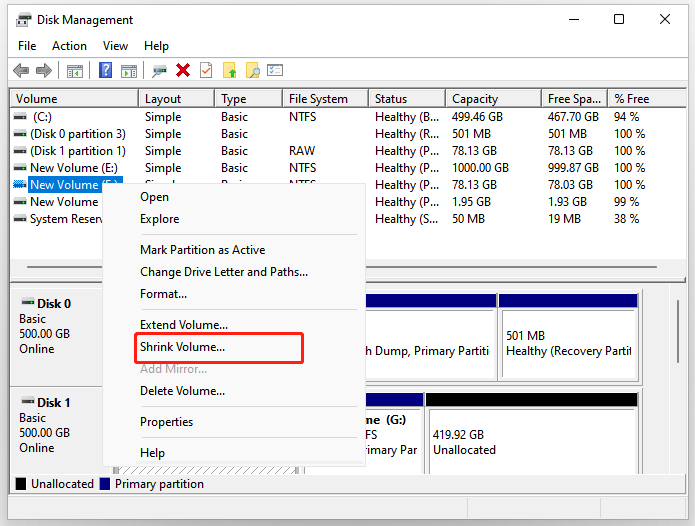
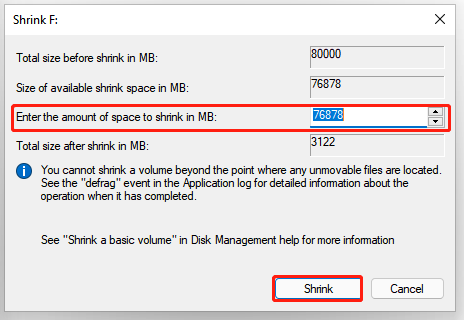
Step 3. Enter the desired amount of space to shrink in the box and click on Shrink. After that, you will get the unallocated space.
Step 4. Right-click the Unallocated space next to the volume that’s just adjusted and select New Simple Volume.
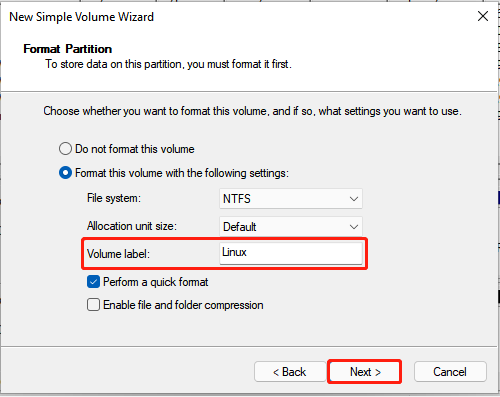
Step 5. Click on Next, and then set the simple volume size to the maximum possible value and click on Next.
Step 6. Assign a drive letter for the new partition and set its label to Linux. After that, click on Finish to complete the process.
Although Disk Management can help you shrink volume and create a new simple volume, you may encounter some issues or limitations. For instance, the shrink volume button is greyed out even if there is enough space available for shrink. In this case, MiniTool Partition Wizard is a good choice.
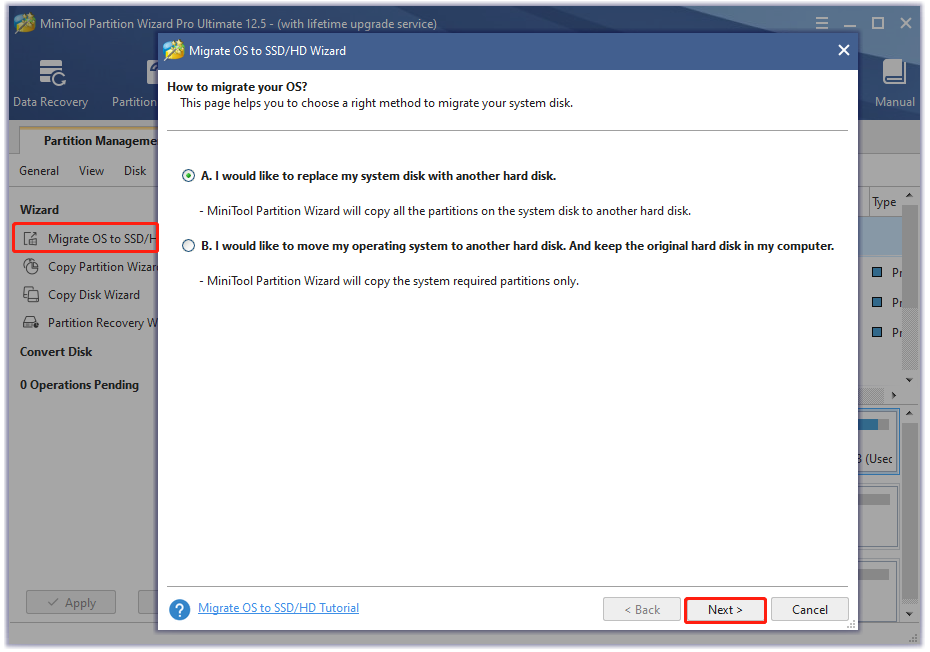
Way 2. Use MiniTool Partition Wizard
MiniTool Partition Wizard is simpler and more effective than the Windows tool to shrink volume. Its Move/Resize Partition feature can help you enlarge or shrink partition easily. To do so, follow the steps below:
MiniTool Partition Wizard FreeClick to Download100%Clean & Safe
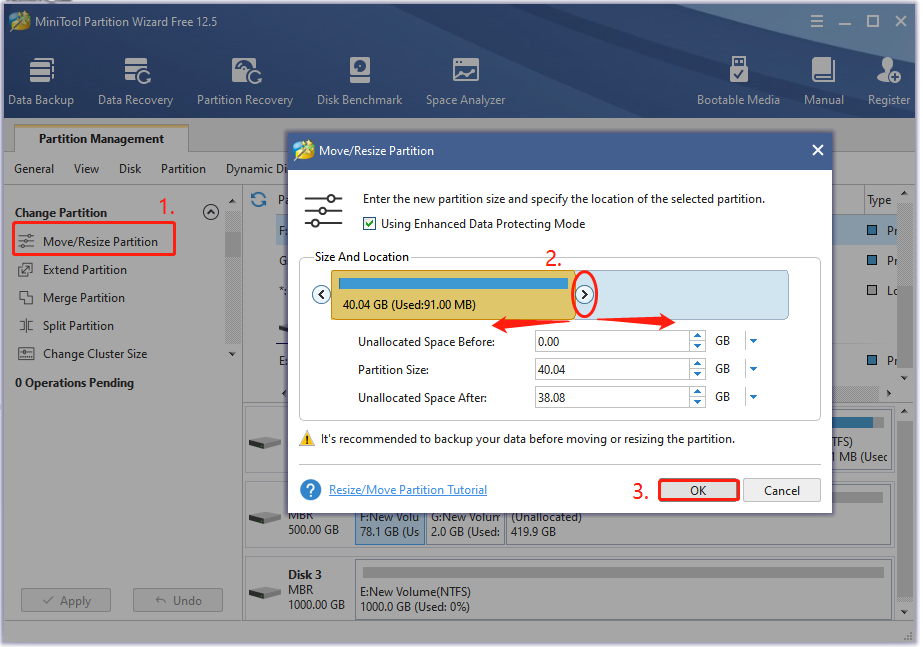
Step 1. Launch the MiniTool program to enter its main interface, and then select the partition that you want to shrink and click on Move/Resize Partition from the left pane.
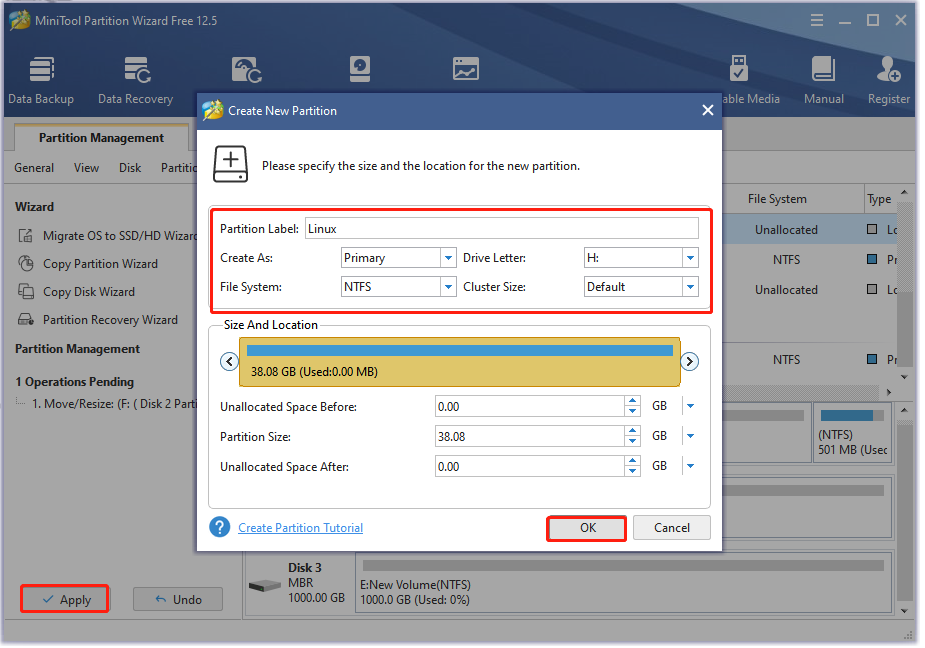
Step 2. Drag the slider bar to occupy the free space that you want to take from the unallocated space and click on OK. Also, you can input the specific number in the Unallocated Space Before, Partition Size, and Unallocated Space After.
Step 3. Right-click the Unallocated space from the disk map and select Create.
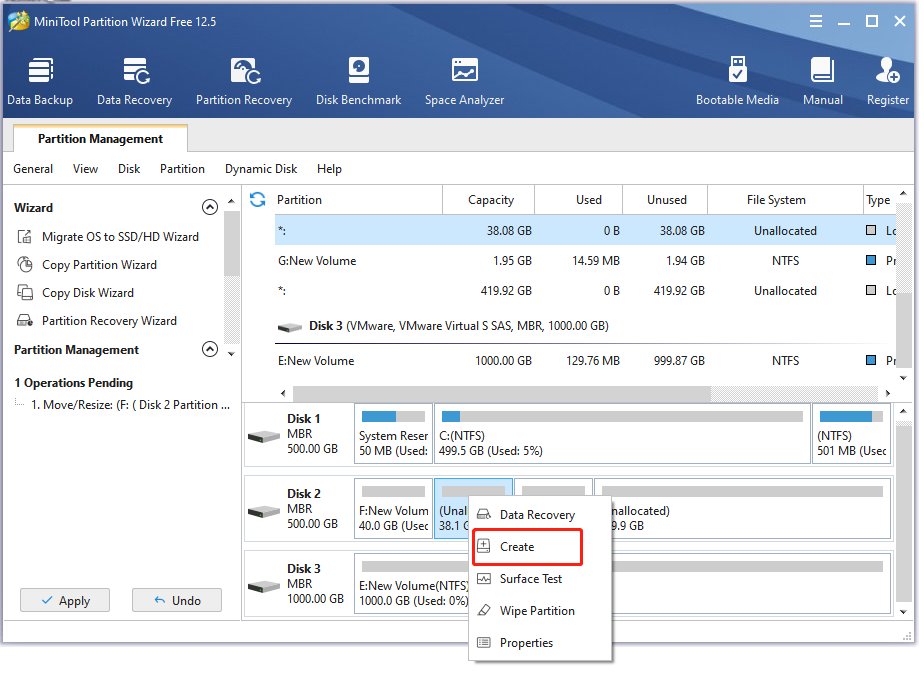
Step 4. In the pop-up window, you can specify the size and location for the new partition. Here you can change the drive letter, set partition label, and so forth based on your demands. Once confirmed, click on OK.
Step 5. Click on Apply to execute the pending changes.
Part 2. Download a Right Linux Distribution
Now, you need to download the right Linux distro. Here are take Ubuntu for example.
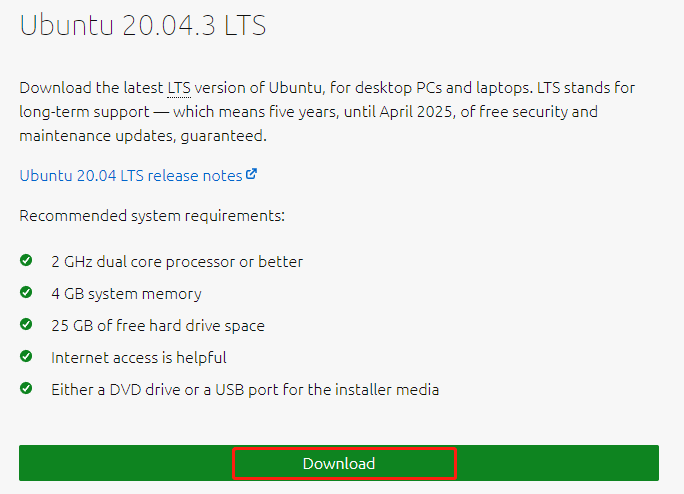
Step 1. Click here to open the download page of the Ubuntu ISO file and click on Download after you confirm the Ubuntu version.
Step 2. Select a location to save the ISO and click on Save. Once done, you should have a file with the ISO file extension.
Part 3. Create a Bootable Linux USB Drive
After you download the Linux distro, you need to use Rufus to create a bootable Linux USB drive. Here’re detailed steps:
Step 1. Insert your USB drive into your Windows PC.
Step 2. Launch Rufus, and then select the USB drive from the Device drop-down menu.
Step 3. Click on Select and select the Linux ISO file that you downloaded.
Step 4. Make sure other settings are correct and click on Start. Then click on OK in the pop-up confirmation window.

Once the process is completed, you should have a bootable Linux USB drive. Let’s see how to dual boot Windows 11 and Linux in the following part.
Part 4. Set up Windows 11 and Linux Dual Boot
Make sure the bootable Linux USB drive is inserted into your Windows PC and follow the steps below to install Linux:
Step 1. Restart your computer, and then press the Delete or F2 key to enter BIOS. Different PC brands may use different BIOS hotkeys and you can check it on your PC’s motherboard documentation.
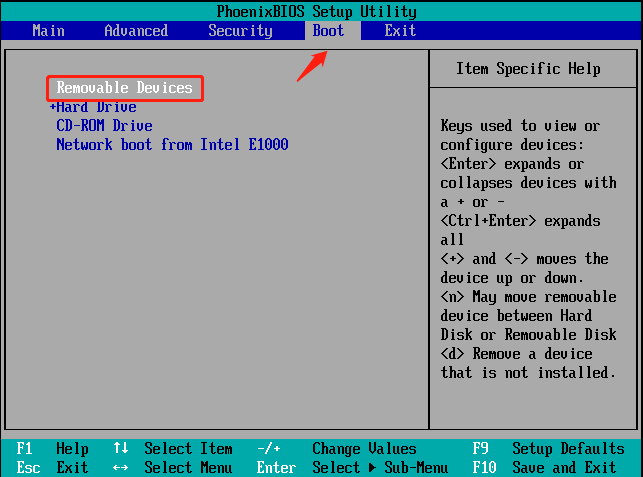
Step 2. Navigate to the Boot tab using the arrow keys, and then set the USB drive as the first boot device and press F10 to save the change and exit.
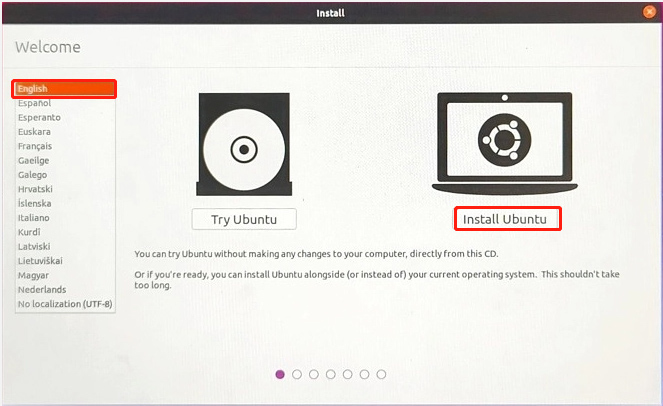
Step 3. Your computer should boot from the USB drive. Select the Ubuntu as boot menu and press Enter to boot into Ubuntu.
Step 4. To install the Linux distro on the new partition, select your desired Language from the left pane and click on Install Ubuntu.
Step 5. Select your network if you want to download the third-party software for your graphics card and media device.
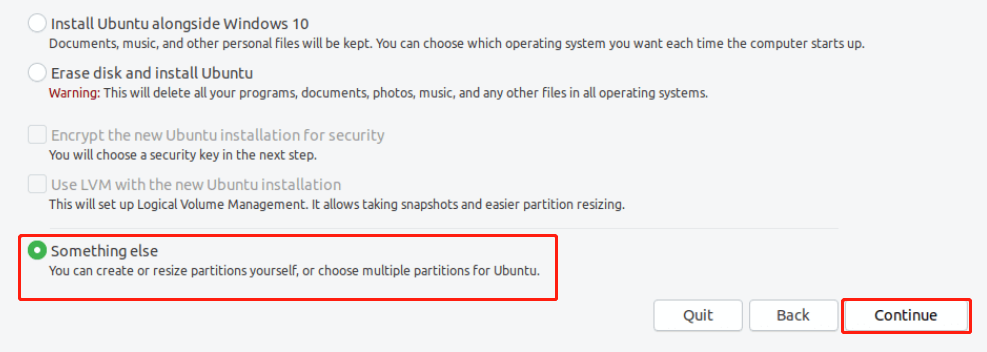
Step 6. In the Installation type page, select the Something else option and click on Continue to set the boot partition for Ubuntu.
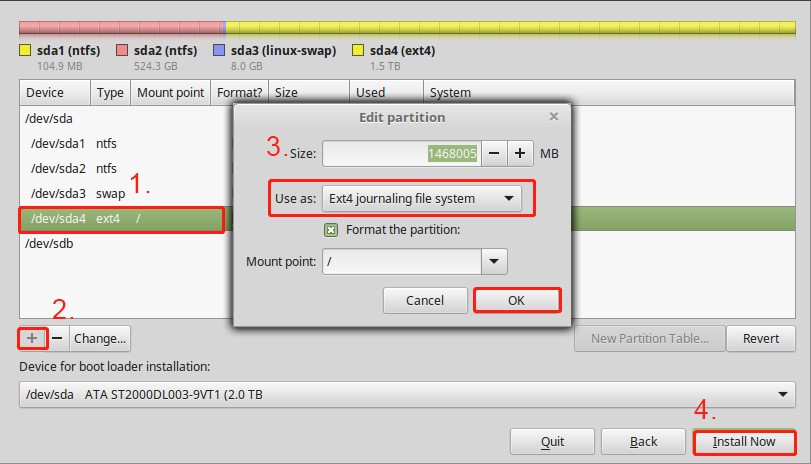
Step 7. Select the partition you created at the beginning and hit the + icon from the lower-left corner.
Here you need to use the following configuration for the Linux boot partition. After that, click on OK in the dialog box. This will install Ubuntu on the partition without affecting your Windows 11 installation.
- Size: at least 31000 MB
- Use as: Ext4 journaling file system
- Mount point: /
Step 8. Once confirmed, click on Install Now and select your preferred options like Keyboard layout, Time zone, and User information via the on-screen instructions.
Step 9. Once installed, click on Restart Now and enter BIOS again by pressing the Delete key. Then set your hard drive as the first boot device and press F10 to save the change.
Step 10. Now, you will be asked to choose Windows 11 or Linux to boot the computer. Well, you need to select the desired operating system each time you boot the computer.
Have a Try Now
How to set up the dual-boot Linux and Windows 11? A complete guide has been illustrated. Now, it’s your turn to have a try. If you have any supplements and opinions, please leave them in the comment area. For any difficulties when you use MiniTool Partition Wizard, you can send us an email via [email protected].
About The Author

Position: Columnist
Ariel has been working as a highly professional computer-relevant technology editor at MiniTool for many years. She has a strong passion for researching all knowledge related to the computer's disk, partition, and Windows OS. Up till now, she has finished thousands of articles covering a broad range of topics and helped lots of users fix various problems. She focuses on the fields of disk management, OS backup, and PDF editing and provides her readers with insightful and informative content.