Have a need to upgrade Windows to 64 bit from 32 bit in Windows 10/8/7 since your memory is not used? How to upgrade 32 bit to 64 bit? This post shows you some things that you should check out, as well as the way to perform Windows 64 bit upgrade.
Why Upgrade 32 Bit to 64 Bit in Windows 10/8/7
Microsoft offers both 32-bit and 64-bit versions of Windows 10/8/7. The 32-bit version is also known as the x86 version while the 64-bit version is known as the x64 version.
When installing Windows 7, 8 or Windows 10, you can choose to install 32-bit or 64-bit version of Windows. But most of you may choose to install the 64-bit version instead of the 32-bit version. If you have installed a 32-bit operating system, you may change it to a 64-bit system.
Why change 32 bit to 64 bit of Windows OS? This is because the 32-bit version is limited to 4GB of RAM (Ramdon Access Memory), which is a small amount these days when PCs usually have 8GB or more. If you installed many applications at the same time, “your computer is low on memory” error message may appear.
If you want to actually use more than 4GB of RAM resources, probably you need a 64-bit version of Windows. With the additional access to memory, you can run more apps simultaneously and improve performance. And the system improves productivity with memory-intensive tasks, such as virtual machines, video editing, Office-working, and web browsing when dealing with a lot of open tabs.
What’s more, 64-CPU may have backward compatibility, allowing it to run 32-bit programs and may also support running 32-bit operating systems. In this aspects, 64-bit version of Windows may have more benefits than 32-bit.
Besides, it’s not surprising that many applications now require a 64-bit operating system due to that limitation. Moreover, you can run x64 and x86 applications on a 64-bit OS, but that is not possible on a 32-bit OS.
Related article: Is My Computer 64 Bit or 32 Bit? Try the 5 Ways to Judge out
How to Convert 32 Bit to 64 Bit Windows 7/8/10 without Data Loss
In the following paragraphs, we will walk you through four steps to upgrade Windows to 64 bit.
- Make Sure Your Processor Is 64-Bit Capable
- Ensure Your PC Hardware Has 64-Bit Drivers Available
- Back up Your PC
- Upgrade 32 Bit to 64 Bit
Move 1: Make Sure Your Processor Is 64-Bit Capable
To do this work, go to Settings > Systems > About. On the right-hand side of the interface, navigate to the System type entry.
Then, you will see one of the following system type:
- 64-bit operating system, x64-based processor: Your CPU support 64-bit and you have already installed the 64-bit edition of Windows 10. So, you don’t need to upgrade to 64 bit.
- 32-bit operating system, x64-based processor: Your CPU supports 64-bit, but you have installed the 32-bit version of Windows.
- 32-bit operating system, x86-based processor: Your CPU supports 32-bit and you have installed the 32-bit version of Windows.
To be specific, if you see the second entry, you are in luck and you can move on to the next section to continue Windows 10 64 bit upgrade since your 64-bit Central Processing Unit can run a 64-bit version. But if you see the third entry, you cannot install a 64-bit OS since your CPU doesn’t support 64-bit.
Move 2: Ensure Your PC Hardware Has 64-Bit Drivers Available
In addition, you should check whether other components, for example, video and sound cards, can work properly with a 64-bit version of Windows 10. Simply speaking, 64-bit OS requires 64-bit hardware drivers and the 32-bit drivers won’t work.
Modern hardware should certainly offer 64-bit drivers but some old hardware may no longer support and manufacturers may haven’t offered 64-bit drivers. To check for this, please go to your manufacturer support website to see if 64-bit drivers are available for download.
Move 3: Back up Your PC
Since you are making major changes to your operating system, it is indispensable to make a full backup of Windows 10. When you upgrade 32 bit to 64 bit in Windows 10/8/7, your personal files, settings, and applications will be deleted. And the best thing is to back up all the affected files to your external storage devices or USB drive to avoid data loss.
To back up your important files, you need a free backup program to help you. Which one is worth recommending? MiniTool ShadowMaker, a piece of professional file backup software, will be a good option, coming with many powerful features.
With the help of this freeware, you can create an image file for files & folders, Windows operating system, disk or partition. Besides, it can help you to sync files to other locations for backup. Above all, automatic file backup, differential & incremental backup can be created.
Right now, before you free change 32 bit to 64 bit of Windows 10/8/7, get MiniTool ShadowMaker Trial Edition from the following button to back up your crucial files. Note that this edition only allows you to free use for 30 days. If you want to keep this software all the time, get its Pro Edition.
MiniTool ShadowMaker TrialClick to Download100%Clean & Safe
Step 1: Double-click on this program to open it.
Step 2: Which feature should you use to back up files, Backup or Sync? Both are available. And here, you take the first feature as an example.
In the Backup window, you need to decide which files to back up and where to save the backup image file. Just go to the Source section and choose personal files you want to back up.
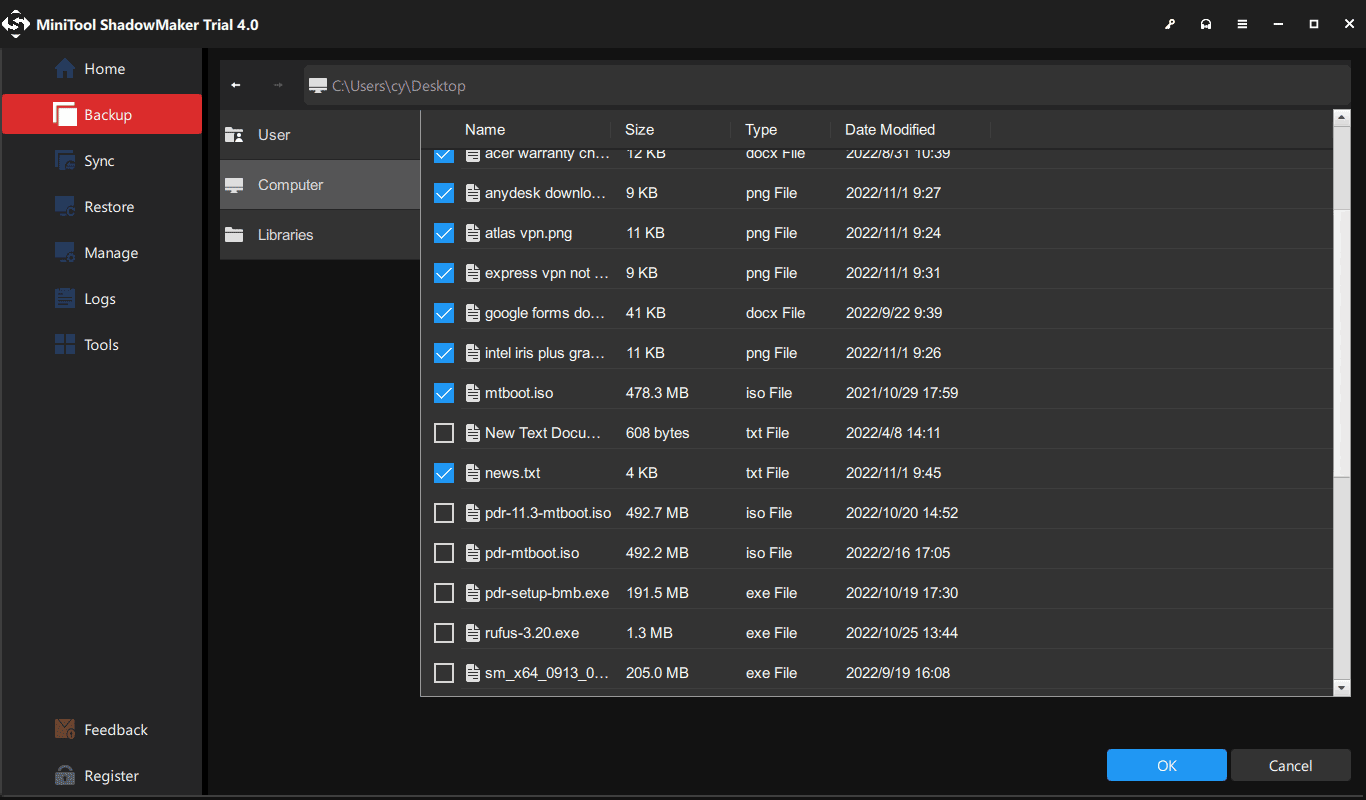
Then, go to the Destination section and choose an external hard drive, USB flash drive, or NAS as the storage path.
Step 3: Finally, start the full backup process of your important files by hitting the Back Up Now button.
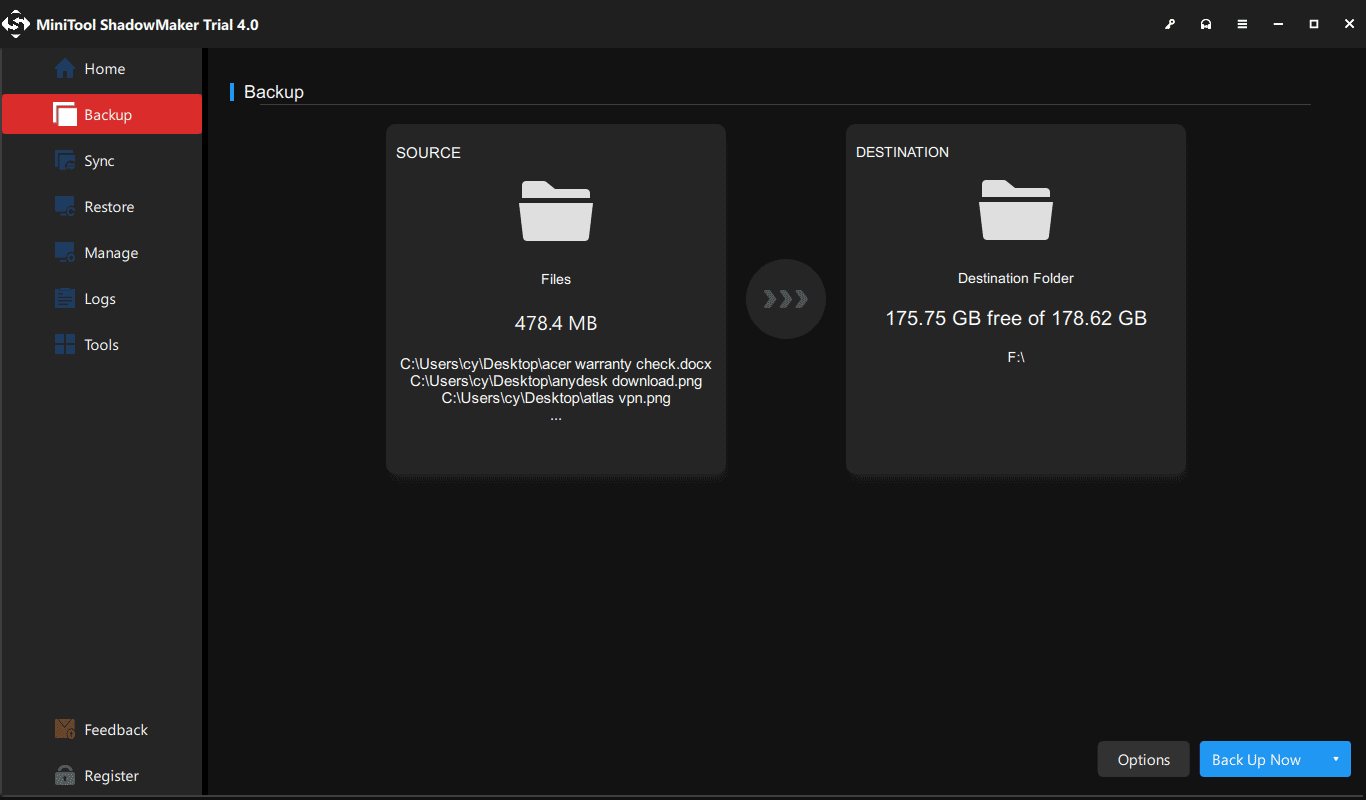
Now, all operations to back up files are told to you. If you are planning to convert 32 bit to 64 bit of Windows 10/8/7 operating system, don’t hesitate to free download this backup software to prevent your data from losing after upgrading to the 64-bit version of Windows.
MiniTool ShadowMaker TrialClick to Download100%Clean & Safe
Right now, the previous three steps are told to you. Reading here, it is time for you to take action to upgrade Windows 10 32 bit to 64 bit. Just go to the next move to follow the corresponding steps for Windows 10 64-bit version upgrade.
Move 4: Upgrade Windows to 64 Bit
How to convert 32 bit to 64 bit Windows 7/8/10? As mentioned above, performing an upgrade from 32-bit to 64-bit version of Windows is actually clean install. Now, follow the steps below to make a reinstallation.
Create a Bootable USB Drive
Here, take Windows 10 64 bit upgrade as an example and we will show you the step-by-step instructions. Right now, insert your USB flash drive with at least 4GB of storage space to your device and to create the 64-bit Windows 10 installation media.
Step 1: Open the official web page to download Windows 10 Media CreationTool.
Step 2: Click Download tool now under Create Windows 10 installation media.
Step 3: Double-click on the MediaCreationTool.exe to run this utility and then accept the Microsoft terms.
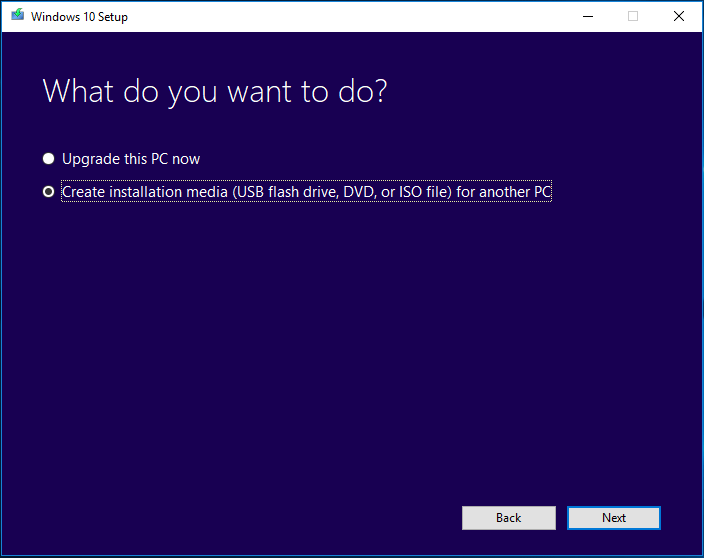
Step 4: There are two options. Check the option Create installation media (USB flash drive, DVD or ISO file) for another PC.
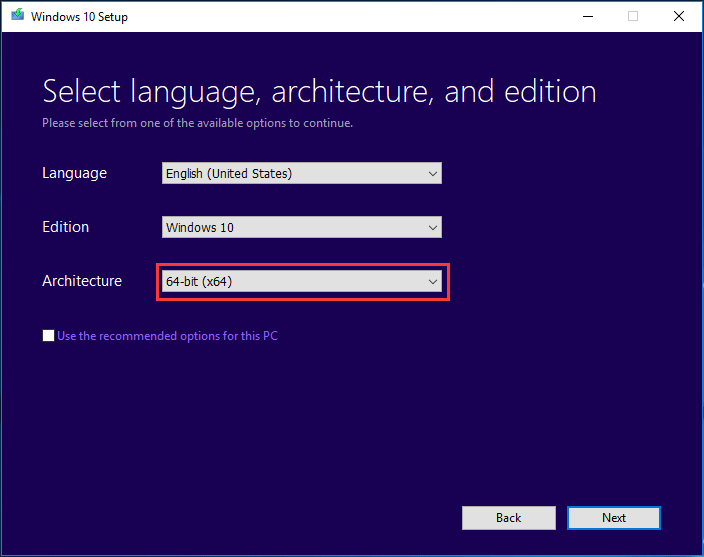
Step 5: Please choose language and edition. To upgrade Windows 10 to 64 bit, here please specify the 64-bit (x64) option for 64-bit Architecture.
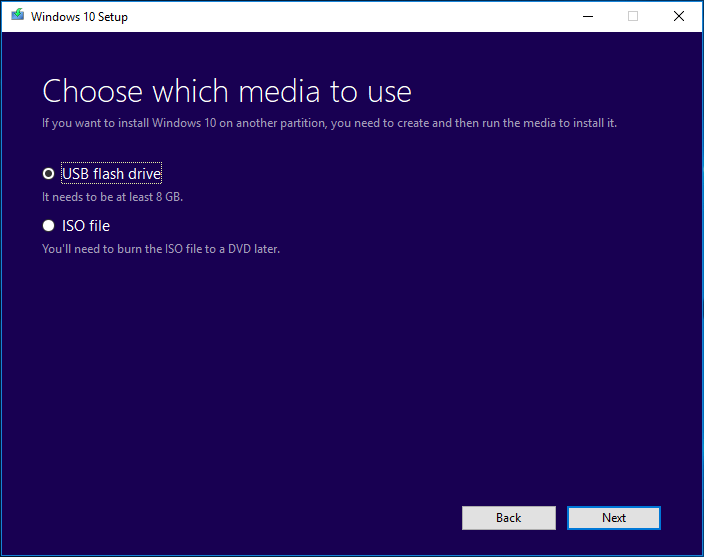
Step 6: Choose the USB flash drive option so as to create a bootable USB drive. Additionally, you can also check the option ISO file but you need to burn the file to a USB drive or CD/DVD. Here, we recommend the first one.
Step 7: Next, all your drives on your computer will be listed. Just choose the USB flash drive from the list to continue.
Step 8: Then, this tool will start downloading needed files and creating a bootable drive from ISO file that is compatible with Windows 10 64 bit. Wait for the process to be finished.
Install Windows 10 64 Bit from Scratch
How to upgrade Windows 7 32 bit to 64 bit without CD or upgrade Windows 8/10 to 64 bit without disk? Now, restart your computer with the bootable USB drive and then follow these steps:
Step 1: After booting your PC from the USB drive, choose language, time and currency format and keyboard.
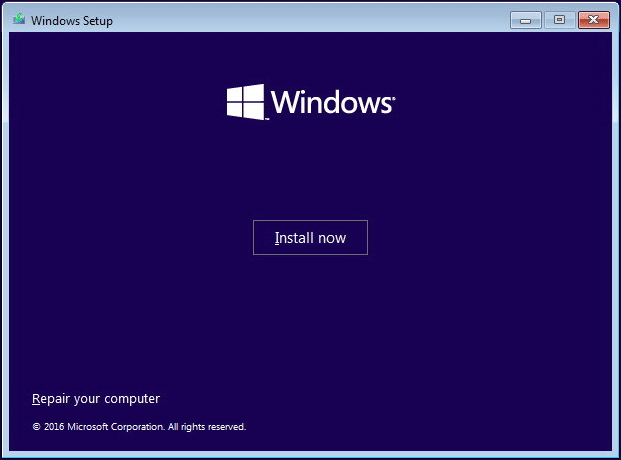
Step 2: Click Install now to continue.
Step 3: Your purpose is to upgrade 32 bit to 64 bit for Windows 10, so you should click the I don’t have a product key link (assuming your PC has been already properly activated).
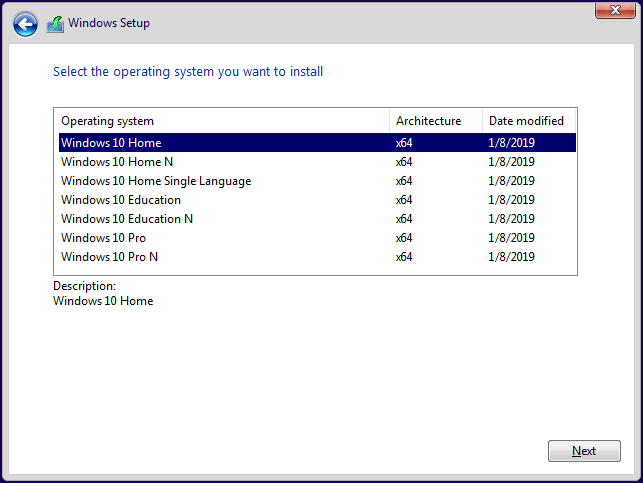
Step 4: Choose the edition of Windows 10 to go on.
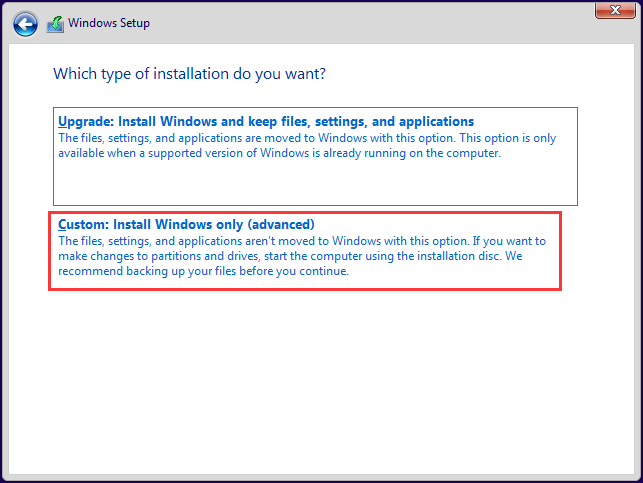
Step 5: Accept the license terms. To upgrade Windows 10 32 bit to 64 bit, please choose Custom: Install Windows only (advanced).
Step 6: You may ask: how to upgrade 32 bit to 64 bit Windows 7/8/10 without formatting? Actually, it is easy. In the following drive list option page, choose the partition(s) with the current installation of Windows, and click the Delete button instead of formatting operation to remove it from the hard drive.
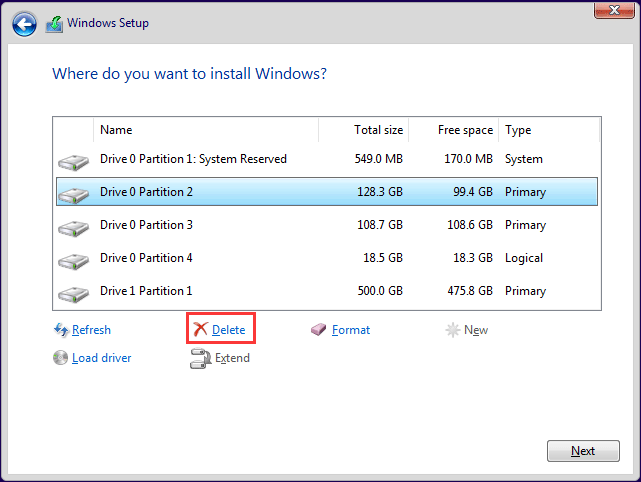
Step 7: Then, click the unallocated space to continue. Then, the setup will install the 64-bit version of Windows 10 on your computer. Later, you need to complete the Out-of-box experience (OOBE) setup the OS with your preferences by following the on-screen directions.
More information feel free to watch this video guide:
Bottom Line
Want to upgrade 32 bit to 64 bit? Here is the overview that you should do before the upgrade and how to convert 32 bit to 64 bit Windows 7/8/10. Just follow the above guides to start the upgrade operation. Remember to leave a comment below or contact [email protected] if you have any different idea or question when you change 32 bit to 64 bit.
