When Hardware Acceleration is enabled, it is important to know if it is worth enabling it or if it should be turned off. You can run many tests to see if Hardware Acceleration is actually doing anything useful. Now, read this post from MiniTool to know how to disable it.
What Is Hardware Acceleration?
In most processors, the instructions are executed sequentially, that is, one after the other, but if you slightly modify the same process using Hardware Acceleration Windows 10, you can execute them faster.
It moves all graphics and text rendering from the Central Processing unit to the Graphics Processing unit. It tries to move graphics from the CPU to the GPU to accelerate graphics performance and rendering speed for better performance.
Sometimes the Hardware Accelerator is referred to simply as a graphics accelerator or floating point accelerator, a hardware accelerator can significantly improve the performance of your application.
Although it is best to leave the settings at their default values in Windows, you can turn off or disable Hardware Graphics Acceleration or reduce Hardware Acceleration as needed. Turning off Hardware Acceleration completely will run the application in software rendering mode.
Before proceeding, you should know that not all computer systems support this feature. Most new computers with NVIDIA or AMD/ATI graphics cards will not be able to change the amount of acceleration. These options are available on older systems and systems using onboard video. Then, I will introduce how to disable Hardware Acceleration Windows 10.
Also see: [Solved] No AMD Graphics Driver is Installed on Windows 10
How to Disable Hardware Acceleration on Windows 10
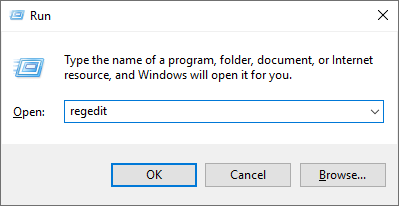
- Open the Run box and type regedit, click OK.
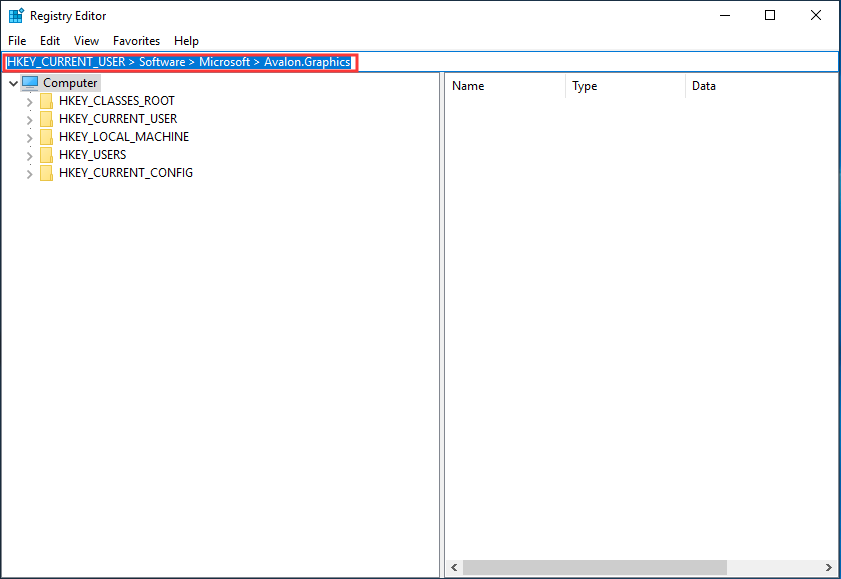
- Go to HKEY_CURRENT_USER > Software > Microsoft > Avalon.Graphics.
- Double-click DisableHWAccelerationand set its value to1 and click OK.
How to Disable Hardware Acceleration on Windows 10?
If you don’t know how to disable hardware acceleration, you can follow the steps below. Here are the detailed steps.
Step 1: Press the Windows and R keys at the same time to open the Run dialog box.
Step 2: In the Run box, type regedit and click OK.
Step 3: Copy and paste HKEY_CURRENT_USER > Software > Microsoft > Avalon.Graphics to the address bar to open it.
Step 4: Find DisableHWAcceleration on the right pane. If you cannot find DisableHWAcceleration, you can create one: right-click the empty space on the right pane and click New > DWORD (32-bit) Value and name it DisableHWAcceleration.
Step 5: Double-click DisableHWAcceleration and set its value to 1 to disable Hardware Acceleration on your Windows 10.
Step 6: At last, click OK to save the setting.
Here is how to disable Hardware Acceleration.
Further Reading:
If you find that the Hardware Acceleration option is grayed out, check if your hardware permits it and ensure that you have updated drivers. You can also check if DWORD DisableHWAcceleration it has a value 0.
If you receive an Unexpected error, the new settings could not be saved to registry message box. Then you can try the following methods:
1. Run Display Quality Troubleshooter.
2. Run Hardware and Devices Troubleshooter.
3. Visit the manufacturer’s website to download and install the latest drivers.
4. Disable Hardware Acceleration Windows 10 with the method above.

Final Words
This post has introduced what Hardware Acceleration is and how to disable Hardware Acceleration Windows 10. If you have such a demand, you can refer to the method above.
About The Author

Position: Columnist
Having been an editor at MiniTool since graduating college as an English major, Daisy specializes in writing about data backups, disk cloning, and file syncing as well as general computer knowledge and issues. In her free time, Daisy enjoys running and going with friends to the amusement park.