You can run 2 operating systems on a computer. If you want to run Windows 11 on macOS, you can set up dual-boot. So, how can you dual boot Windows 11 and macOS? Read this guide of MiniTool and you can find the detailed steps for this task.
Running two operating systems is a common thing. If you want to enjoy another operating system on your PC, but don’t want to reinstall the system or install it on a virtual machine, you can perform a dual-boot.
Since Windows 11, a brand new operating system, is released, some of you may want to install this OS to experience its new UI and features. You can dual boot Windows 11 and Windows 7, dual boot Windows 11 and Windows 10, dual boot Windows 11 and Windows 8, etc.
In addition, you can install Windows 11 on macOS so that you can enjoy Windows 11 on your Mac. Here, we will show you much information focusing on Windows 11 and macOS dual-boot.
How to Dual Boot Windows 11 and macOS
The best and easiest way to dual boot macOS and Windows 11 is to install macOS first and then install Windows 11. This is because there is a built-in tool in a Mac to help you install Windows operating system.
Install Windows 11 on Mac Boot Camp Assistant
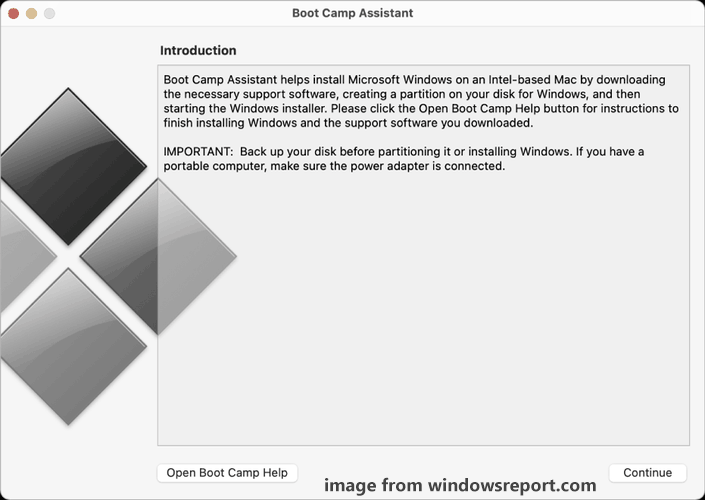
Apple has a tool called Boot Camp Assistant that comes with a Mac by default. With it, you can switch between macOS and Windows. You can easily install Windows 11 on your Mac using Boot Camp Assistant, without additional settings. This tool can work best when you are using the latest version of macOS.
Steps to dual boot Windows 11 and macOS using Boot Camp
Step 1: Download an ISO file of Windows 11 via the Microsoft Website.
Step 2: Go to Utilities and choose Boot Camp Assistant.
Step 3: You are asked to back up your Mac. Click Continue.

Step 4: Locate the Windows 11 ISO file you have downloaded. You can see the system disk is divided into two drives – one for macOS and another for Windows 11. Allocate 64GB or more for the Windows partition. Next, click Install.
Step 5: Type in a password and restart your Mac.
Step 6: Your Mac will enter the Windows setup environment. You need to choose a language, time format, and input method to continue.
Step 7: Choose I don’t have a product key.
Step 8: Choose a version of Windows 11.
Further Tip:
Boot Camp is only available for devices with Intel Processor running Mac OS. Besides, not all Macs have a TPM 2.0 chip. Thus, you need to use a workaround to bypass the TPM 2.0 requirement. That is, Windows 11 can run on any Mac that can run Windows 10 and meet other minimum system requirements.
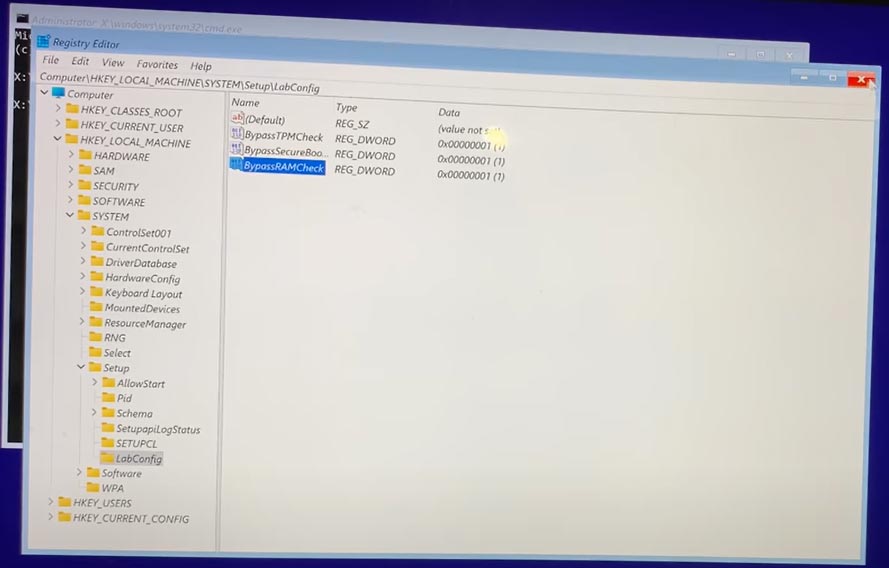
- If you get an error message saying “This PC can’t run Windows 11”, press Shift+F10 to open Command Prompt, type in regedit, and press Enter to open Registry Editor.
- Go to Computer\HKEY_LOCAL_MACHINE\SYSTEM\Setup.
- Right-click the Setup folder and click New > Key. Name it as LabConfig.
- Then, create three new items under the key by right-clicking the space and choosing New > DWORD (32-bit) Value – BypassTPMCheck, BypassSecureBootCheck, and BypassRAMCheck. Set the value data of all these items to 1.

Step 9: Go back to choose Windows 11 edition again and then start installing Windows 11 by following the on-screen instructions.
Final Words
Now, you should successfully install Windows 11 on macOS with Boot Camp and you can dual boot Windows 11 and macOS. If you have any suggestions on the dual-boot, let us know by leaving a comment below.
