As time goes on, there will be more and more files on your Mac computer and the available disk space will be less and less. Then, you will need to take some measures to free up disk space on Mac. MiniTool Software writes this post to show how to clear disk space on Mac automatically and manually.
How to Check Storage on Mac?
After you use your Mac computer for a long time, there should be more and more files on the drive. Is it necessary to clear disk space on Mac? First, you can go to check how much storage is available on your Mac and then make a further decision.
How to check storage on Mac? Here are the things you should do:
- Click the Apple menu (the Apple logo) that is on the top-left side of the Mac Desktop and then select About This Mac.
- Switch to the Storage section and you can see the storage information of the Mac drive, including how much disk space is available on Mac.
You can also see that there is a long bar with different colors of segments. Each segment of the bar stands for a storage space that is used by a category of files. You can move the pointer over each segment to get more information.
It is OK if the available disk space is still enough. However, if the system says your disk is almost full or there is not enough space to save new files, you will need to clear storage on Mac if you don’t want to upgrade the drive on your Mac to a larger one.
Do you know how to free up disk space on Mac? If you have no idea, this post will be helpful for you: we will show you how to let Mac automatically clear disk space and how to manually free up disk space on Mac.
How to Clear Disk Space on Mac Automatically?
There is a Manage button in the Storage section. You can click it to access the Storage Management interface and then manage storage on your Mac.
The Storage Management feature will show you some recommendations for optimizing storage on your Mac computer. These recommendations include Store in iCloud, Optimize Storage, Empty Trash Automatically, and Reduce Clutter. If some of these recommendations have been turned on, you will see fewer options.
How to clear storage on Mac? You can make full use of these four recommendations to manage and free up disk space on your Mac.
How to clear storage on Mac
- Store in iCloud
- Optimize Storage
- Empty Trash Automatically
- Reduce Clutter
Store in iCloud
You can use this feature to save all files, photos, and messages in iCloud to save much disk space for your Mac.
Click the Store in iCloud button in the Storage Management interface and choose what you want to store in iCloud:
Desktop and Documents
This option allows you to save all files on these two locations to iCloud Drive. When storage space is needed, only the recently opened files are kept on your Mac and you can even work offline. Your files stored in iCloud will be shown with a downloaded icon. You can click the Download button to download the original file when necessary.
Photos
If you select this option, all your photos and videos with their original and full-resolution will be saved in iCloud Photos. Photos with space-saving (optimized) versions will be kept on your Mac when storage space is needed. If you want to use the original photos or videos, you can just click them to open and download.
Messages
You can select this option to store all messages and attachments in iCloud to save disk space on Mac. Like the Desktop and Documents option, only the recently opened messages and attachments are saved on your Mac computer when storage space is needed.
After checking the option you want to use, you need to click the Store in iCloud button to save the settings.
Optimize Storage
You can use this feature to automatically delete the Apple TV movies and TV shows that you have already watched and keep the recent email attachments on your Mac to clear disk space.
After clicking the Optimize button, you will see two options: Automatically remove watched movies and TV shows and Download only recent attachments.
Automatically remove watched movies and TV shows
When this feature is enabled, your movies and TV shows that you have purchased from the iTunes Store and already watched will be removed from your Mac when storage space is needed. If you want to watch a movie or TV show, you can click the Download button to download it again.
Download only recent attachments
If you select this feature, Mail will automatically only download the attachments that you have recently received. If you want to use other attachments, you can manually download them.
If you don’t select this feature, Mail will download the attachment only when you open the email or attachment, or you want to save the attachment to your Mac computer.
After selecting the options you want to use, you need to click Optimize to execute the operations.
Empty Trash Automatically
You can use this feature to make Mac automatically and permanently remove the files that have stayed in the Trash for more than 30 days.
After clicking the Turn on button that is next to Empty Trash Automatically, you need to click the Turn On button to enable this feature.
Reduce Clutter
You can use this feature to identify files and delete the files you don’t use anymore.
Click the Review Files button that is next to Reduce Clutter and then find the large files or files you may don’t want to use and show them in categories including Applications, Documents, Music Creation, Photos, or Trash.
You can access each category to see the files in it. For example, in Documents, the files are sorted in Large Files, Downloads, Unsupported Apps, and File Browser. You can click into each sort to find the files you don’t need, select them, and click Delete to remove them from your Mac.
Tips: For macOS Sierra or Later Versions
If you are running macOS Sierra or later, the system can automatically take these actions to clear disk space on Mac:
- It can automatically find the duplicate downloads in Safari and only save the most recent downloaded version.
- It will remind you to delete the used app installers.
- It can remove the old fonts, languages, and dictionaries that you don’t need for a long time.
- It can clear caches, logs, and unnecessary files when storage space is needed.
How to Free up Disk Space on Mac Manually?
Of course, your Mac can’t do all jobs to free up disk space on Mac. When necessary, you can manually do some things to release free space for new data.
- If you have downloaded some music files, movies, as well as some other media to your Mac, you can go to check which ones are needless and then delete them.
- You can access the Downloads folder to find and delete the files you no longer use.
- You can also move some files to an external data storage drive to free up much disk space.
- You can compress files to free up disk space as much as possible.
- You can go to the Mail app to delete both unneeded and junk mail, and erase the deleted mail from Trash in Mail.
What If You Delete Important Files by Mistake
You should be careful when you clear disk space on Mac because you may remove some important files by mistake. However, if this sad thing happens finally, what should you do to rescue the lost files?
You can first go to Trash to check whether you can find your needed files. If yes, you can directly restore them from Trash. If you can’t find them, you will need to use a professional Mac data recovery software to get them back.
You can try Stellar Data Recovery for Mac, free Mac data recovery software, to recover deleted Mac data. This software is specially designed to recover data from a Mac computer. It has a trial edition and you can use it to scan the drive on your Mac and see whether it can find your needed files. You can go to the download center to get the trial edition.
Here is a guide on how to use Stellar Data Recovery for Mac to rescue your deleted files.
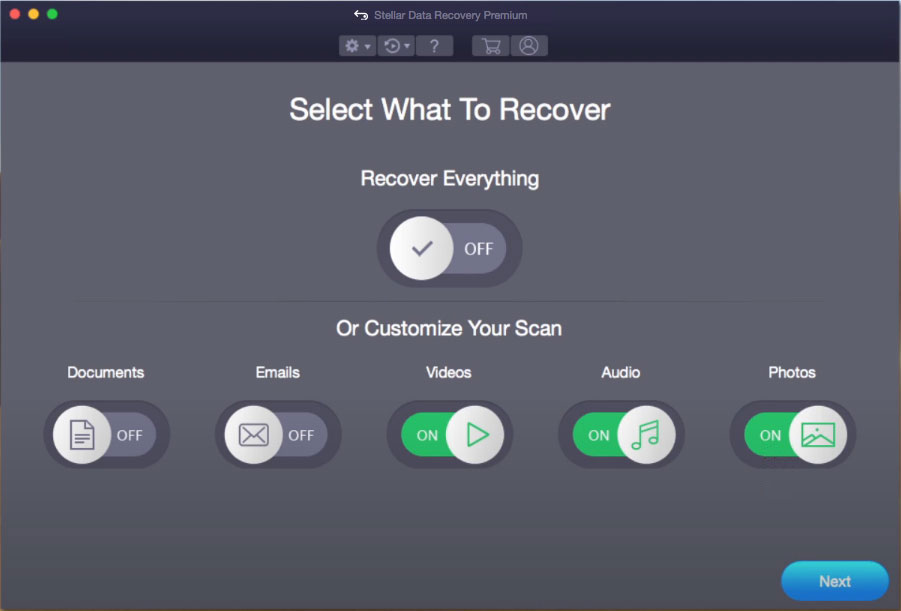
1. Open Stellar Data Recovery for Mac.
2. In the Select What To Recover interface, you can see some buttons. If you want to recover all types of files, you can turn on the button for Recover Everything. If you only want to recover some certain types of files, you can just turn on the buttons for these types.

3. Click Next to continue.
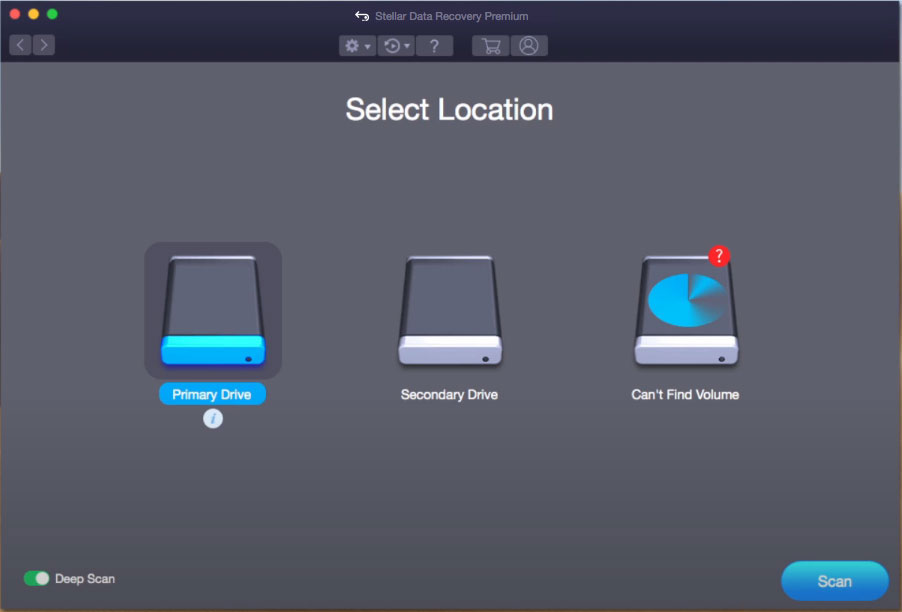
4. Select the drive you want to recover data from. If you want to perform a deep scan, you can turn on the button for Deep Scan that is on the bottom-left side of the interface.

5. Click Scan to start the scanning process.
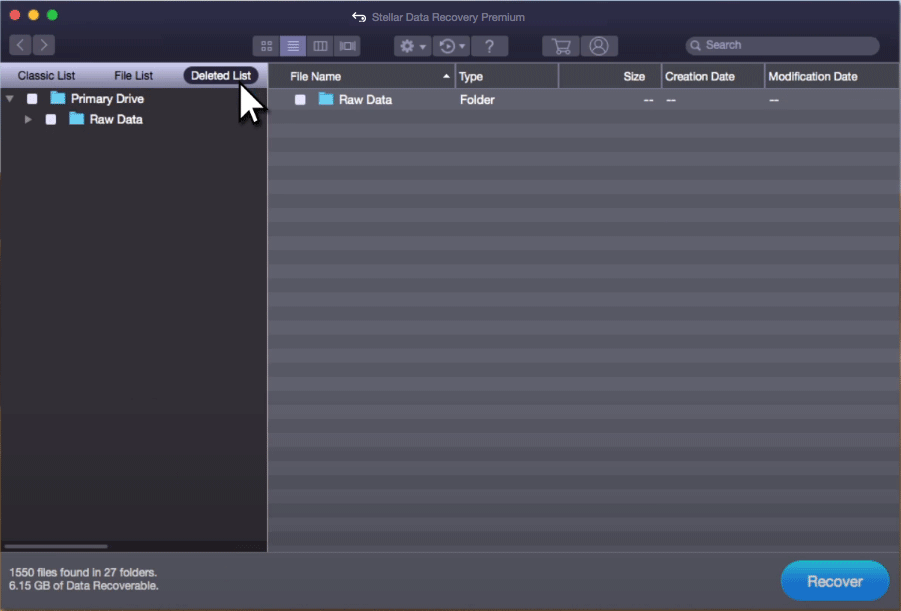
6. When the scanning ends, you can see the scan results interface. The scanned files are sorted by three types: Classic List, File List, and Deleted List. Since you only want to retrieve deleted files, you can switch to Deleted List and then find the files you want to recover.

7. This software allows you to preview the scanned files. You can double-click on the file to preview it.

You can’t use the trial edition of this software to recover your Mac data. You need to activate it and then check your needed files to recover.
Bottom Line
After reading this post, you should know how to clear disk space on Mac. Besides, you also obtain a dedicated Mac data recovery software to help you rescue your lost and deleted Mac data. Should you have any related issues, you can let us know in the comment or contact us via [email protected].
